Premier | Till Sale
Description
Till sale enables you to sell an item to a client, however, it does not ask you to input a client's name. Therefore no information will be stored on the client's card and no further information will be viewable once the client has left the premises.
Although till sale items will show on your End of Day and you need to account for the revenue taken, it will not show you who purchased the item or what it was. Also, you will not be able to contact this client using Marketing.
Resolution
In "Reception" click onto “Till Sale"
The following information will be displayed:
- “Till” – this will give you the till name.
- “Quantity” – this will tell you how many of the items that the client is being billed for.
- “Description” will give you the description of the items being billed for.
- “Add” – this box will only be ticked if your client has been upsold a treatment, for example, if your client has booked in for a facial and during that treatment time the therapist has conducted another treatment and this needs to be “Added” on before the client departs. If a treatment is added on at this stage this box will automatically be ticked
- “Staff” this shows you the staff member who has conducted the treatment or who has sold a retail item, if you need to amend the staff member click onto the downwards arrow located next to the staff name and select the required staff member.
- “Unit price” – this tells you how much the item on the client’s bill is for.
- “Service” this box will only be ticked if you charge the client a service charge for this item.
- “Discount” - before you can allocate a discount you are required to enter a reason in the reason box located next to the discount box, once this has been allocated you will be able to enter an amount in the discount box.
- “Reason” using the dropdown box select the reason for the discount, note some reason codes will require the manager’s authorisation before proceeding, if this is the case a box will automatically appear asking for their login details.
- “Total” gives the total amount that is due from the appointment / retail item, accounting for any discounts.
- “Payment Method” – this will only be used if you require the item to be complimentary, accounting for a course item or putting the item On Account.
- “Tax Total” – this shows the tax amount.
- “Less Allocated” – this will show any money that has already been paid.
- “Total to Pay” – this gives a grand total to pay.
Adding Stock
- If there is a barcode scanner; simply scan the items and they will be added to the bill.
- If there is no barcode scanner:
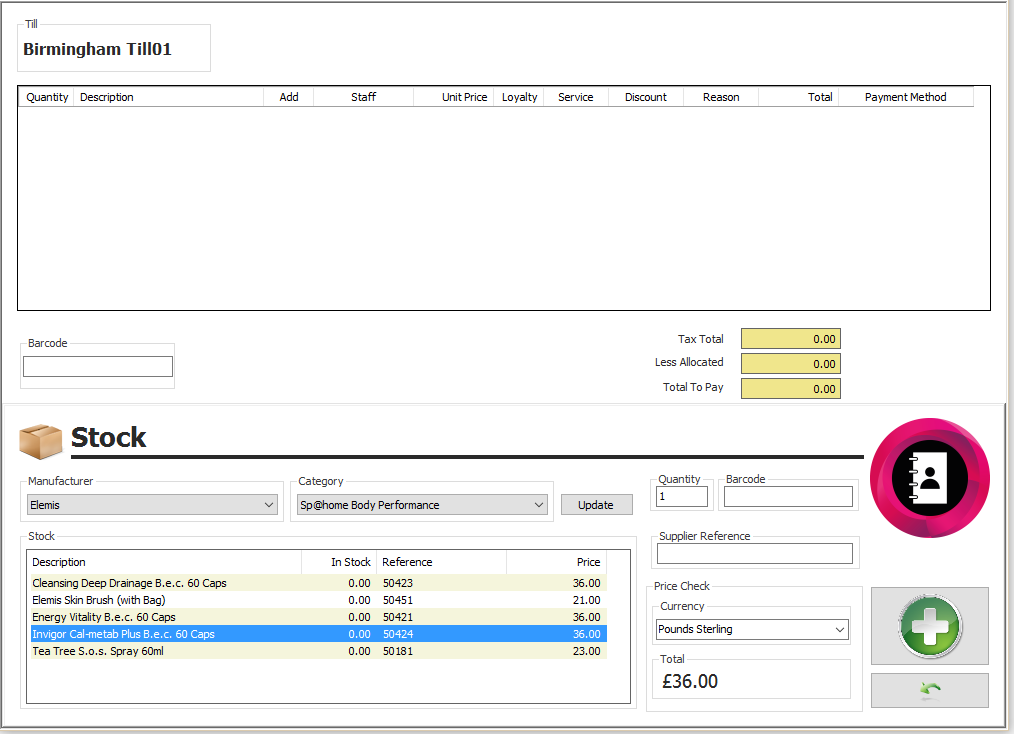
- Select the “Stock” icon and you will now see the following screen
- Select the “Manufacturer” that is required, by clicking on the dropdown, you can also select the “Category” to filter the list further.
- Press the “Update” icon and you will then receive a list of all retail items.
- Select the relevant stock item from the list and enter the amount they are purchasing in the “Quantity” field.
- Click on the “Green Plus” to then add this to the bill.
- Once you have added all required items, click on the “Backwards Arrow” to close the additional screen and proceed with the bill
Food and Beverage

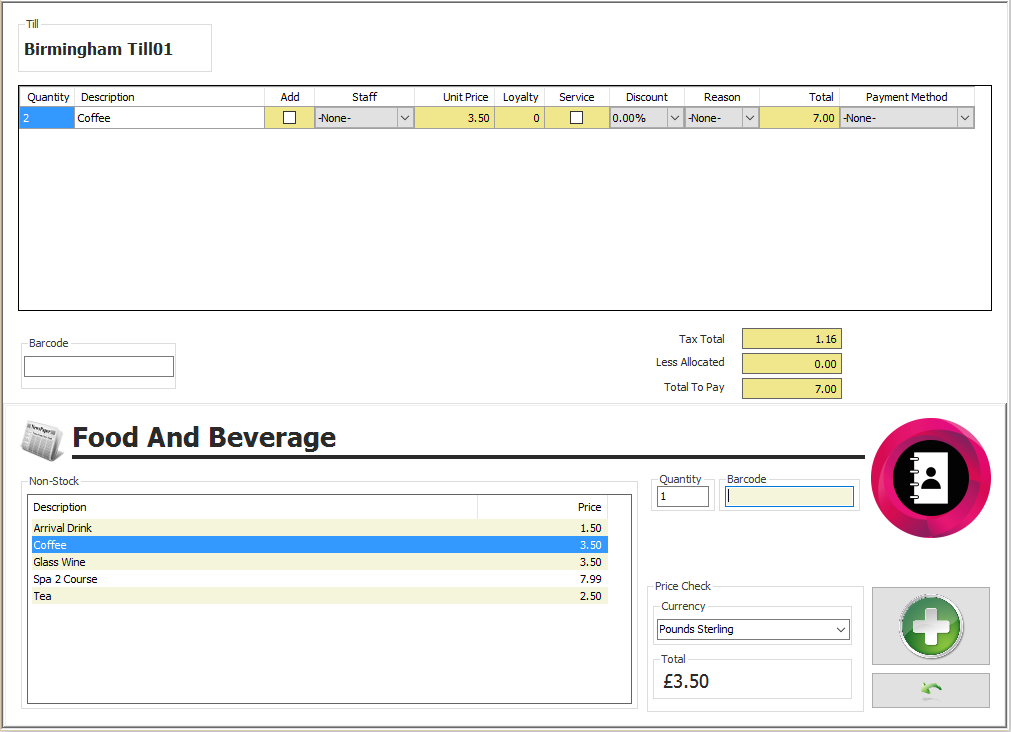
- If you need to add on any food or beverage items that the client has purchased please click on the “Food and Beverage” icon, you will then see the following screen.
- Select the item that you require from the list provided and enter the amount they are purchasing in the “Quantity Box”.
- Click on the “Green Plus” and once you have added all items required, click on the “Green Backwards Arrow”.
Miscellaneous
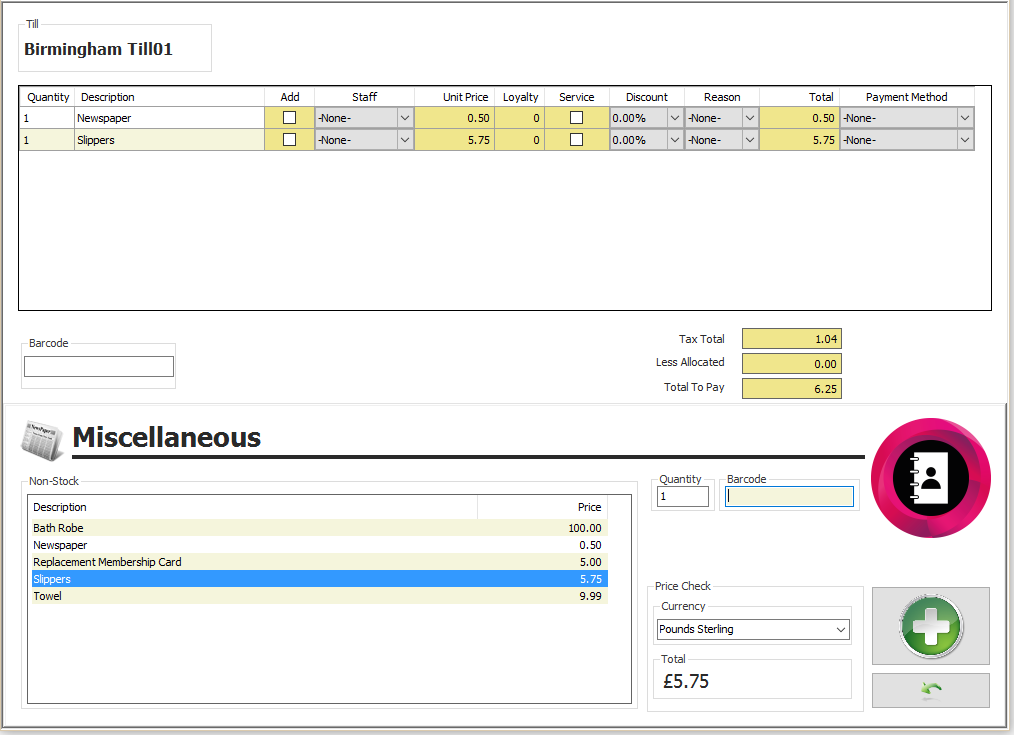
- If you need to add a miscellaneous item to the bill click on the “Miscellaneous” icon, you will then see the following screen. Select the item required from the list provided and enter the amount they are purchasing in the “Quantity Box”.
- Click on “Green Plus” which will add the item required to the bill.
- Click on the “Green Backwards Arrow” when you have added all items.

Any items added using the Stock, Food and Drink, or Miscellaneous icon will default the staff member of "None", if you need to allocate a specific staff member click on the “Downwards Arrow” located next to the staff name box and select the staff name required.
Related Articles
Premier | Client Sale
Description Client sale allows you to complete a bill and allocate all items to a specific client, therefore saving all previous treatments and any stock items onto their client card so you are able to view them at any time. Resolution In “Reception” ...Premier | Courses
Description Courses are used to sell multiple appointments in advance and track usage on the day of the appointment. Typically the value of appointments included in a Course are at a reduced value due to purchasing these in bulk, therefore on ...Premier | Future Payments
Description The future payment facility enables an appointment which is already booked to be paid for in advance. Resolution Selling a Future Payment In “Reception” click on “Future Payments” (See figure 1). Figure1 Search for your client. Select ...Premier | Amending Till Receipts
Click on “Amend Receipts” in Reception (figure1) Figure 1 When entering “Till Receipts” the following screen (figure 2) will appear, if for any reason you need to reprint the clients receipt, ensure you are on the correct client and then click onto ...Premier | Departures
Description When the client has finished their appointments and has come to pay they need to be departed in the system. Resolution Select the “Departures” icon (Figure 1). Figure 1 You will now be presented with the following screen (see Figure 2). ...

