Premier | Reservations
Description
To book packages you need to use the Reservations menu. The Reservations menu is where you take the initial booking, determine the package the clients will have, add on any additional treatments facility appointments or group activities along with scheduling all items and take any deposits.
You are also able to book groups of friends onto a reservation where they do not require a package but you may wish to group these people together.
Resolution
To create a new reservation
- Select the “Reservations” icon on the main reception screen (see Figure 1).
Figure 1
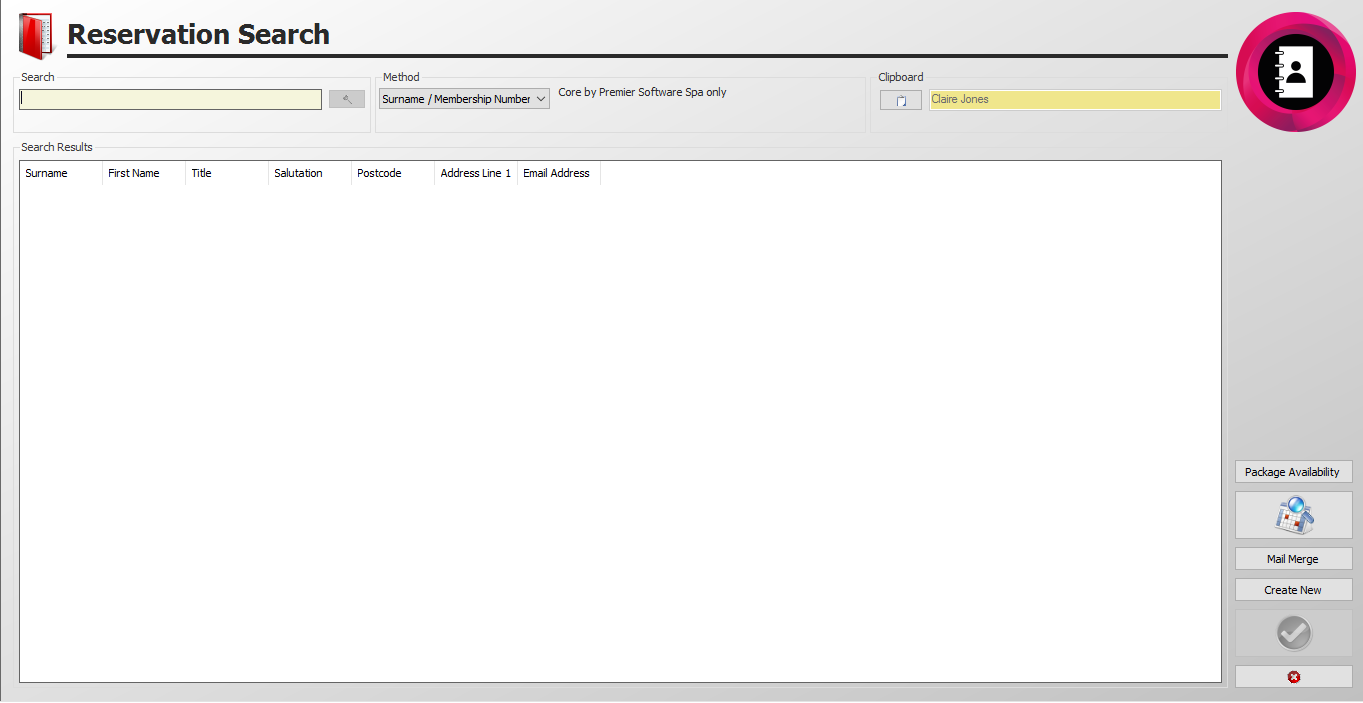
- You will now be presented with the following screen (see Figure 2).
Figure 2
- Enter the client's Surname into the “Search” box. Existing reservations with the same surname will appear in the” Search Results” box. If there are no existing reservations with that surname, a box will appear stating “No Reservations were found. Create New?" Click on “Yes”.
- If once you search you need to create a new reservation click on “Create New”.
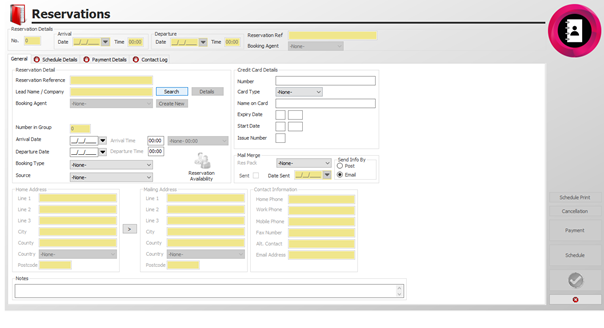
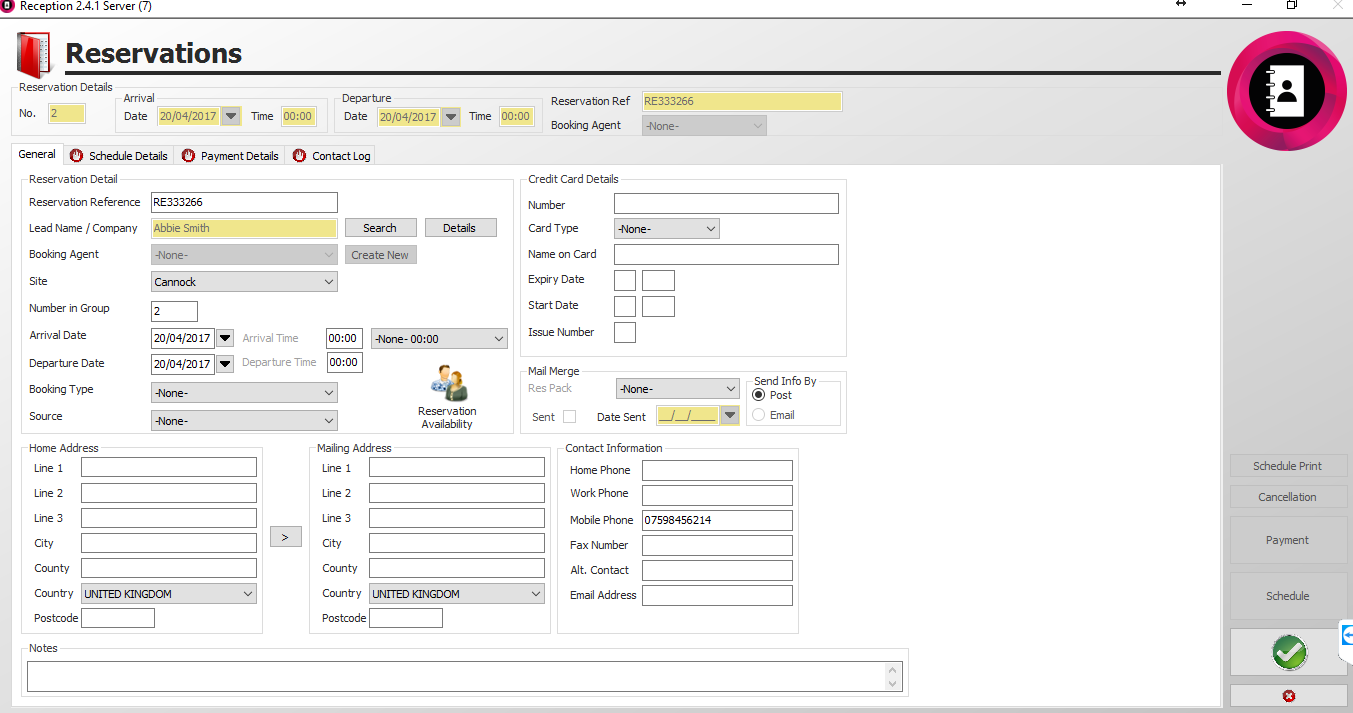
The next screen you see will be the “General” details for the new reservation (see Figure 3).
- The first thing to do is assign a “Lead Name” – this is the client who is “in charge” of the reservation and who you would correspond with. Click the “Search” button beside the “Lead Name / Company” box and search for the client.
- “Details” – by clicking onto this icon you will be taken to the lead names client card.
- “Number in Group” – this specifies how many people are going to be a part of the reservation.
- Now set the “Arrival Date” and “Departure Date”, i.e. the dates they will arrive and depart for the reservation.
- “Arrival Time” and “Departure Time” – if times are inputted into this section it will reflect when scheduling for example if you try and book an appointment before 10.00 am a message will appear stating that the appointment cannot be booked as it is outside hours.
- “Booking Type” – click on the downwards arrow and if applicable allocate the relevant booking type.
- “Source” – click on the downwards arrow and if applicable allocate the source – this is how your client has heard about you.
- “Reservation Availability” –gives you the ability to control the number of clients that are permitted to come either on a certain day or time.

- “Credit Card Details” – this allows you to store the lead name credit card details
- “Mail Merge” – this concerns sending out reservation documents directly to the client. If you have document confirmations set up you can select the document template you wish to send from the “Res Pack” dropdown. If you do not have any in place, please refer to the E-Mailing prompt sheet.
- “Home Address” – input the lead name's home address.
- “Mailing Address” – if different from the home address input a mailing address, it may be that the lead name does not want any correspondence going to their home address.
- “Contact Information” – complete as required.
- “Notes” – input any notes as required.
- If you have chosen for the system to auto-generate a “Reservation Reference” the green tick will be available, if you have opted to create your own you will need to enter this into the “Reservation Reference” box until this has been completed the green tick will remain unavailable.
- When you click the “Green Tick” a reservation reference will be created for this booking. After the Green Tick has been clicked, the other tabs at the top of the screen become accessible.
Schedule Details
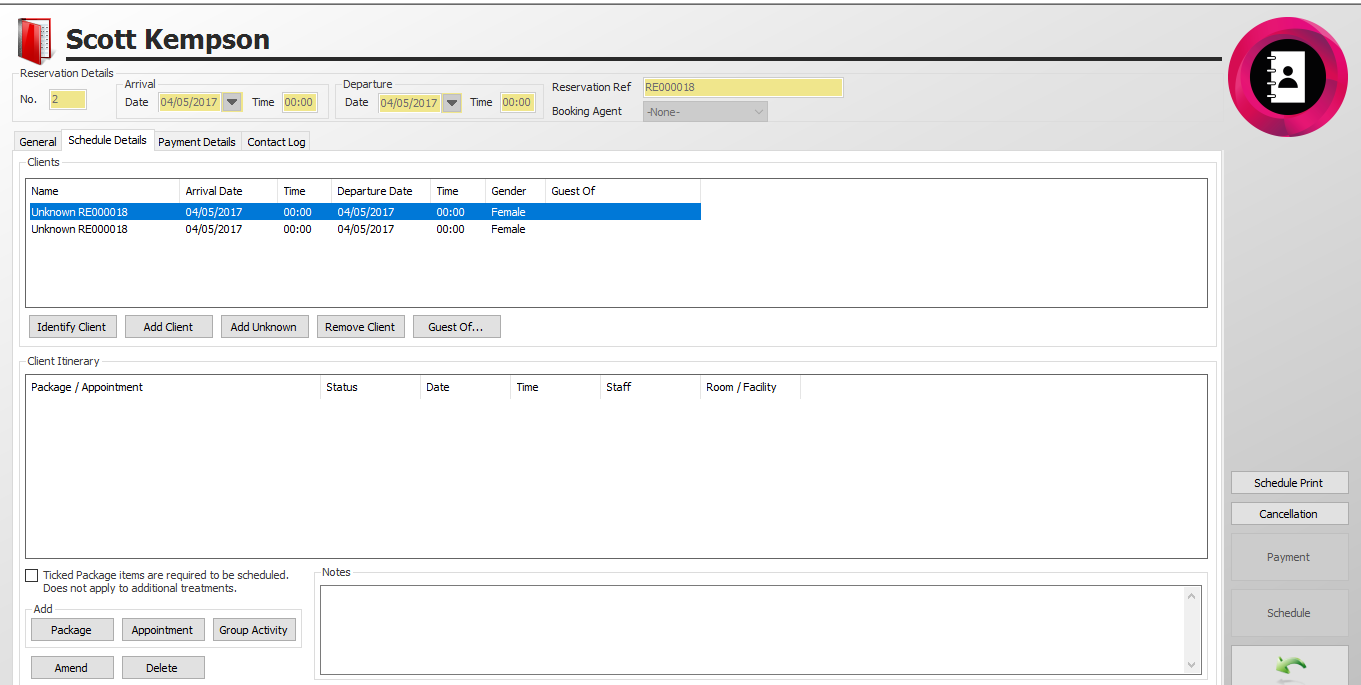
- Open the “Schedule Details” tab.
- To begin with, none of the clients are known, so they appear as unknown. Select an unknown client and click “Identify Client” to search for the client’s details (see Figure 4).
- Usually one of the unknown clients will be the Lead client, when you click identify client the lead name will be on the clipboard. Identify as many clients as you can.
- Click the “Package” button.
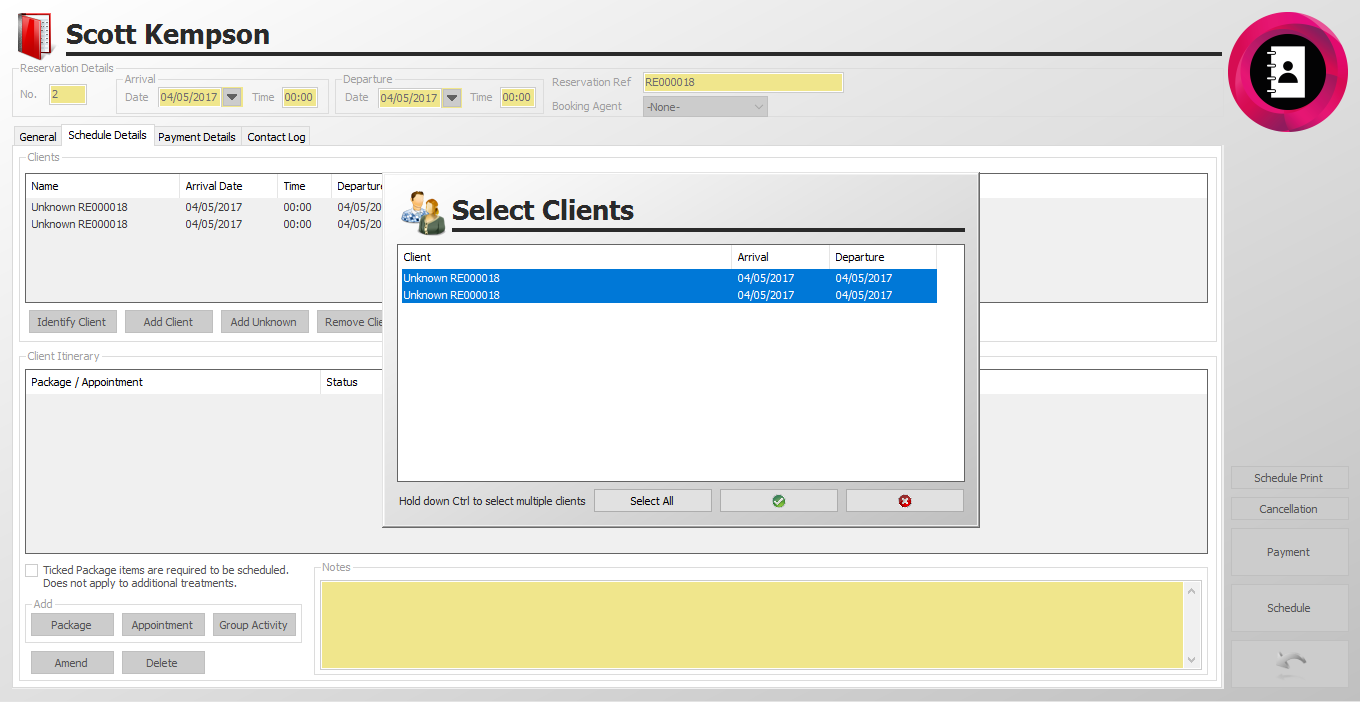
This button is used to identify which package each client will be having. Highlight the client name from the list, or use “Select All” if every client will have the same package see figure 5. The “CTRL” keyboard key can also be used to select more than one client.
Press the “Green Tick” once the relevant clients are highlighted.
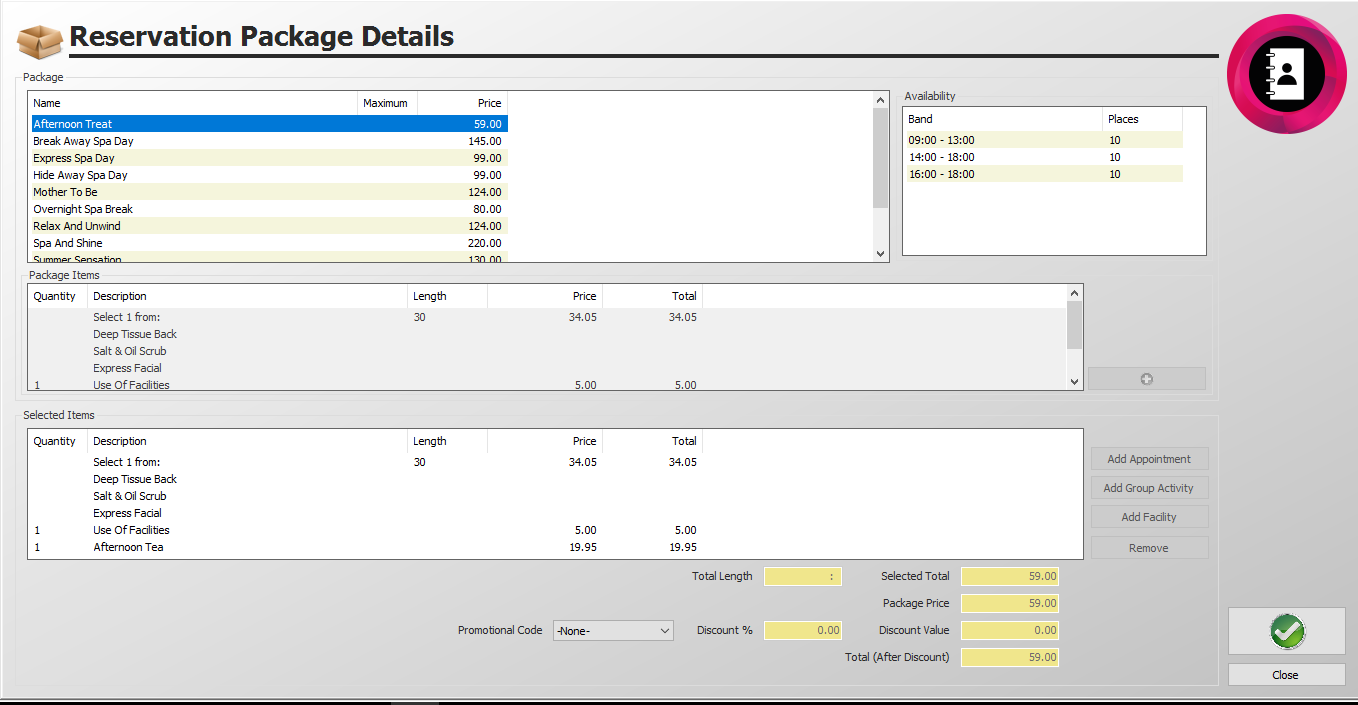
Select the “Package” for the client(s) then press the “Green Tick” see figure 6
If you have time bands in use, after selecting the package you will need to select the required time band from the Availability box (Figure 7).
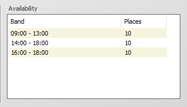
Figure 7
After the package is chosen, the display will return to the “Schedule Details” screen; repeat the steps above to ensure that all clients have a package.
Amending a Package
- If you select the wrong package click on the name of the package and click on the amend button to select the correct package from the list provided and then click the refresh button (Figure 8).
Figure 8
Adding Additional Items
- The clients may wish to add additional “Packages”, “Treatments” or “Group Activities” to their reservation: the buttons at the bottom of the screen can be used to add these to the reservation see (Figure 9).
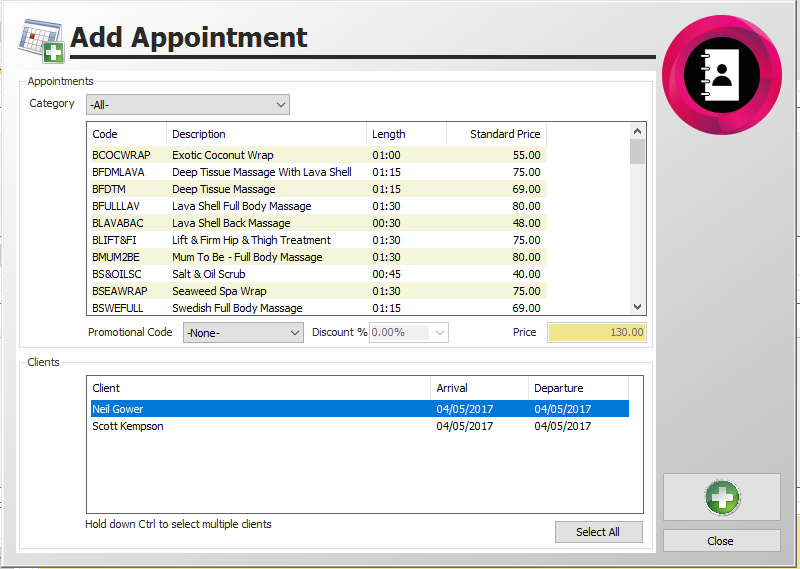
- Click on the “Appointment” icon and the following screen will be shown (see Figure 10).
- If both clients wish to add on the same appointment press the “Select All” icon, select the relevant appointment from the list shown and then “Green Plus”. If they wish to have different appointments, highlight one client at a time, select the required appointment and “Green Plus”.
- If you need to discount the cost of the additional treatments for any reason this can be done from this screen, click on the downwards arrow at the end of the “Promotional Code” box, select the relevant “Reason” and input a discount if required. Before any discounts can be given ensure they are configured correctly within “Manager”, please see the separate prompt sheet on promotional pricing for details on how to do this.
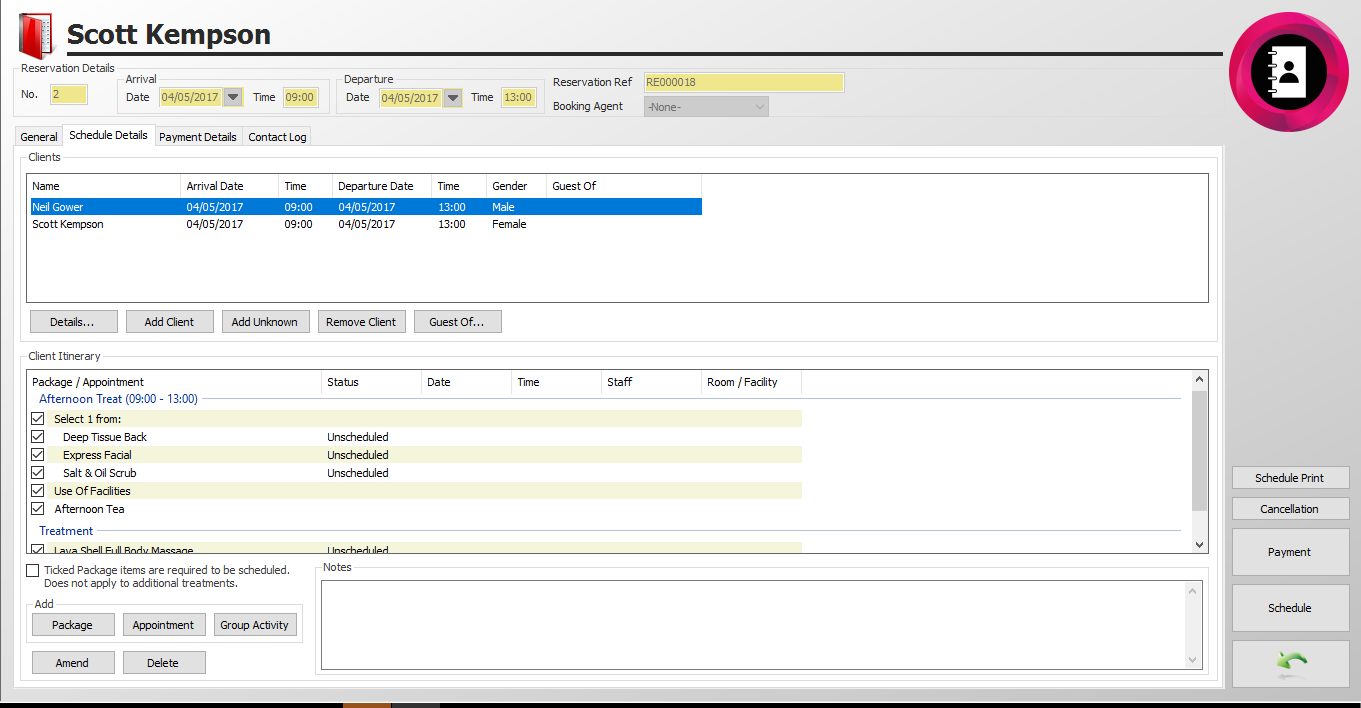
- Press “Close” to return you to the main reservation details screen, you will now see that all additional treatments have been added to the client itinerary (see Figure 11).
- If you need to remove an item click on the “Delete” icon.
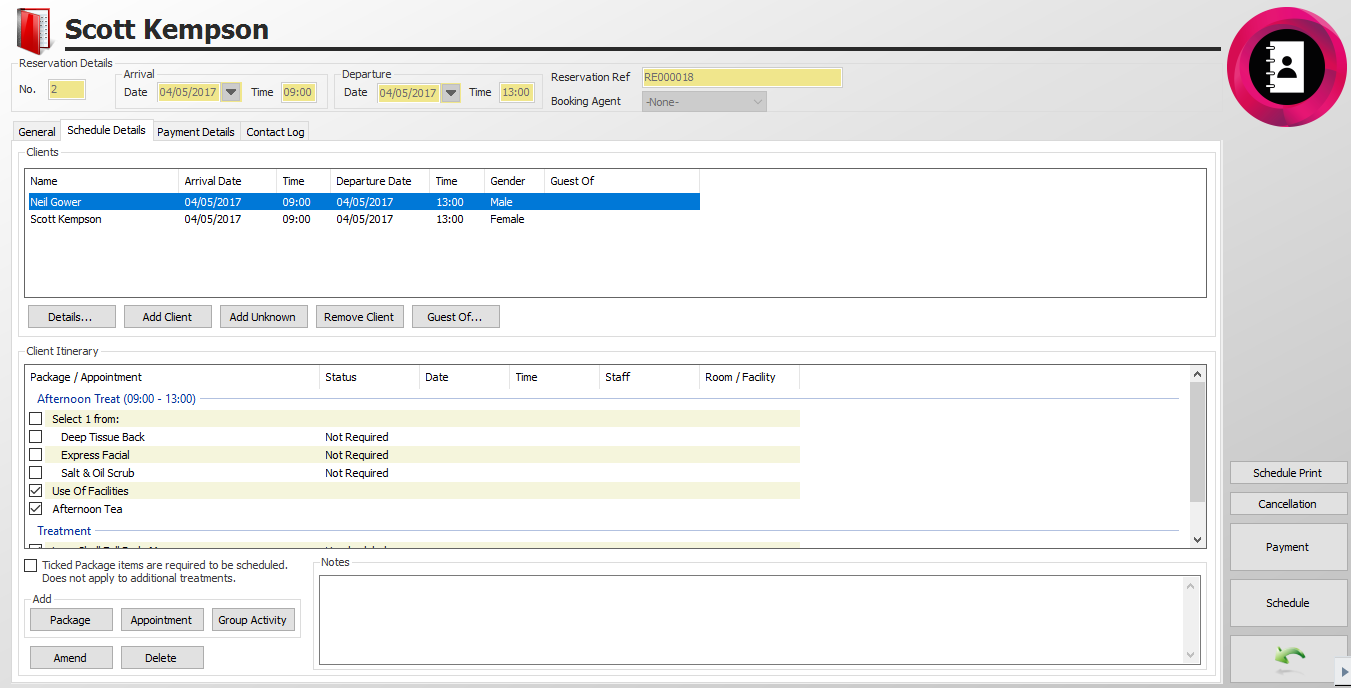
- If the client wishes to amend a treatment which is included as part of the package untick the box located next to the name of the treatment and instead of showing “Unscheduled” it will show “Not Required” (see Figure 12).
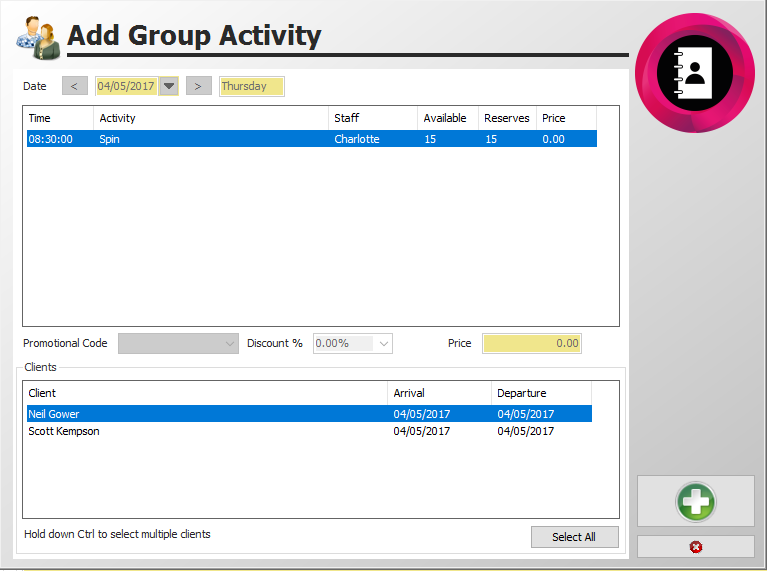
Click on the “Group Activity” Icon and the following screen will appear (see Figure 13).
Figure 13
- Select the relevant “Group Activity” from the list provided, you will notice it tells you the “Time” of the group activity, and the “Name” of the group activity in the example above it is Spin, which “Staff Member” conducts the class how many “Spaces” are available, how many “Reserve Spaces” are remaining and if applicable the “Price”.
- If both clients wish to partake in the same group activity press “Select All”, select the relevant group activity and then press the “Green Plus” button, once completed press the “Red Cross”.
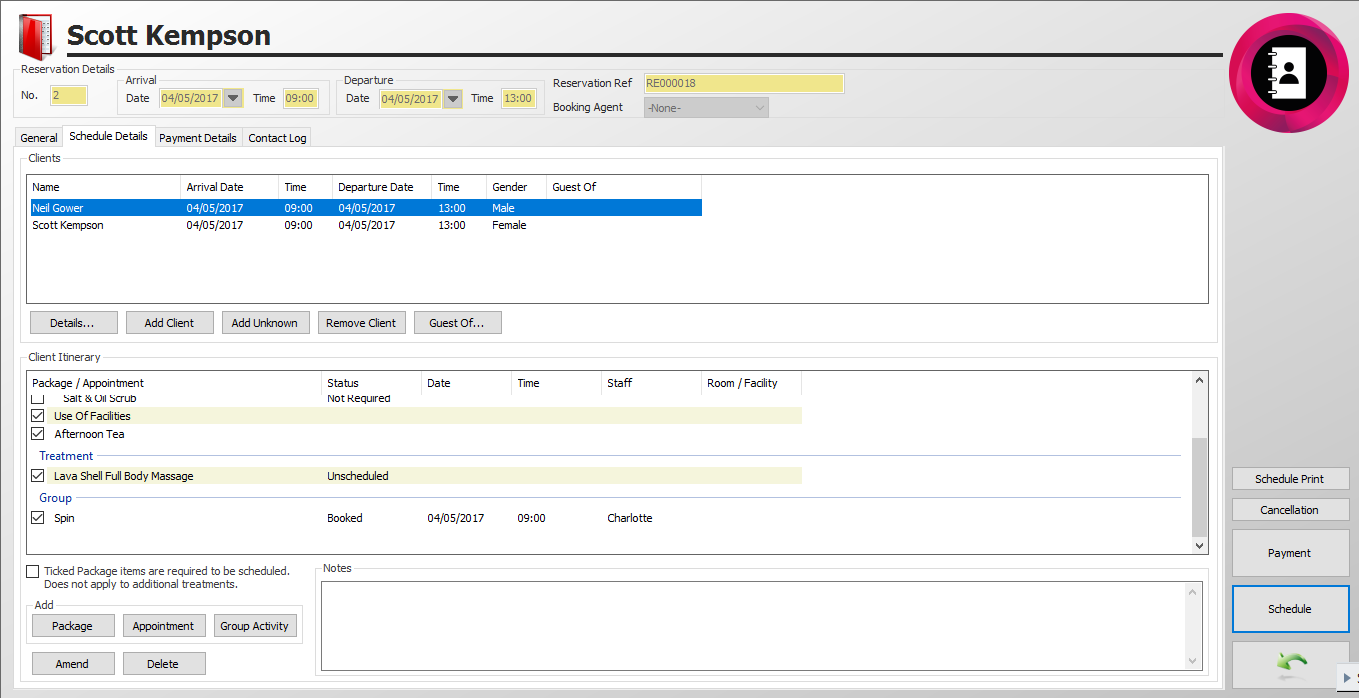
- This group activity now appears within the client itinerary (see Figure 14).
Figure 14
- You will notice the Status of this group activity is booked; the system automatically books this type of group activity for you so there is no further action required.
- The bookings that make up the reservation along with any additional treatments must now be scheduled. Note that it is not compulsory to schedule everything, and the user may return to the reservation at any time to complete or amend the scheduling.
- Click the “Schedule” button (see Figure 15).
Reservation Views
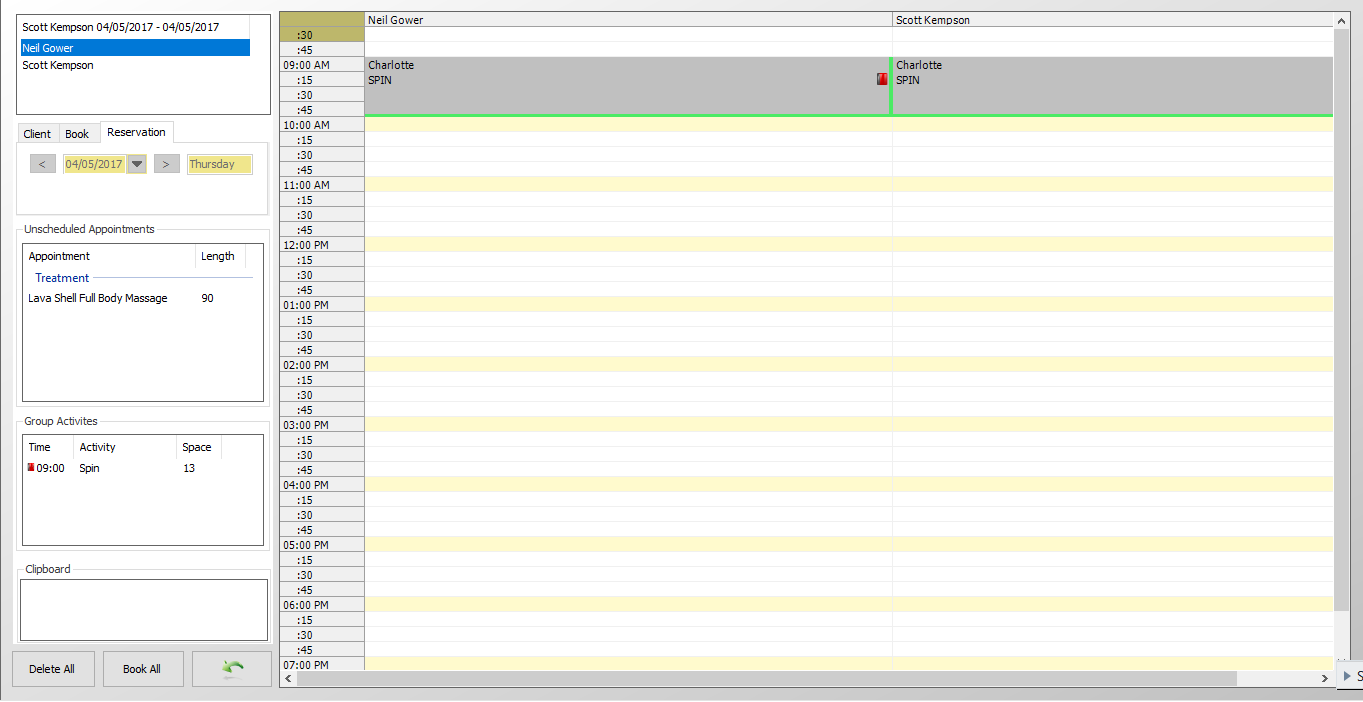
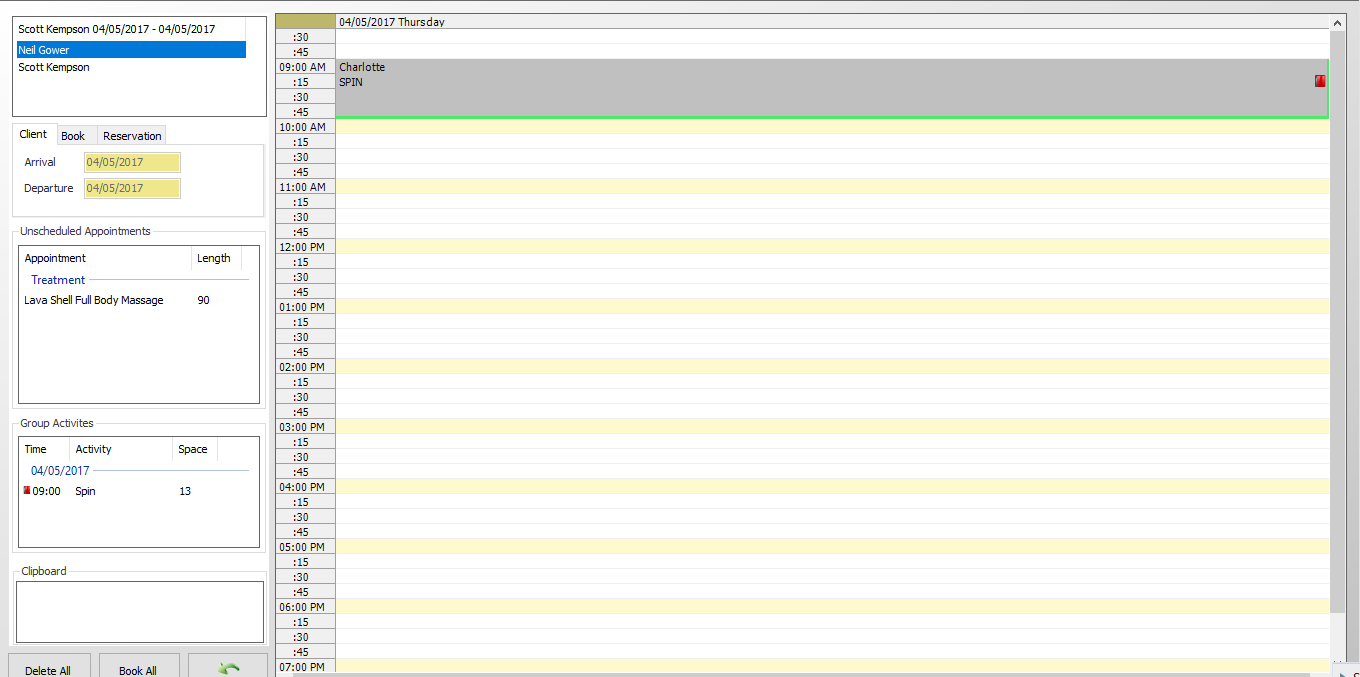
- The next screen displayed will depend on your settings and the view you have stated that you wish to see when you schedule a reservation, the first one shown below is the “Reservation” screen which will display all clients side by side, also shown if applicable will be any group activities which have been booked, in the example below both clients are participating in the Spin class at 08:30 am (see Figure 16).
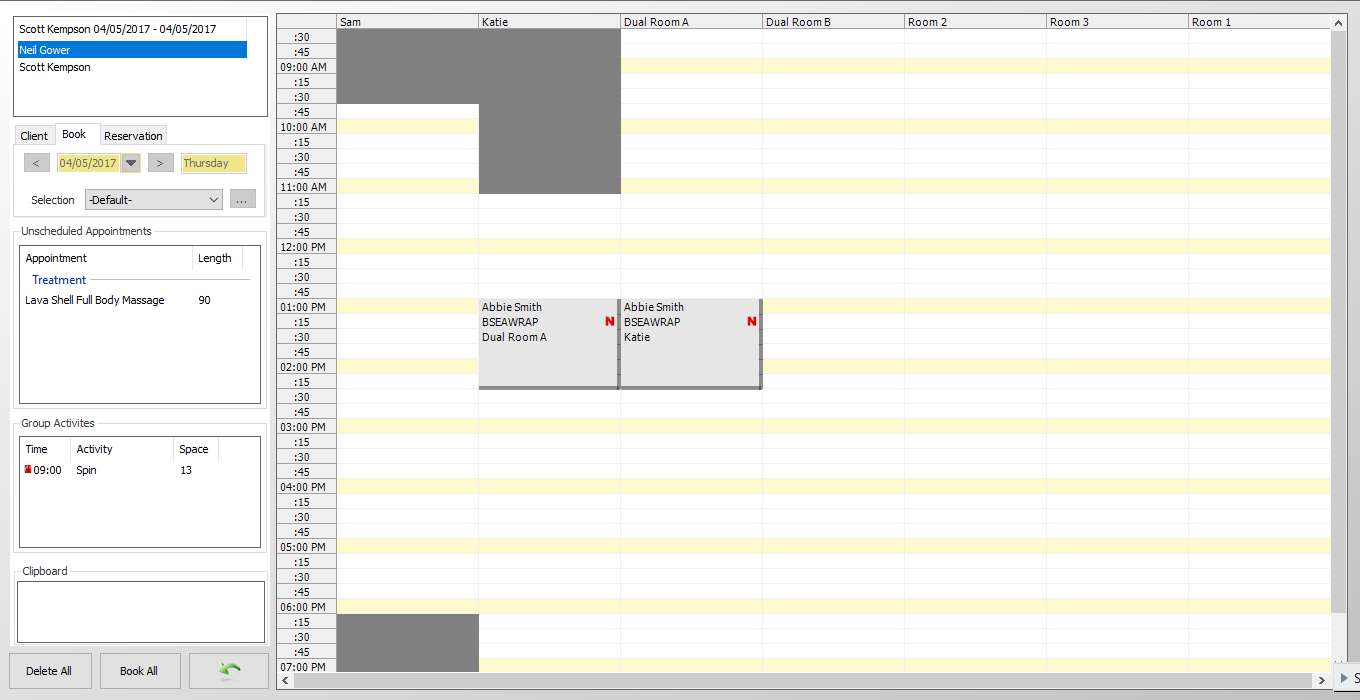
The second view shown is “Book”, which will display your default view of Appointment Booking (see Figure 17).
The third view is “Client” which will show the selected clients' appointments, along with any group activities booked (see Figure 18).
- To schedule package items or additional treatments, select the client in the top-left corner.
- Drag an item from the “Unscheduled Appointments” box and drop it at the time you wish to schedule it.
- Repeat until you have scheduled everything you wish to schedule for every client.
- Click the “Green Arrow” to return to the reservation details screen.
- If the package can be taken over several days, click on the forwards arrow located next to the date and this will move the diary to the next day’s date. To move the date backwards click on the backwards arrow.
- The book all feature will automatically book the appointments into the diary for you; this will be based on the first available appointment and can only work on packages not including a selection.
- If you need to delete all appointments press the “Delete” button.
Payments
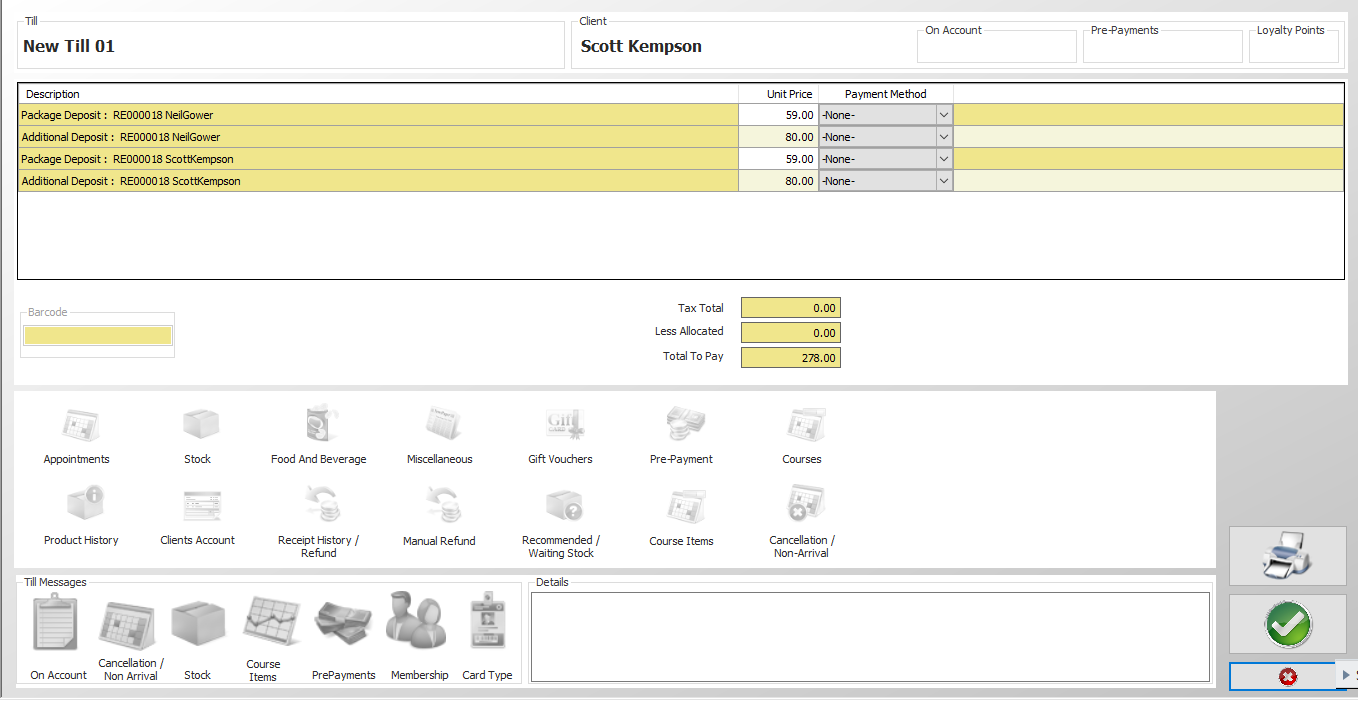
- Click the “Payment” button on the right-hand side of the screen. You will now be presented with the bill-screen (see Figure 19).
In the example above you will see that we have 4 bill lines, 2 for the first client and 2 for the 2nd client. The first bill line reflects the package and the 2nd bill line reflects the additional treatments that we have booked. It is not possible to add anything to this bill (e.g. stock, food and drink, etc.) – it is simply a bill for processing this reservation’s deposit.
- If a client is not paying the full amount, click into the “Unit Price” box for that client’s items and change the value to match the amount they are paying now.
- Click the “Green Tick”.
- Choose the payment methods as you would for any other type of bill.
- Click the “Green Tick”. This will return the user to the reservation details screen.
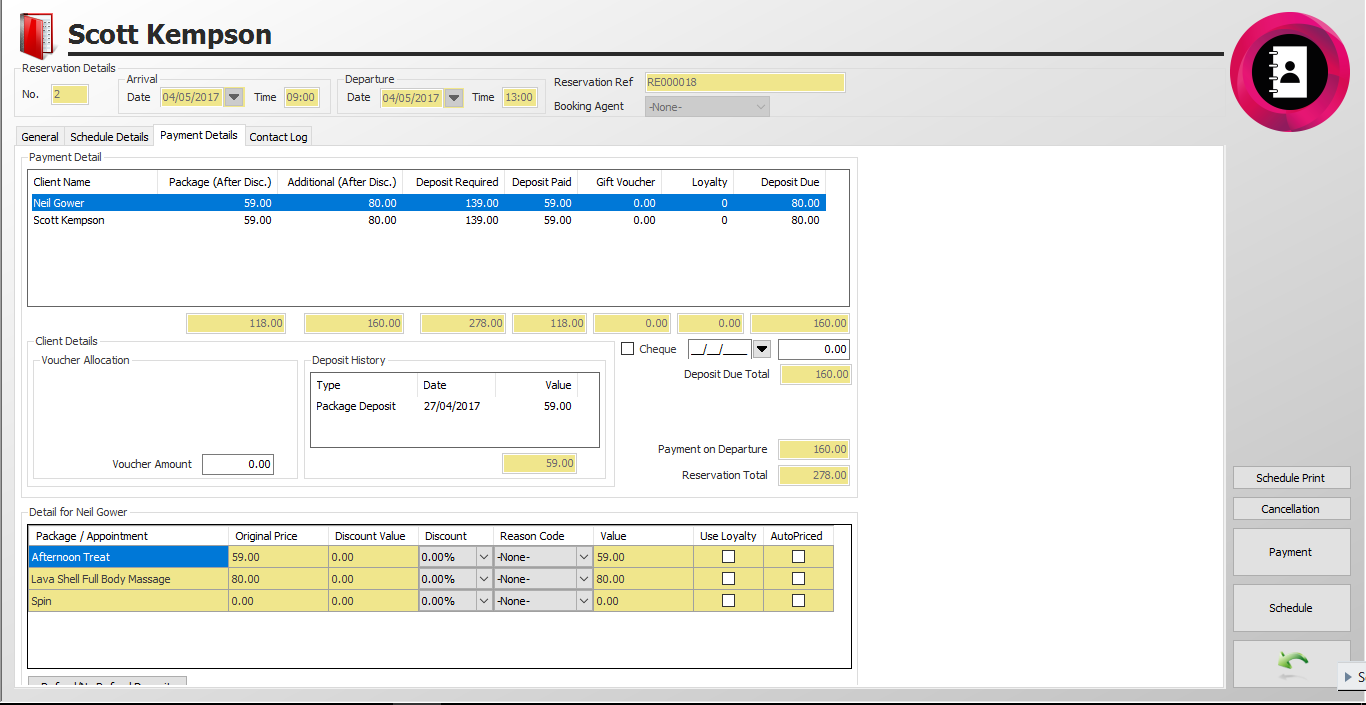
- The “Payment Details” tab can be used to see the deposits paid and the outstanding balance (see Figure 20).
- This screen also allows you to state if a client is paying with a “Voucher” and the amount from that voucher along with if you are expecting a “Cheque”, the “Date” and the expected “Amount”.
- If you need to “Discount” the package for any reason you will need to click on the “Reason Code”, select the relevant reason, gain authorisation if required, and then input the relevant discount in the “Discount Box”. Before any discounts can be given ensure they are configured correctly within Enterprise Manager, please see the separate prompt sheet on promotional pricing for details on how to do this.
- Once you are satisfied with the reservation details, schedule and deposits, click the “Green Backwards Arrow” to return to the main menu.
Contact Log
Reservation Arrival and Departure
- When a client arrives for their reservation, they should be arrived and departed just like a normal booking. If there is still payment outstanding for the reservation, then this payment will be requested when they are departed.
Schedule Print
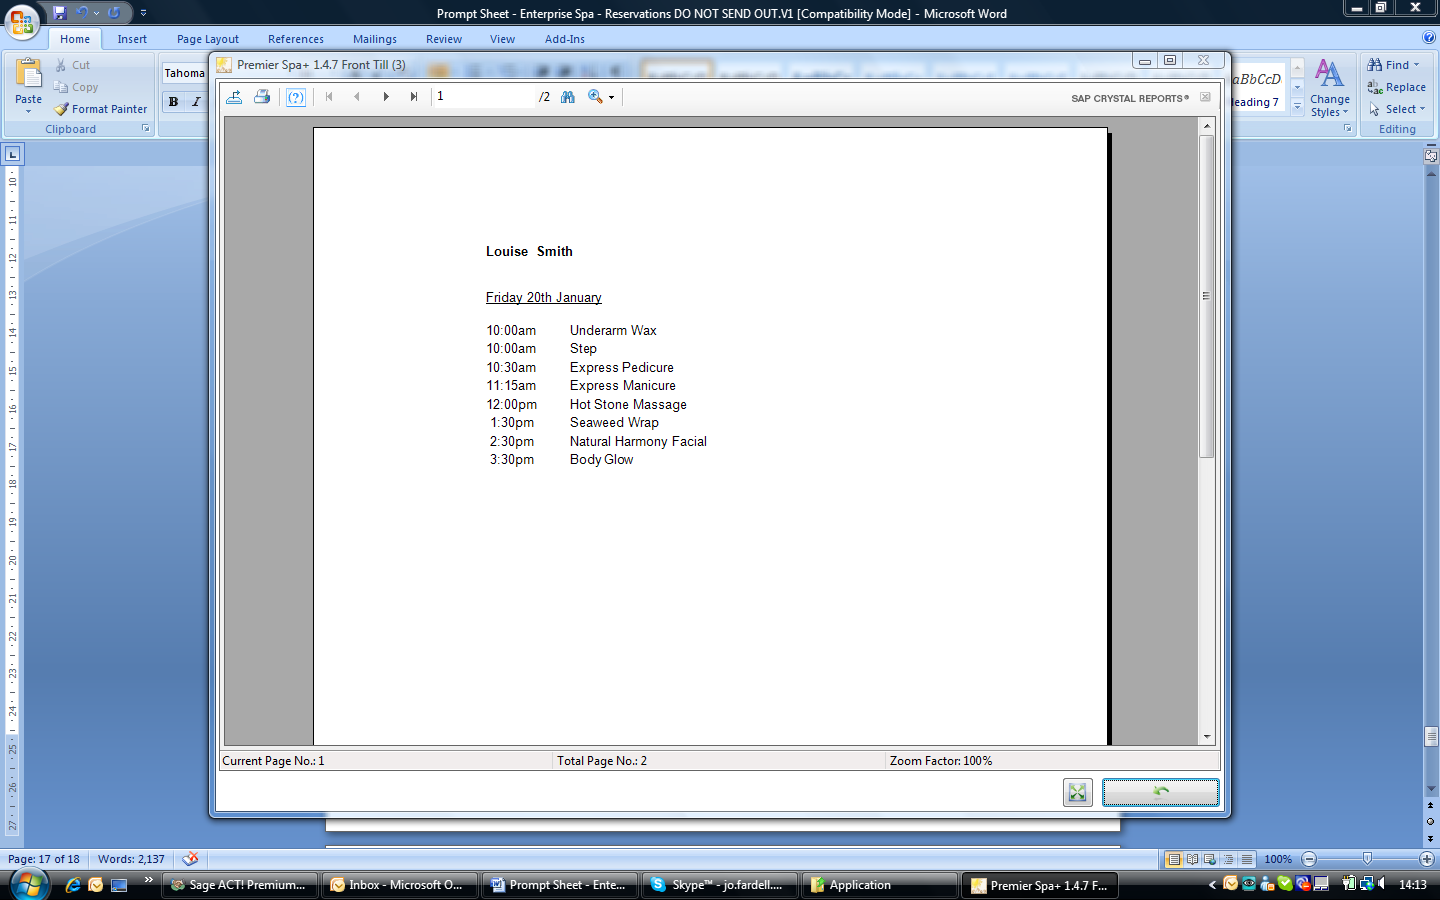
- By clicking on “Schedule Print” you will be able to print a schedule for each client, the example below (Figure 21) is standard however this may be customized to meet your requirements:
Cancellations
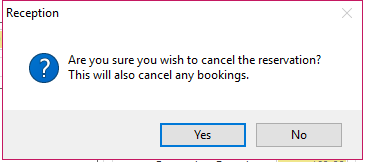
- The “Cancellation” of a Reservations is dealt with within the Reservations screen, once you have selected the relevant Reservation click on the “Cancellation” button and the following box will appear (Figure 22).
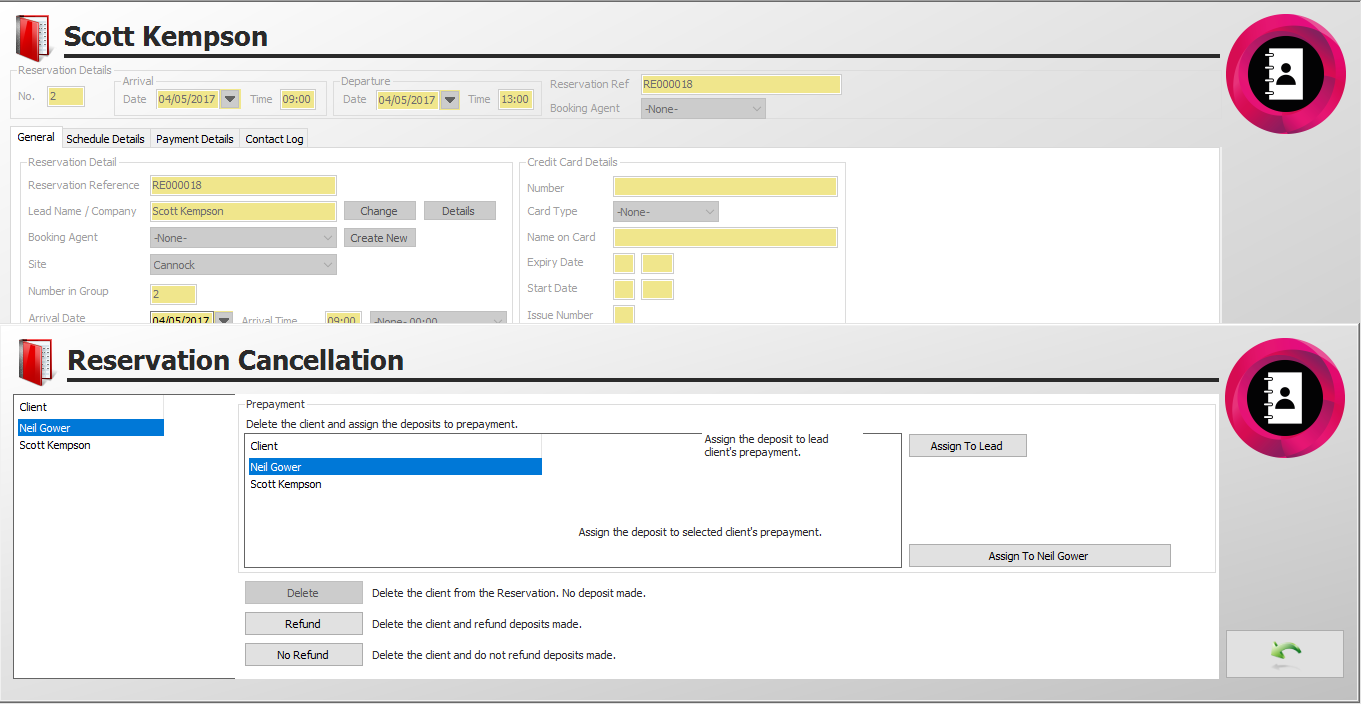
- Click “Yes” and the following screen will appear (Figure 23).
Figure 23
- You will now be presented with several options when you cancel the client, this relates to any money paid and how the revenue is going to be accounted for.
- When cancelling the” Lead Name” you can allocate any monies paid to their “Pre-Payment Account”, offer them a “Refund” or state “No Refund “, the latter option means the company will keep the revenue, if NO revenue has been paid upfront the option of Refund and No Refund are unavailable and you simple need to click onto “Delete” as this will remove the client.
- When cancelling other members of the reservation the same options are available, however as well as refunding any revenue to the client’s pre-payment account you are also able to opt to put this onto the lead names pre-payment account.
- Any cancellations will automatically be logged on the client card (see Figure 24).
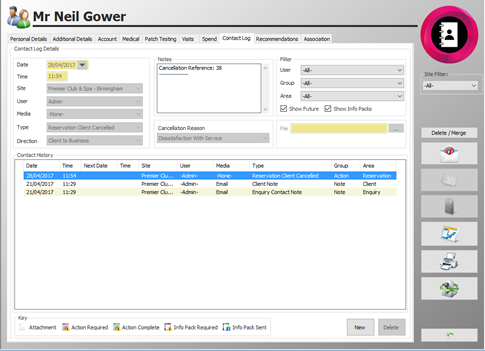
Figure 24
Controlling Your Reservations Capacity
Package Time Bands
- Time bands can manage the number of clients allowed during various hours and control the number of clients per package. If you are considering reservations online you will need to configure to validate availability. Even if you are not online with reservations, package time bands are a useful facility to control the capacity of your business.
- Before you can utilise this feature, please ensure it is configured correctly within “Enterprise Manager”. Please see the prompt sheet on “Package Setup” for full details.
Reservation Availability
- For example; you may allow 20 clients to visit who are on an Afternoon Treat package but only 10 who are on a Relax Me package. By using Reservation Availability, do not overbook a specific package or time.
- Before you can utilise this feature please ensure it is configured correctly within “Enterprise Manager” - please see the prompt sheet on “Package Setup” for full details.
- If you do have this configured, above the Reservation Availability icon (as shown in Figure 4), select an option from the dropdown.
Figure 4
- This dropdown box will show you a list of packages that can be booked, select the required package and this will automatically count towards the total numbers for this package. Reminder: you still need to allocate the required package and schedule it accordingly.
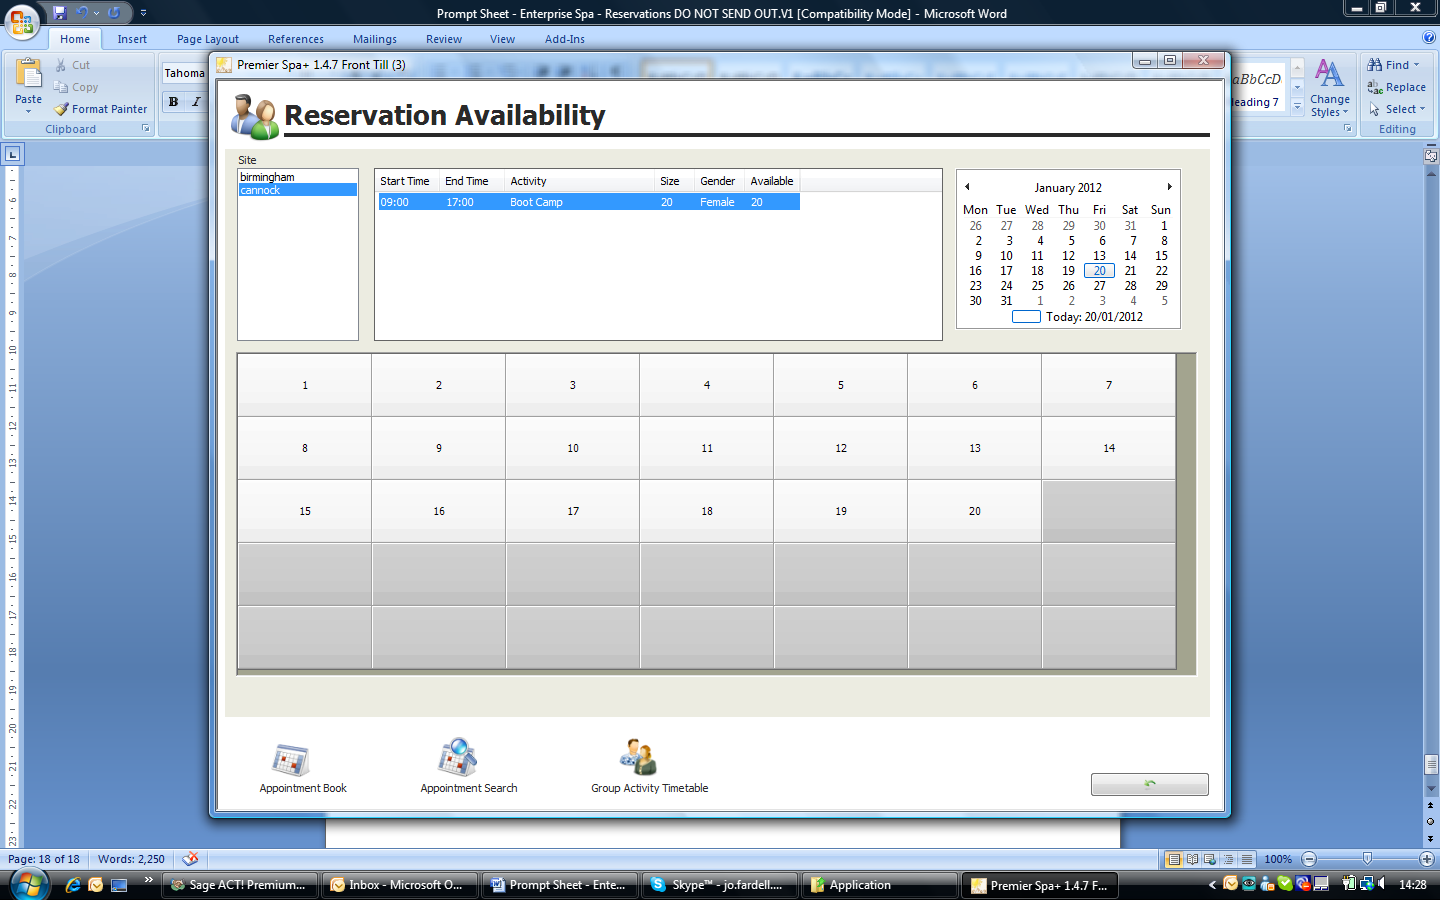
- Click on “Reservation Availability” and the following screen will appear (Figure 5).
Figure 5
- You will be able to see how many clients have already booked this package along with how much availability is left. Press the “Green Backwards Arrow” and “Green Tick”.
Related Articles
Premier | Appointment Booking
? Summary The Appointment Book allows staff to view, book, and manage client appointments. It provides features for scheduling, searching, billing, and managing availability, along with a comprehensive screen layout for daily operations. ❓ Likely ...Premier | Create Reservation
Description To book packages you need to use the Reservations menu. The Reservations menu is where you take the initial booking, determine the package the clients will have, add on any additional treatments facility appointments or group activities ...Premier | Reservation Amendments
Description This section covers the ability to amend a reservation Resolution In "Reception" click onto “Reservations" Reservation - Amend Dates Arrival Date - the date the clients are due to arrive arrival dates are used on confirmations and ...Premier | Reception Reports
Description Reception Reports Resolution In “Reception” Click onto “Reports”, see figure 1 Figure 1 Bills “Bills Analysis “ “Dates” – this report can be ran for selected date ranges simply by clicking on the downwards arrow located at the end of the ...Premier | Cancelling Ecommerce Bookings In EMS
Description This guide will take you through the process of completing a cancellation of a OneJourney in Premier Spa. It is recommended that you first cancel the booking and complete the required administration of the booking in your OneJourney ...
