Premier | Reception Reports
Description
Resolution
In “Reception” Click onto “Reports”, see figure 1
Figure 1
Bills
“Bills Analysis “
“Dates” – this report can be ran for selected date ranges simply by clicking on the downwards arrow located at the end of the dates box, alternatively by selecting “Custom” you are able to input your own date range.
“Till” – This report can be ran for “All Selectable” – this will show all tills, you also have the ability to run the report based on individual tills, click onto the “Radio” button then select the till you require.
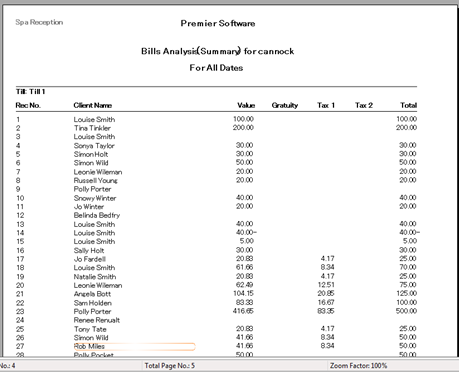
This report shows “Till Number” / “Receipt Number” / “Client Name” / “Value” / “Gratuity” / “Tax 1” / “Tax 2” and “Total” , see figure 2
Figure 2
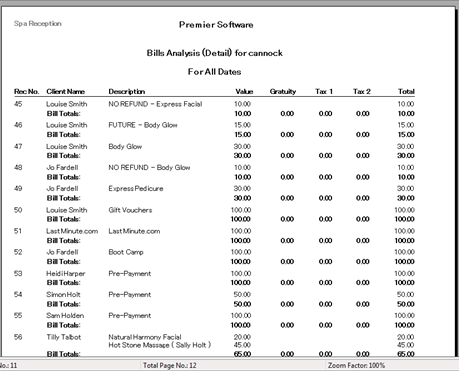
Detail – shows the same as the above report with the added addition of “Description” which shows what “Treatment “/ “Product “has been purchased, see figure 3
Figure 3
“Bills Analysis with Payment Methods”
“Dates” – this report can be ran for selected date ranges simply by clicking on the downwards arrow located at the end of the dates box, alternatively by selecting “Custom” you are able to input your own date range.
“Till” – This report can be ran for “All Selectable” – this will show all tills, you also have the ability to run the report based on individual tills, click onto the “Radio” button then select the tills you require.
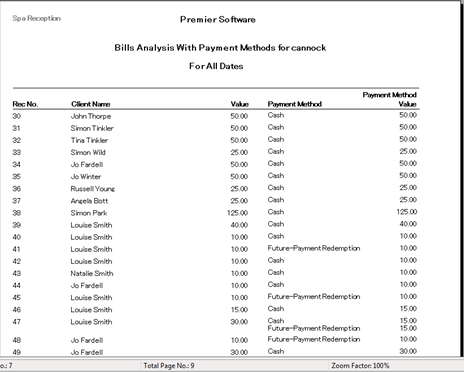
This report shows “Receipt Number” / “Client Name” /” Value” / “Payment Method “/ “Payment Method Value”, see figure 4
Figure 4
This above report can also be ran before you complete your End of Day to ascertain if the amounts in the Till are correct – Premier Software recommend that only senior staff have access to this report as the End of Day should be completed without the aid of this report.
This report can also be run if the End of Day is incorrect to help ascertain which bill needs to be amended.
Statistics
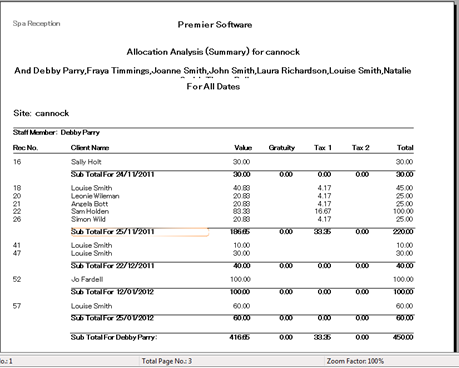
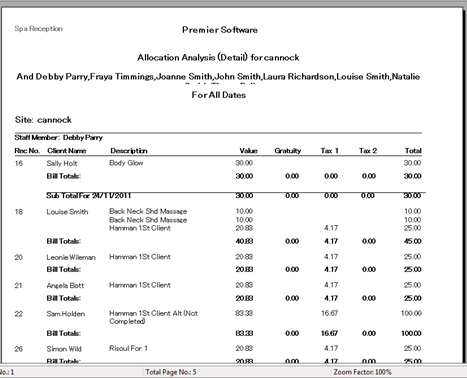
“Allocation Analysis” – this report shows which staff members have conducted what treatments and how much revenue they have contributed the company over the date range selected for the report.
“Dates” – this report can be ran for selected date ranges simply by clicking on the downwards arrow located at the end of the dates box, alternatively by selecting “Custom” you are able to input your own date range.
“Staff” – you are able to leave this as “All Selectable” – this will print off every staff member regardless of working hours, you also have the ability to state which staff members you wish to print off schedules for, click onto the “Radio” button and then select the staff member you require.
“Till” – This report can be ran for “All Selectable” – this will show all tills, you also have the ability to run the report based on individual tills, click onto the “Radio” button then select the tills you require, see figure 5
Figure 5
Detail – This report is the same as the one above however by including the “Detail” you also see what treatments each client had, see figure 6
Figure 6
Reservations
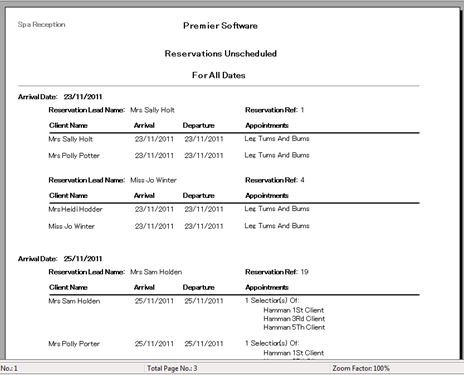
“Reservations Unscheduled” – this report should be ran on a regular basis; it will show all appointments which have not been scheduled for appointments accounted for within Reservations.
“Dates” – this report can be ran for selected date ranges simply by clicking on the downwards arrow located at the end of the dates box, alternatively by selecting “Custom” you are able to input your own date range, see figure 7
Figure 7
- This report shows the “Arrival Date” / “Reservation Lead Name” / “Reservation Ref Number” / “Client Name” / “Arrival Date” / “Departure Date” / “Appointments” which still need to be scheduled.
Reservations Booked
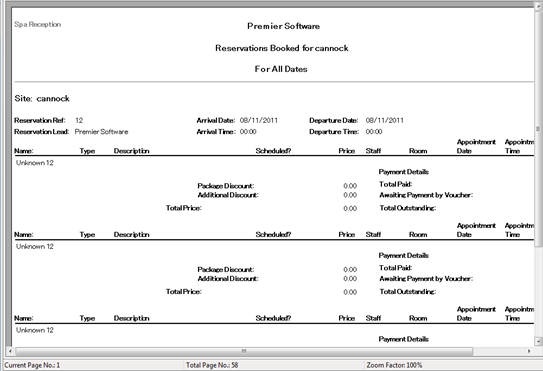
This report will show all reservations that have been booked
“Dates” – this report can be ran for selected date ranges simply by clicking on the downwards arrow located at the end of the dates box, alternatively by selecting “Custom” you are able to input your own date range, see figure 8
Figure 8
This reports shows “Site” / “Reservation Reference” / “Arrival Date” / “Departure Date” / “Reservation Lead” / “Arrival Time” / “Departure Time” / “Name” / “Type” / “Description” / “Scheduled” / “Price” / “Staff” / “Room”
Revenue Breakdown
Income Centre Overview (unconfirmed)
This report will show all revenue that is due to be paid depending on the dates ran for the report
Staff / Room / Facilities
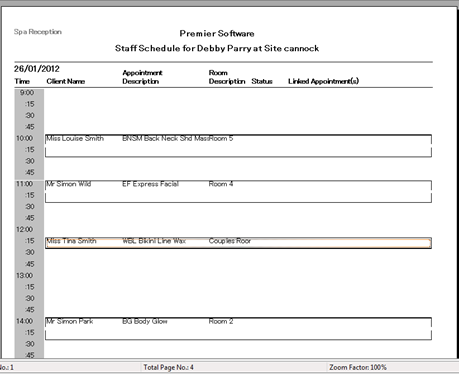
“Staff Schedule” – Premier Software recommend that each staff schedule is printed of the previous evening; this report gives a detailed account of what is booked with which staff member the following day.
“Dates” – this report can be ran for selected date ranges simply by clicking on the downwards arrow located at the end of the dates box, alternatively by selecting “Custom” you are able to input your own date range.
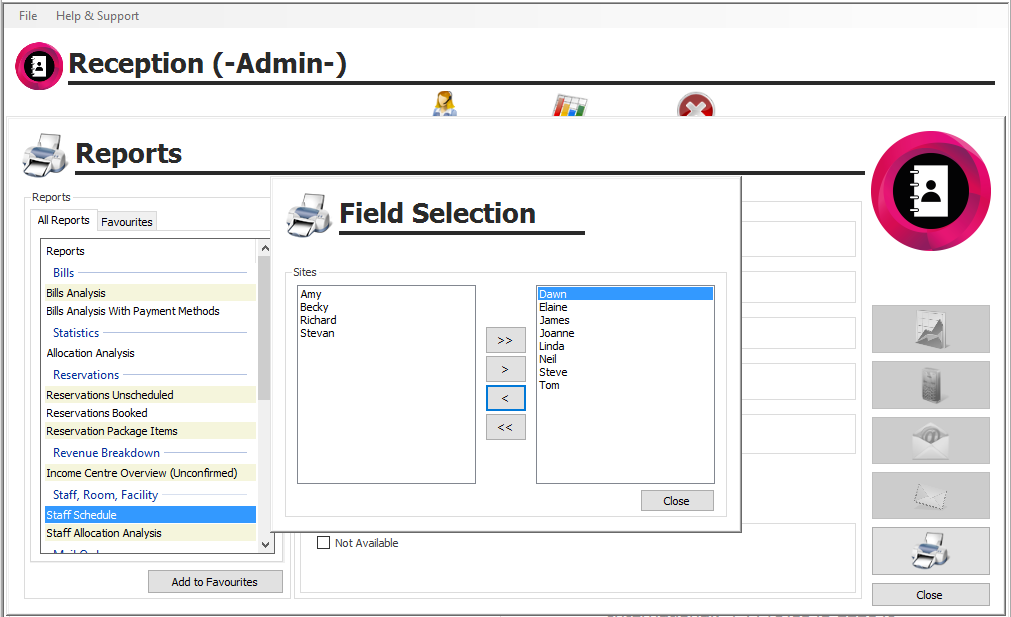
Staff” – you are able to leave this as “All Selectable” – this will print off every staff member regardless of working hours, you also have the ability to state which staff members you wish to print off schedules for, click onto the “Radio” button and then select the staff member you require, see figure 9.
Figure 8
- Highlight the staff member whose schedule you need to print off and use the “Single Arrow” to move them from the left hand box to the right hand one, if you need to move all staff members use the “Double Arrow”.
- Press “Close”
- If you wish to include schedules for those staff members who are not available ensure that you tick the “Not Available” box.
- Press the “Print” button and you will now see the schedules for all therapists selected, see figure 10
Figure 9
Clients
“Clients Items on Account”
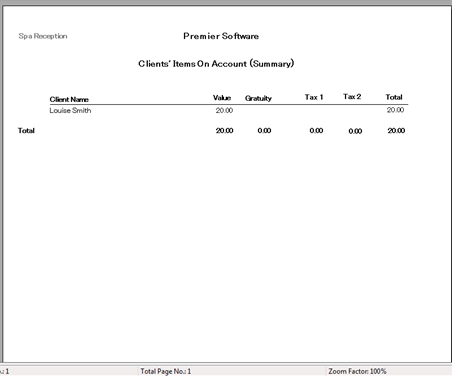
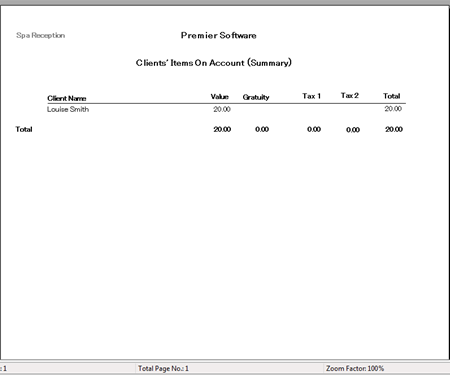
This report will give you details of which clients have items on account which still need to be paid for.
“Dates” – no date are able to be selected for this report, see figure 11
Figure 10
- The above report shows “Client Name” / “Value”/ “Gratuity” / “Tax 1” / “Tax 2” and “Total”
- The second view is populated by ticking the “Detail” box, see figure 12
Figure 11
- The report shows the same detail as above , however when you select detail it also shows the “Client Name” / “Receipt Number “/ “Quantity” and “Description”
Appointment Reminders
“Dates” – this report can be ran for selected date ranges simply by clicking on the downwards arrow located at the end of the dates box, alternatively by selecting “Custom” you are able to input your own date range
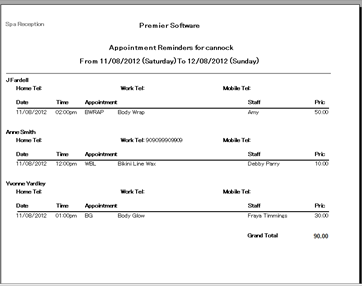
The Appointment Reminders details all clients that have treatments booked for the date selected, it will show the clients “Name” / “Home Phone Number “/ “Work Telephone Number” / “Mobile Telephone Number” / “Date” / “Time” / “Appointment “/ “Staff” and “Price”, see figure 13.
Figure 12
If required this information can be forwarded to the client via “Email” or “SMS Text Message”
Appointment Confirmation
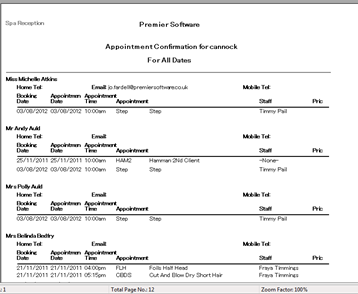
This report is used to notify clients that their appointment has been booked successfully, figure 14
Figure 14
This report will show the “Client Name” / “Home Telephone Number” / “Email Address” /” Mobile Telephone Number” /”Booking Date” / “Appointment Date” / “Appointment Time” / “Staff Member” and “Price”
If required this information can be forwarded to the client via “Email” or “SMS Text Message”
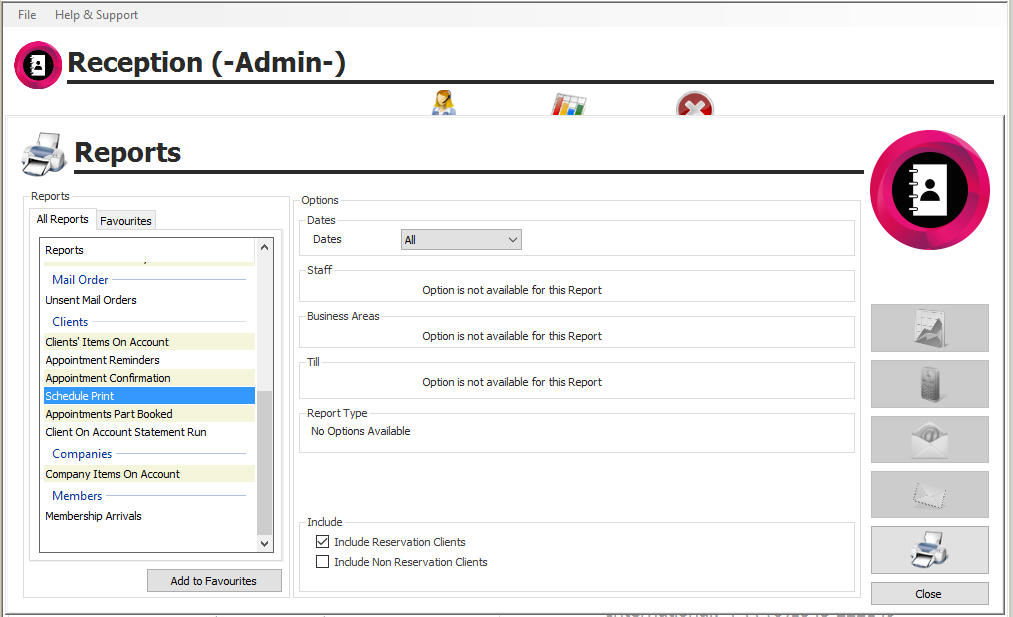
Schedule Print – this can be used if you wish to give the client details on or before arrival of the day/s booked.
“Dates” – this report can be ran for selected date ranges simply by clicking on the downwards arrow located at the end of the dates box, alternatively by selecting “Custom” you are able to input your own date range.
“Include Non Reservation Clients” – if ticked you will be able to print schedules for clients who are not part of a reservation, figure 15
Figure 13
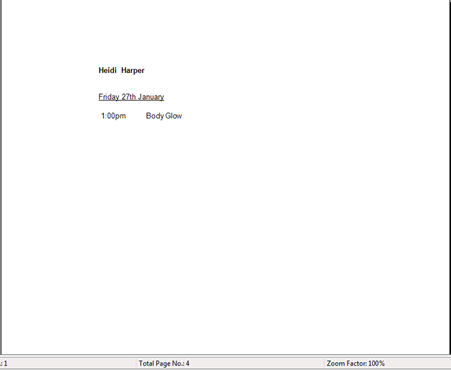
- This report will show the “Client Name” / “Date of Treatment” / “Time of Treatment” and “Name of Treatment”, see figure 16
Figure 14
Appointments Part Booked
This report will show all appointments which have been booked into the diary without a staff member, it may be the case that all appointments are booked into a “Room” and the staff members are allocated at a later date. All such appointments will appear in “Red” within the diary.
“Dates” – this report can be ran for selected date ranges simply by clicking on the downwards arrow located at the end of the dates box, alternatively by selecting “Custom” you are able to input your own date range.
This report will show the “Date” / “Time” / “Room” / “Client Name” and “Appointment Description”, see figure 17.
Figure 15
Companies
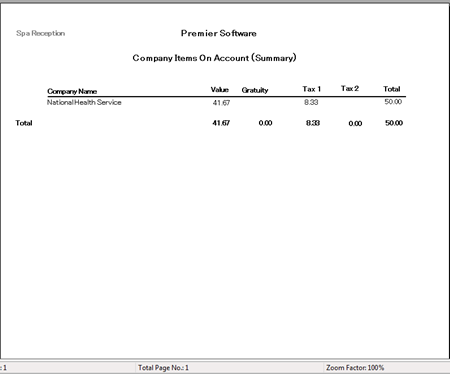
“Company Items on Account “- This report will give you details of which companies have items on account which still need to be paid for.
“Dates” – no date range can be selected for this report.
This report shows you the “Company Name” / “Value” / “Gratuity” / “Tax 1” / “Tax 2” and “Total”, figure 18
Figure 18
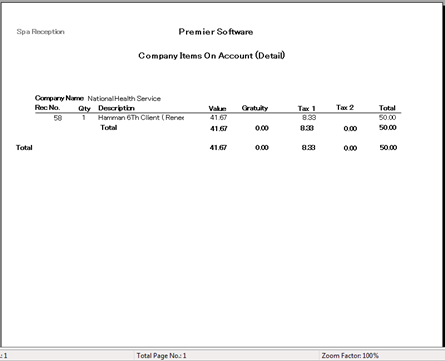
“Detail” – this report is the same as above but you also get “Receipt No” / “Quantity” / “Description of Treatment” and “Client Name”, figure 19
Figure 19
Add to Favourites
This feature allows you to select the reports that you use on a regular basis and allocate them to your favourites.
Click on the required report and then press “Add to Favorites”. The next time you wish to look at this report instead of scrolling down all reports click on the Favorites tab, select and run the required report.
Related Articles
Premier | Automated Marketing and Reports
Description With version 2.2 onwards Premier Core includes automated marketing, automated reception reporting and automated appointment reminders and confirmations. A small number of changes have been made to the system to support this: The 2 ...Premier | Reporting
Description Available Reports Resolution Bills End of Shift Report Summary This report enables you to finish your shift and account for any monies that have been taken during that period, for example if you had a member of staff that works between ...Premier | Exporting Reports
Description Often when running reports there is the requirement for the information to be exported to either send to other personnel or to third parties or other software in order to import the information. The following prompt sheet defines how to ...Premier | Golf Promotional Pricing
? Summary Premier allows you to configure Promotional Pricing Structures to discount golf green fees and additional items. Discounts can be applied as a percentage, fixed value, or manual override, with rules based on player type, course, and day of ...Premier | Revenue Reporting Overview
? Summary In Premier, the financial structure for reporting and assigning revenue/deposits is managed using Business Areas, Income Centre Groups, and Income Centres. Every transaction line is tied to an Income Centre, which rolls up into an Income ...

