Premier | Departures
Description
Resolution
- Select the “Departures” icon (Figure 1).
Figure 1
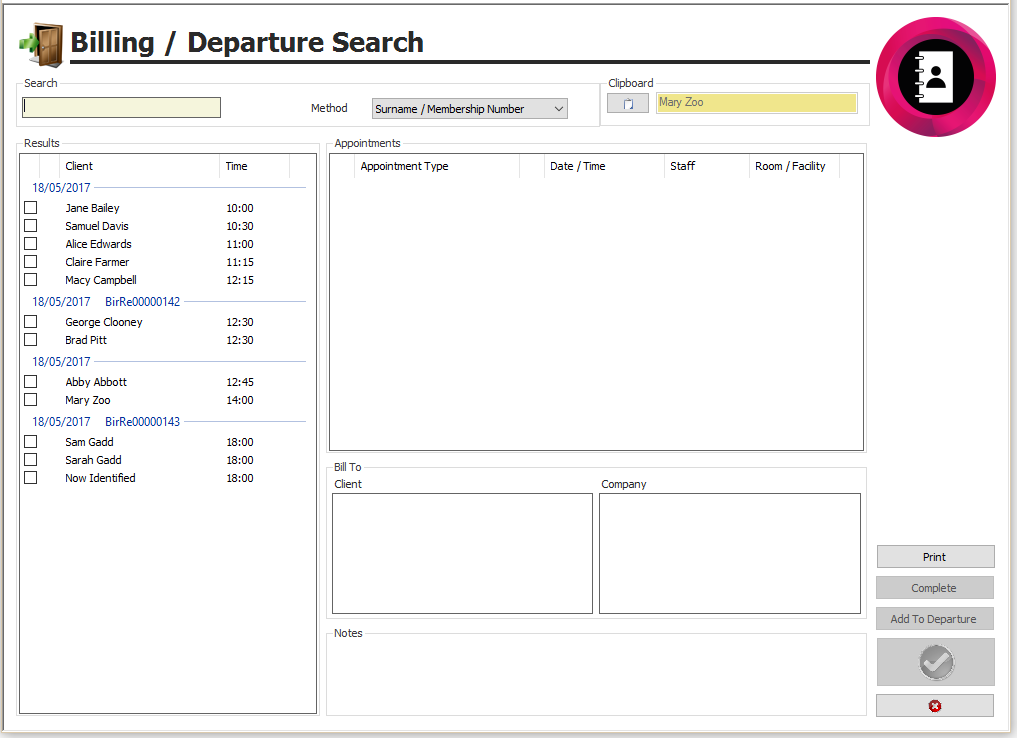
You will now be presented with the following screen (see Figure 2).
Figure 2
This list shows all the clients that have arrived in your system - you get the “Clients Name” and the “Time” the client is due to depart, you will note this is all in time order.
- You can input the client's “Surname” in the “Search” box or alternatively, you can “Click” and add a tick into the box next to the client’s surname, who you wish to depart.
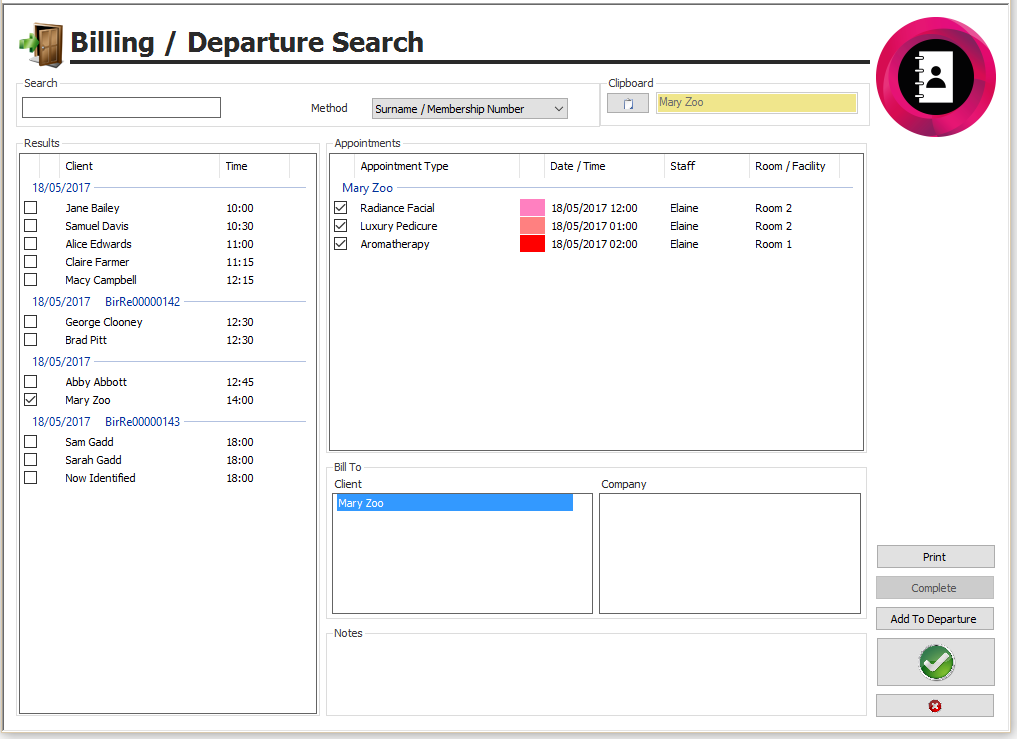
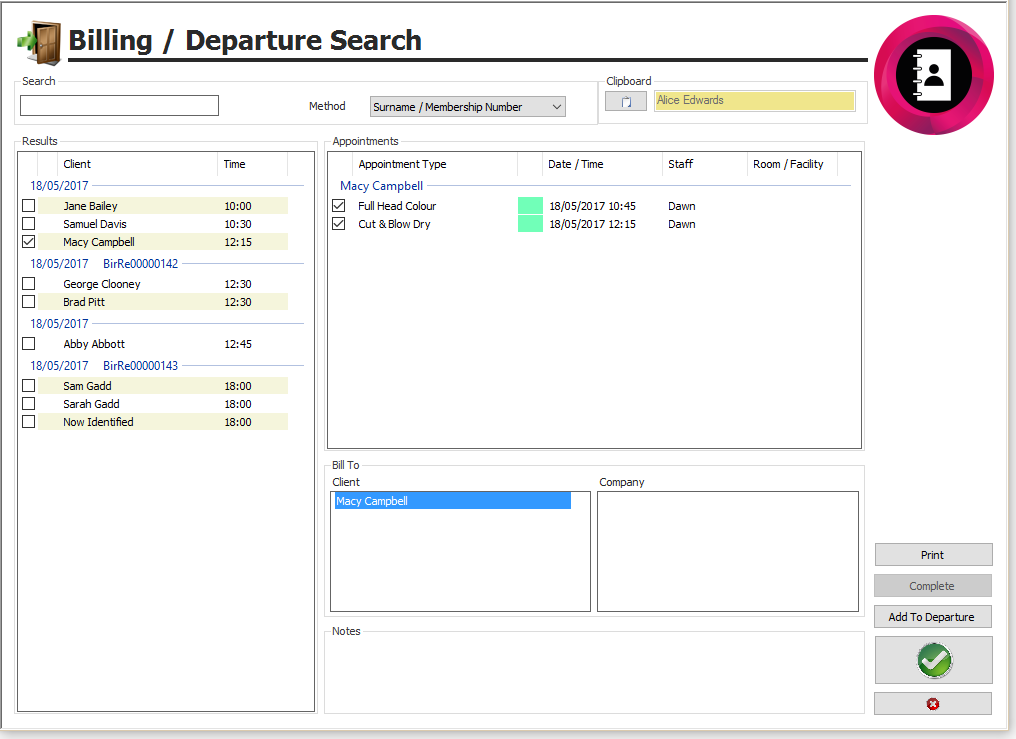
Once you have selected the client you will see the following (figure 3).
Figure 3
You will notice that the client’s appointments have now appeared on the right-hand side under the “Appointment Type”.
The client's name also appears in the “Bill To” box.
- If you are happy with the details then “Green Tick”.
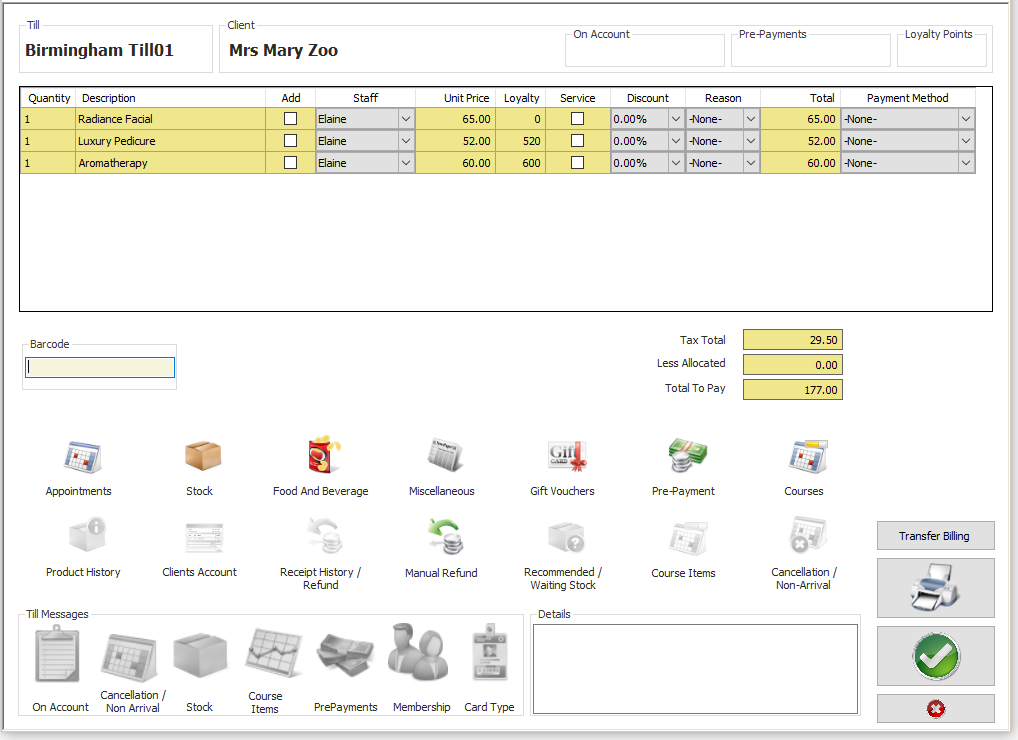
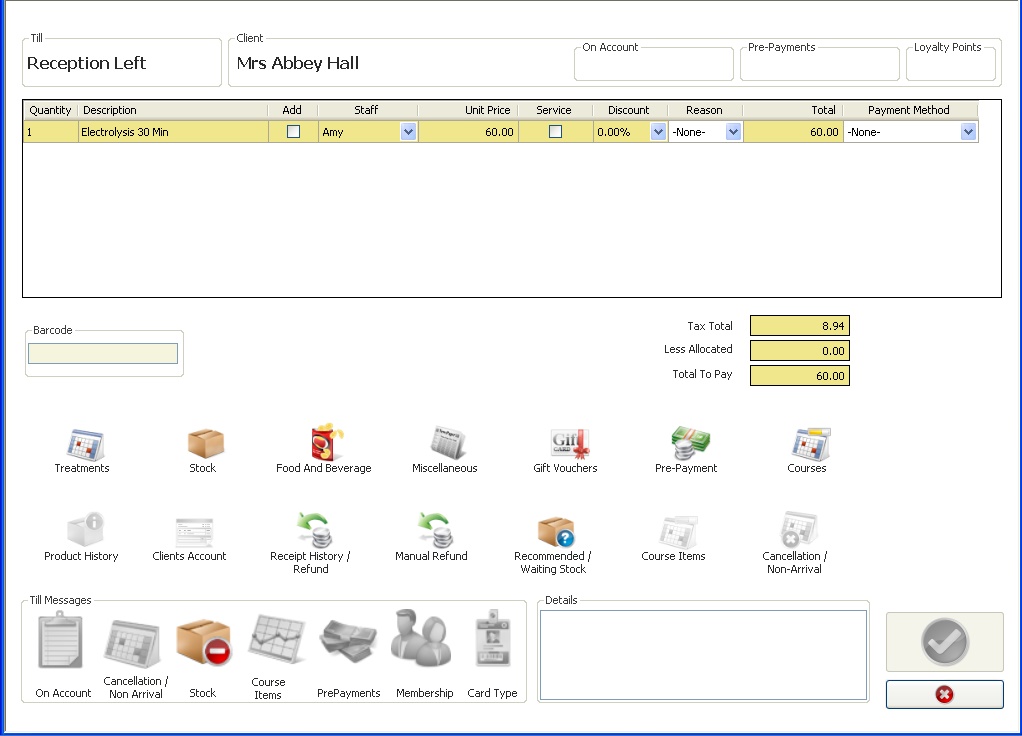
This will take you to the client’s bill, (see Figure 4).
Figure 4
“Till” – this will give you the till name.
“Client” – this gives you the client name.
“On Account” – this will tell you how much revenue the client has accrued on Account.
“Pre Payments” – this will tell you how much money the client has on their pre-payment account.
“Loyalty Points” – this will give you a total of loyalty points that the client has accrued.
“Discount” - before you can allocate a discount you are required to enter a reason in the reason box located next to the discount box, once this has been allocated you will be able to enter an amount in the discount box.
“Reason” using the dropdown box select the reason for the discount, note some reason codes will require the manager’s authorisation before proceeding, if this is the case a box will automatically appear asking for their log in details.
“Total” gives the total amount due from the appointment / retail item, accounting for any discounts.
“Payment Method” – this will only be used if you require the item to be complimentary, accounting for a course item or putting the item On Account.
“Tax Total” shows the tax amount.
“Less Allocated” shows any monies that have already been paid.
“Total to Pay” gives a grand total.
Adding Items to the Bill
Adding Appointments
If you wish to add an appointment to the client’s bill this can be done by clicking on the Appointments icon, it allows you to bill an appointment that has not been booked into the diary.
- Select the “Appointments” icon.
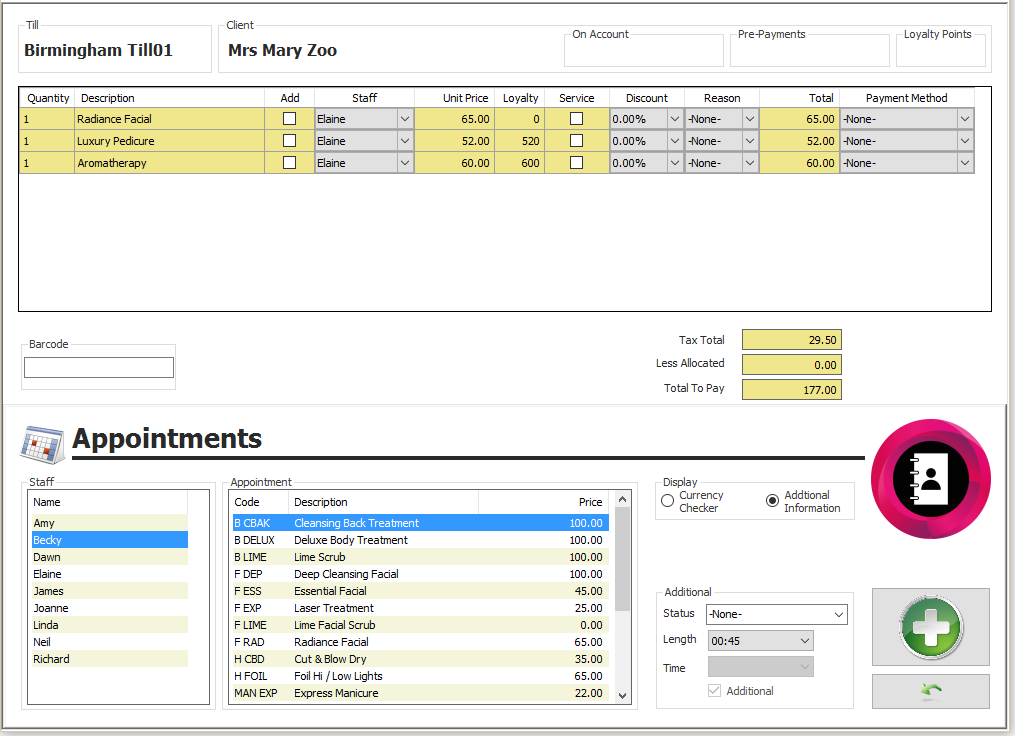
You will now be presented with the following screen (see Figure 5).
Figure 5
- Select the “Staff” member that performed the appointment.
- Select the “Appointment” the client had.
- The “Status” and “Length” can be changed at the side if required.
- Click on the “Green +”.
- Click the “Green back arrow” to close the additional screen and proceed with the bill.
Any appointments added in this way will have a tick in the “Add” box marking it as an additional appointment. This will relate to the reports so that it will be clear how much “upselling” or “Additional Services” are being completed.
Adding Stock
- If there is a barcode scanner present; scan the items and they will be added to the bill.
If there is no barcode scanner:
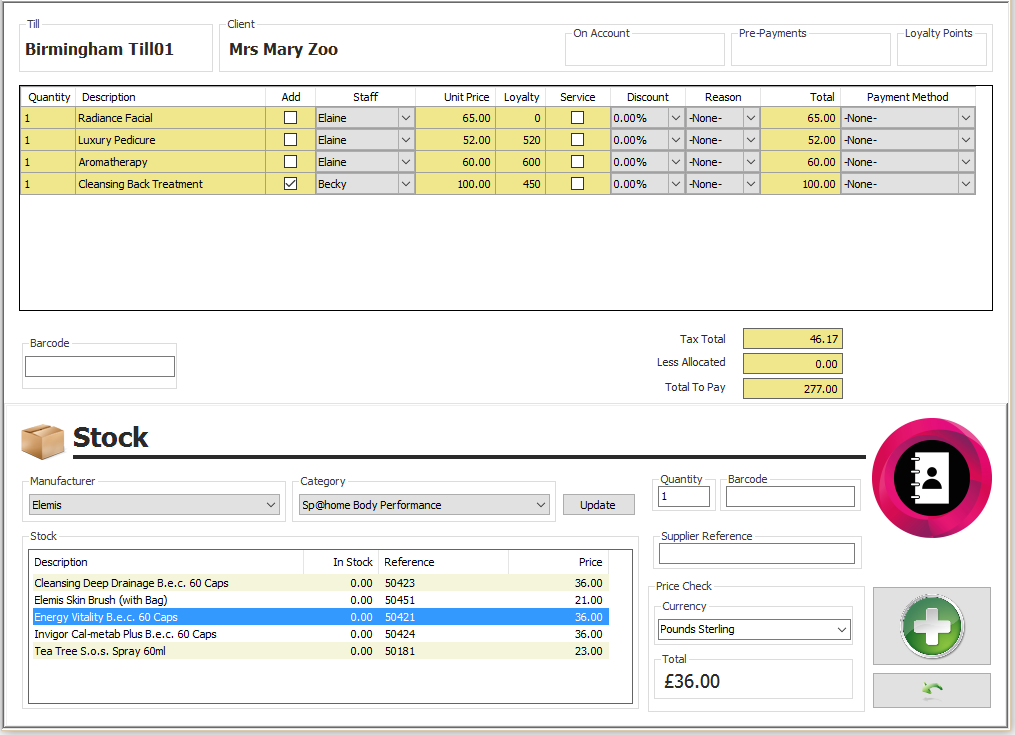
- Select the “Stock” icon, you will now see the following screen (see Figure 6).
Figure 6
- Select the “Manufacturer” that is required, this is done by clicking on the “Downwards Arrow” located at the end of the manufacturer's box.
- You can also select the “Category” to filter the list further.
- Press the “Update” icon, you will then receive a list of all retail items.
- Select the relevant stock item.
- Enter the amount they are purchasing in the “Quantity” field.
- Click on the “Green +”.
- Click on the “Green back arrow” to close the additional screen and proceed with the bill.
Food and Beverage
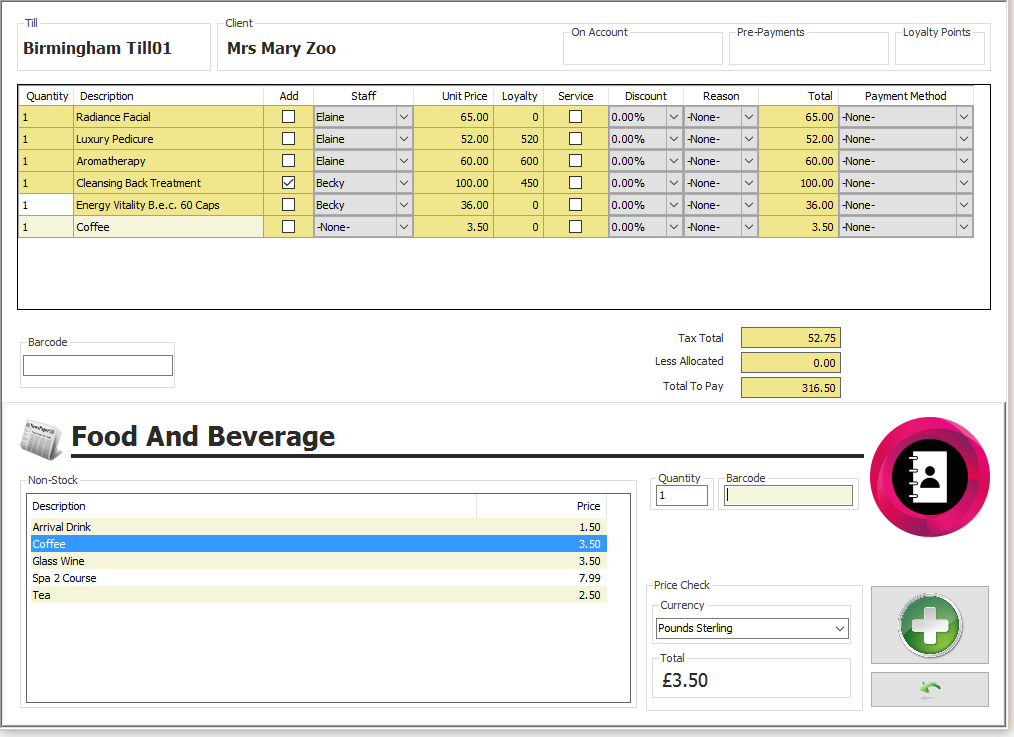
- If you need to add any food or beverage items that the client has purchased, please click the “Food and Beverage” icon and you will then see the following screen (see Figure 7).
Figure 7
- Select the item that you require from the list provided.
- If you are adding more than one of the item, enter the quantity in the “Quantity” field.
- Click on the “Green +”.
- Click on the “Green back arrow” and this will add this item to the client’s bill.
Miscellaneous
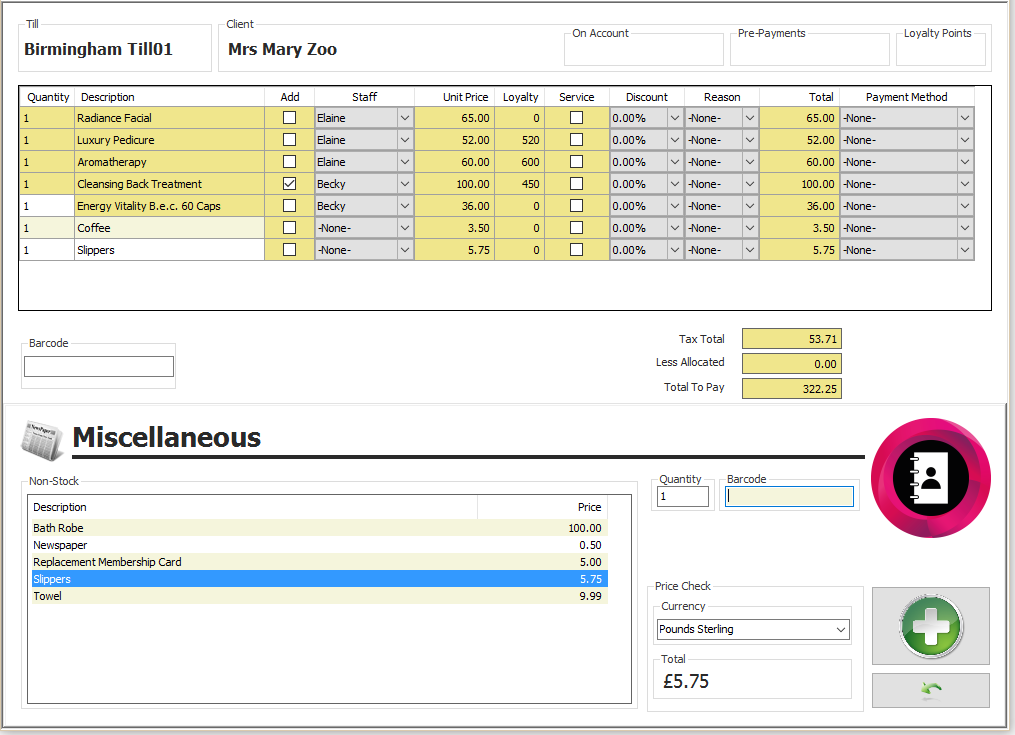
If you wish to add a miscellaneous item to the client’s bill, click the “Miscellaneous” icon. You will then see the following screen (see Figure 8).
Figure 8
- Select the item required from the list provided.
- If you add more than one of the item, enter the quantity in the “Quantity” field.
- Click on the “Green +”.
- Click on the “Green back arrow”, this will add the item to the client’s bill.


Client Specific Sales
The second row of icons is largely specific to the client, the only exception being “Manual Refund”. Otherwise, they give details on the client’s history or provide opportunities for additional sales - “Recommended / Waiting Stock” and “Product History”.
If you are required to take any action, the icon will be highlighted, and you will be unable to click the green tick through to the payments screen unless they have been acknowledged.
Figure 9
“Product History” – this icon will be highlighted if your client has purchased stock from you before and you can see what they have purchased and when.
“Clients Account” – this will only highlight if you allow clients to have an account and it will detail all items on the account – see separate prompt sheet on the client account for full details.
“Receipt History / Refund” – this will show all items that the client has purchased along with the date and how the items were purchased.
- To refund an item click on the Receipt History icon, select the item from the list provided and then click Refund, this will add the item to the client’s bill as a minus quantity and value, so you are aware it is refunded.
“Manual Refund” – is less safe than “Receipt History / Refund” and should ideally only be used for Till Sale transactions, or those that pre-date your use of Core by Premier. You simply select the type of item to be refunded and then the items themselves. No staff members will automatically be allocated and the value to be refunded - unless amended - will be the full sales price.
“Recommended / Waiting Stock” – this will highlight if you have added Recommended Stock to a client’s record card, or if “Retail Allocation” has been configured in Appointment Codes. The recommended items will be listed.
- If you wish to add a recommended stock item, click the “Recommended / Waiting Stock” icon, select the relevant item and then click the “Green +”, this will then add the stock item to the client’s bill.

Till Messages
Figure 10
Before you can green tick and progress to the payment method screen you will need to click onto any “Till Messages” that are highlighted. In the example above (Figure 10, you will notice that the “Stock” icon is highlighted and the “Green Tick” is grey.
Before you can click the Green Tick you must first click the highlighted icon, read the message that appears in the “Details” box and action this accordingly. Once the icon has been clicked, you will then be able to click the “Green Tick”.
Payment Allocation
Figure 11
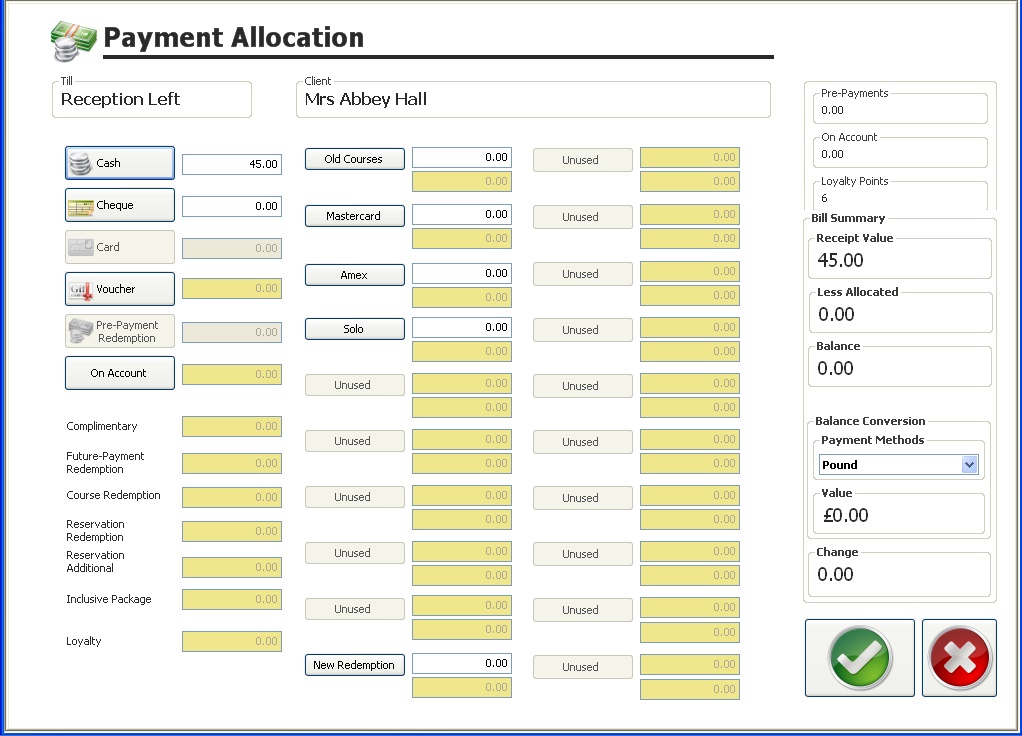
The amount that is due from the client is shown in the “Receipt Value” box.
The total value of the bill will be allocated to your default payment method, in the example above (Figure 11), this is cash (the default payment method can be changed in Site Settings).
- To move the total value to other payment methods, click on the relevant icons, in the example above (see Figure 11), you have the choice of “Cash” / “Cheque” / “Voucher” / “Pre Payment” – (this will only be highlighted if the client has previously purchased a pre-payment –see pre-payment prompt sheet for details) / “Old Courses” / “MasterCard”/ “Amex” and “Solo” (the Card icon located under Cheque is greyed out as you have to specify the type of card taken as payment.

- Once the total balance has been allocated to the correct payment methods, click the “Green Tick”. If there is any change amount due will show in the “Change” box.
- Click on the “Green Tick”. If your system has been so configured, you will now be prompted to book the client’s next appointment; either using “Appointment Search” or “Appointment Booking”, depending on the option selected in “Site Settings”.
Including Another Bill
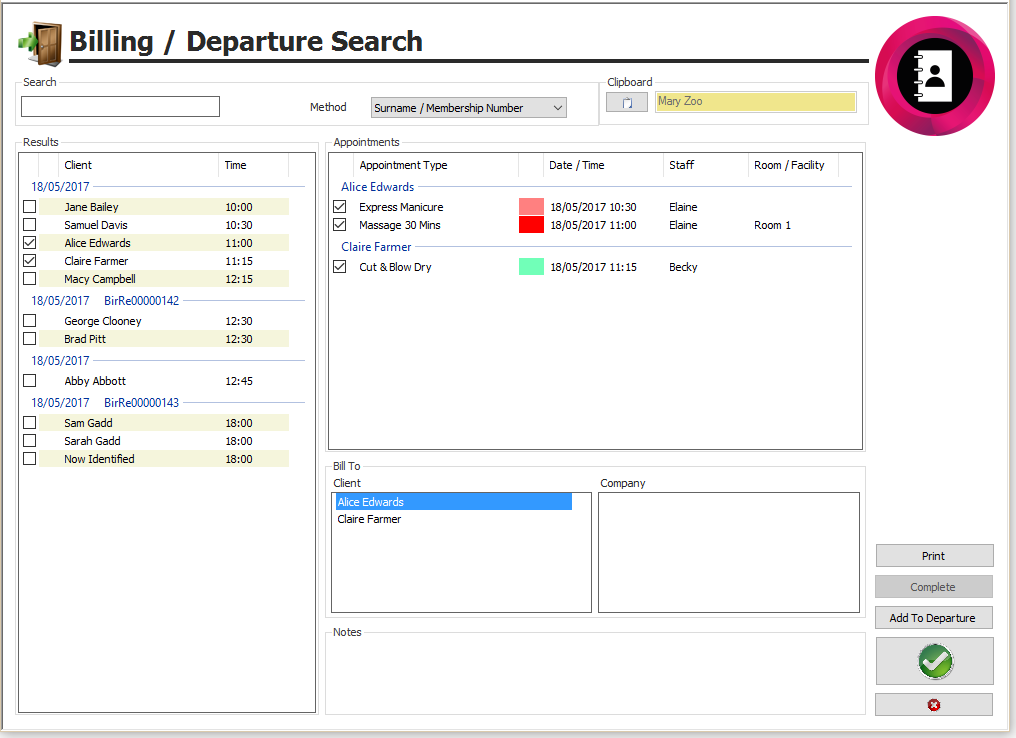
- To combine more than one client’s bill for payment, place a tick in the boxes adjacent to the names of all the clients to be included.
All the appointments for all the selected clients will now be displayed in the “Appointments” box, with an adjacent tick.
- If a particular appointment is to be excluded untick the box adjacent to that appointment.
The first client selected above will automatically be highlighted as the person paying in the “Bill To” area. The person paying will automatically receive any Loyalty Points due and the transaction will be detailed in the “Spend” tab of their client record card.
- To change the person paying, select their name in the “Bill To” area. Their name will be highlighted and moved to the top of the list.
Figure 12
- “Green Tick”.
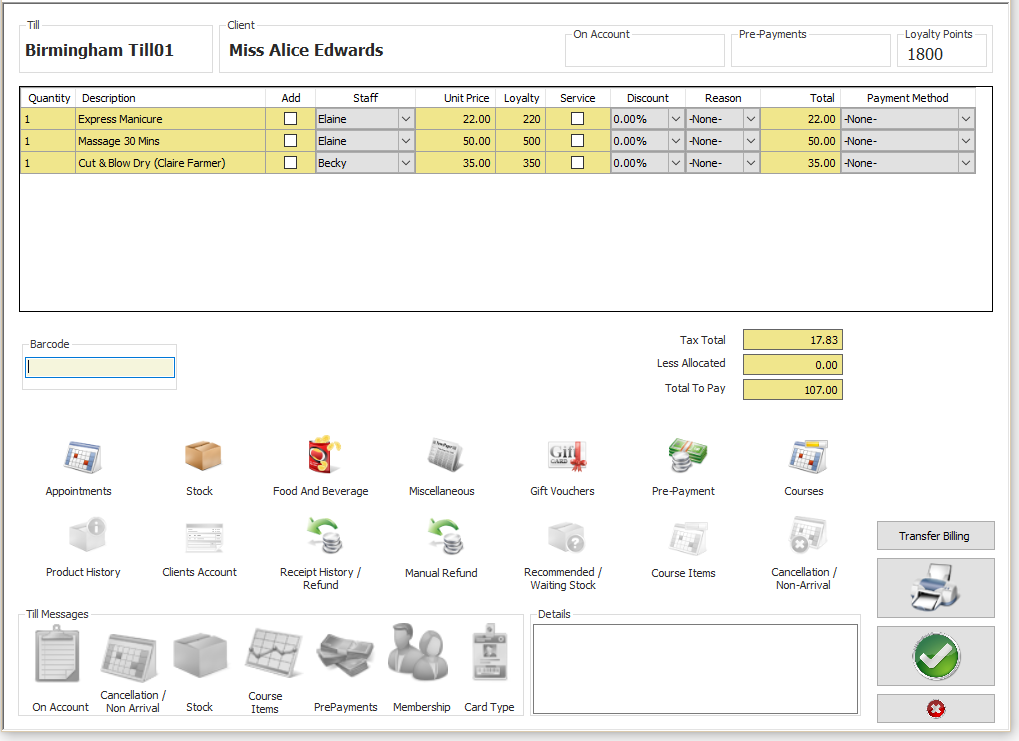
A combined bill will now be displayed (see Figure 13).
You will see that the appointment that has been added for the different client has the client’s name in brackets next to the appointment, so the person paying can see who and what they are paying for.
Figure 13
- “Green Tick”.
- Identify the relevant payment methods and then “Green Tick”.
Add To Departure
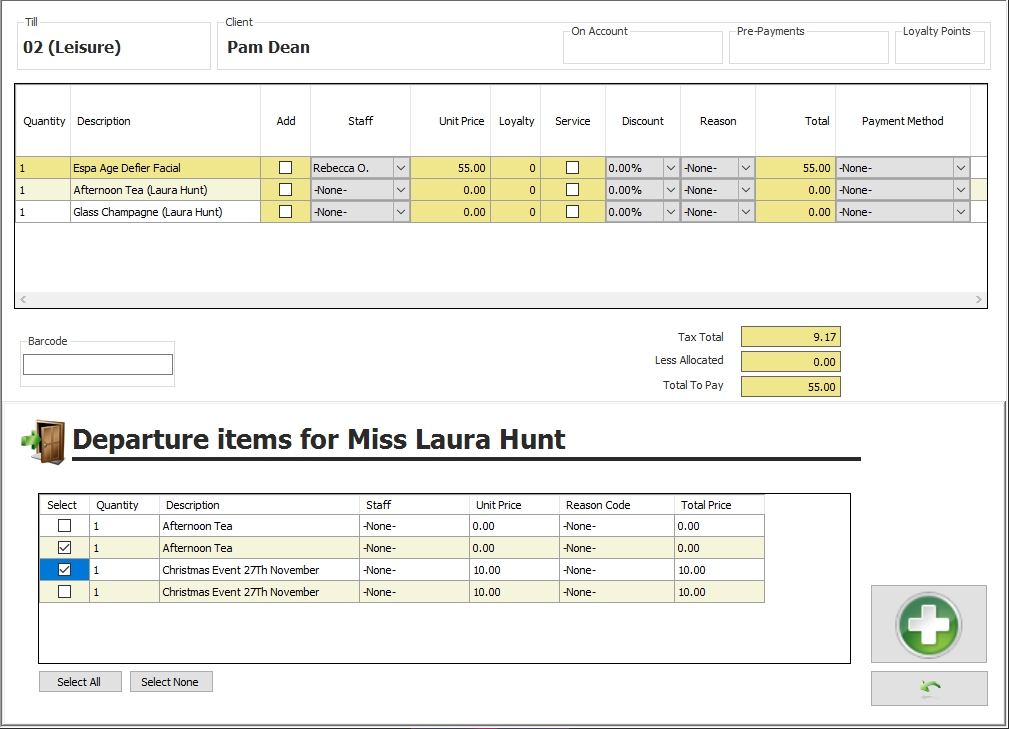
If your client wishes to purchase stock or food and drink items during their visit, you can add them to their bill and then charge for the total amount when the client is due to depart.
- In departures, select the relevant client.
- Click “Add to Departure” as identified in Figure 14.
Figure 14
You will now see a billing screen similar to Figure 13.
- Click on the relevant icons and add the required items to the client’s bill.
- “Green Tick”.
The items will now be “Saved” on the client’s bill and will be accounted for when they are departed.
- A pre-receipt or statement can be produced for any transaction by clicking the printer icon on the billing screen - see figure 13.
If clients request that items be transferred from one client’s bill to another, use “Transfer Billing”.
- Select the client to pay for the item to be transferred.
- Click ”Transfer Billing” and enter the name of the client on whose bill the item currently sits.
A list of the stock and non-stock items allocated to that client will now be displayed (see Figure 15).
Figure 15
- Tick the items to be transferred.
- “Green +”.
- Click the “Green back arrow”.
- Complete the transaction and then depart the paying client as usual.
Related Articles
Premier | Appointment Booking
? Summary The Appointment Book allows staff to view, book, and manage client appointments. It provides features for scheduling, searching, billing, and managing availability, along with a comprehensive screen layout for daily operations. ❓ Likely ...Premier | Group Activity Booking - Arrivals / Departure
Description The Group Activity booking screen provides the ability to Arrive and Depart clients ./ members for the selected activity Resolution In "Reception" click onto “Group Activities" Group Activity Arrivals Select the group activity from the ...Premier | Arrivals
Description The clients that are booked in the diary need to be arrived in the system when they are physically present within the Spa. Resolution In “Reception” select “Arrivals” see figure 1 Figure 1 In the “Arrivals” list will be all of the clients ...Premier | Merging Clients
Description How to Merge Duplicate Client Record Cards Preventing Duplicates - prevention, they say, is always better than a cure. Whilst any computer database or manually managed list will inevitably contain duplicate records on occasion, some steps ...Premier | Commission Set-Up
? Summary Commission Structures in Premier allow you to incentivise staff and monitor performance. Using commission categories, sales can be grouped according to operational needs, and percentages can be assigned to products and services. This ...

