Premier | Creating and Sending Emails
Description
Creating Templates and Configuring your System
Technical Information
In all installations there will be a degree of technical setup required in order for the integrated email merge facility to function. The level of complexity will depend upon your installation type.
The two types of installation are often described in layman’s terms as “FAT” or “THIN”, if you are unsure as to which type of installation you have please consult your Systems Administrator or alternatively you may contact us at Journey. There is a brief explanation below which may also help you to ascertain your installation type and the technical requirements.
Although Microsoft Word is currently required to create the email documents you wish to send you do not need to have Microsoft Outlook. Emails may be sent through Outlook but may also be sent via internet mail services such as Google Mail and Microsoft Hotmail accounts using a service called SMTP.
If Microsoft Outlook Exchange is being used for sending email within your business then in either type of installation it is not necessary for Outlook to actually be installed on the computer being used to send the emails. Microsoft Word is required however as this is used during the sending process to open the template and merge in personalisation. This is done utilising outgoing mail server SMTP settings stored within the Premier application.
“FAT” Client Installation
With this type of installation your Premier Core application is installed locally on your computer. This means that a licensed copy of Microsoft Word must be installed on each workstation that you wish to use for creating, editing and sending merged email.
“THIN” Client Installation
With a “THIN” client installation your Premier application will be hosted on a remote server and you will be accessing your system remotely using either Remote Desktop or a Citrix client installed on your local computer. In order to create, edit and send merged email with this type of installation the host server must be installed with Microsoft Word with the licensing relevant to the hosting method used.

Resolution
Email Setup
Before you can use Premier Core to send emails, you must first enter the details of a default email account.
These details are generally entered for each site location - using Site Settings. They can also be entered at a group level and then be used to send emails centrally for many sites at once - using Main System Details.
Single Sites
- In Manager click General Menu (figure 1).
Figure 1
- Then select Sites (figure 2).
Figure 2
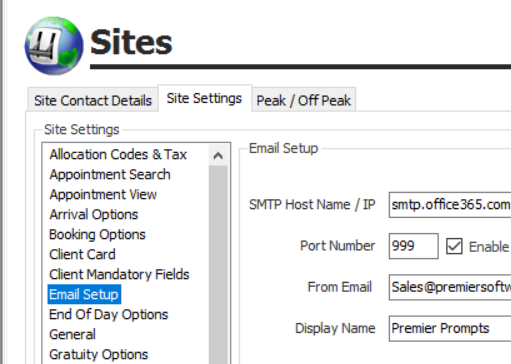
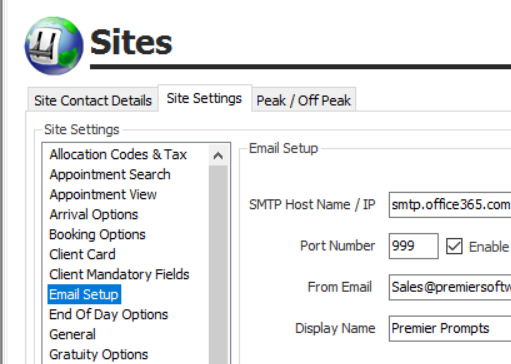
- From the three tabs along the top of the screen select Site Settings and then, from the list displayed down the left hand side of the screen, select Email Setup (figure 3).
Figure 3
- The Email Setup screen should be completed with your particular details - to match the settings of your chosen email account.
An example of the information typically required is given below (figure 4).
Figure 4
You may need to contact your IT team to obtain the relevant “SMTP Host Name / IP”, “Port Number”, whether “Enable SSL” should be ticked or left un-ticked, “Username” and “Password”. A “Domain” should be entered if necessary but is rarely required.
Multi-Site Groups
If you administer a multi-site group, email Setup can be configured per site - using Site Settings as above, and for group wide emails - using Main System Details.
Configure your email settings in both sections and you will always have both options available to you. To send emails per site using the site specific email accounts in site settings, or to send global emails using the email account in main system details.
Site specific email settings:
- To enter different email settings for each of your sites, go to Administrator and click General Menu (figure 5).
Figure 5
- Then select Sites (figure 6).
Figure 6
- From the three tabs along the top of the screen select Site Settings and then, from the list displayed down the left hand side of the screen, select Email Setup (figure 7).
Figure 7
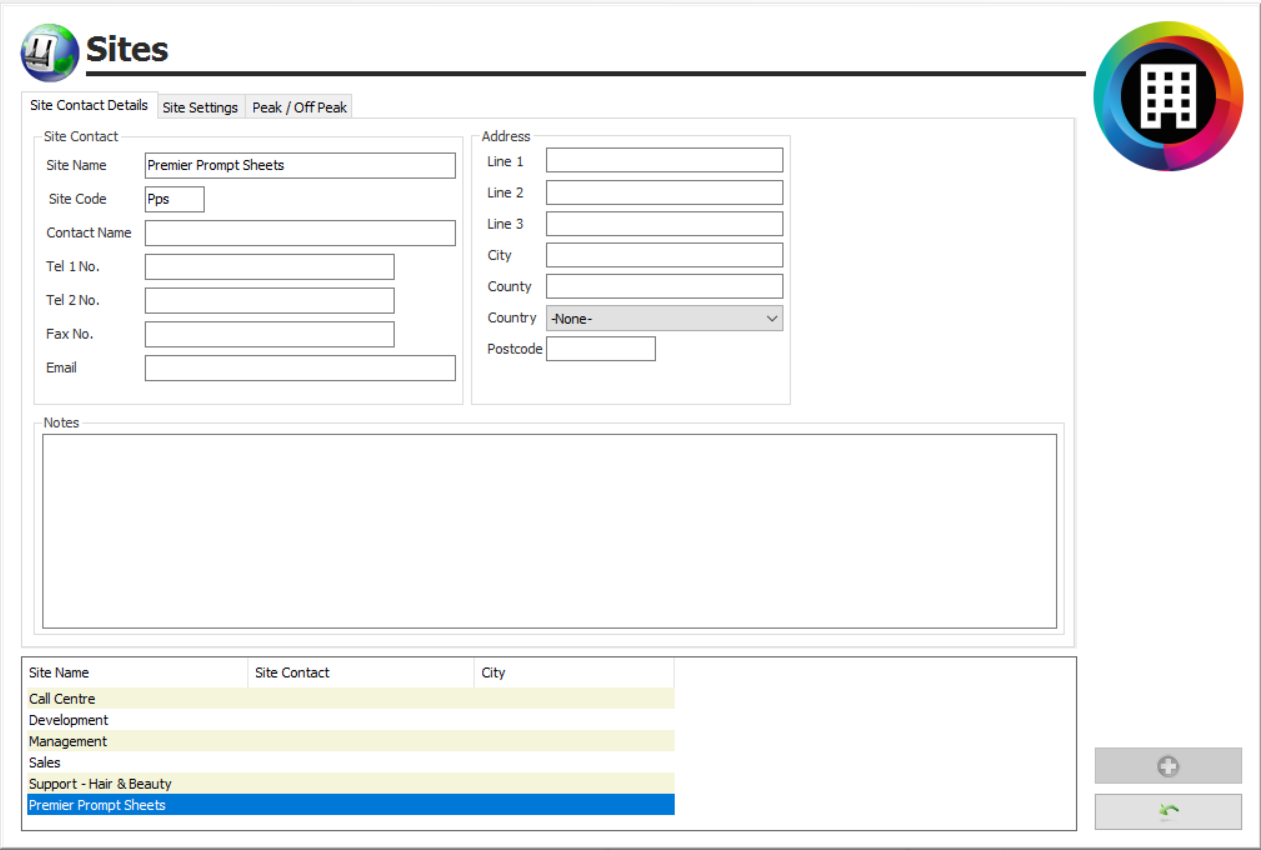
- Select each site in turn - from the list to the bottom of the screen (figure 8).
Figure 8
- Enter the email settings for the selected site.
An example of the information typically required is given below (figure 9).
Figure 9
You may need to contact your IT team to obtain the relevant “SMTP Host Name / IP”, “Port Number”, whether “Enable SSL” should be ticked or left un-ticked, “Username” and “Password”. A “Domain” should be entered if necessary but is rarely required.
Group wide email settings:
- To enter the details for a group wide email account, for example that used by your marketing or central booking teams, go to Administrator and click General Menu (figure 10).
Figure 20
- Then Main System Details (figure 11).
Figure 11
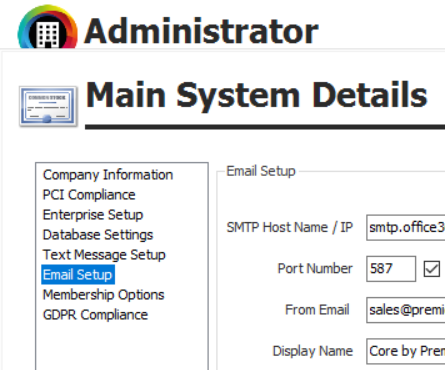
- From the list now displayed down the left hand side of the screen, select Email Setup (figure 12).
Figure 12
- The Email Setup screen should be completed with the relevant details - to match the settings of your chosen global email account.
An example of the information typically required is given below (figure 13).
Figure 13
You may need to contact your IT team to obtain the relevant “SMTP Host Name / IP”, “Port Number”, whether “Enable SSL” should be ticked or left un-ticked, “Username” and “Password”. A “Domain” should be entered if necessary but is rarely required.
When creating templates (as detailed in the following section), to send an email template from all sites, you must ensure that you identify the template in the Email Layout field on the Enterprise Details tab. Site specific Email Layouts should be identified on the Site Details tab.
Creating Templates
Templates in Premier are split into 3 types:
o Reservation Documents - for use when creating reservation confirmations.
o Enquiry Info Packs - for use when you want to email templated in reply to enquiries on such as memberships, appointments or spa days.
o Standard Documents - for everything else, including reminders, confirmations, marketing and emails to members.
- In Manager (or Administrator if multi-site) click General Menu (figure 14).
Figure 14
- Then click as the following icons as appropriate (figure 15).
Figure 15
Each icon has a different range of merge fields, appropriate to the documents they will be used to create and control where the templates are then made available.
Templates are created using Microsoft Word. Please review the Technical Information section of this prompt sheet if you have any issues or queries with regards the installation of Word.
An appropriate template must be created before you can send an email through Premier core.
Reservation Documents
Reservation Confirmations are sent from the Reservations function in Reception. They typically confirm the details of a booking and are emailed to the lead booker.
Figure 16
As in the example above (figure 16), most sites have a small range of templates created, and select the appropriate template for the type of reservation they are booking. You might want separate templates for spa days and overnight spa breaks, for packages and appointment only bookings.
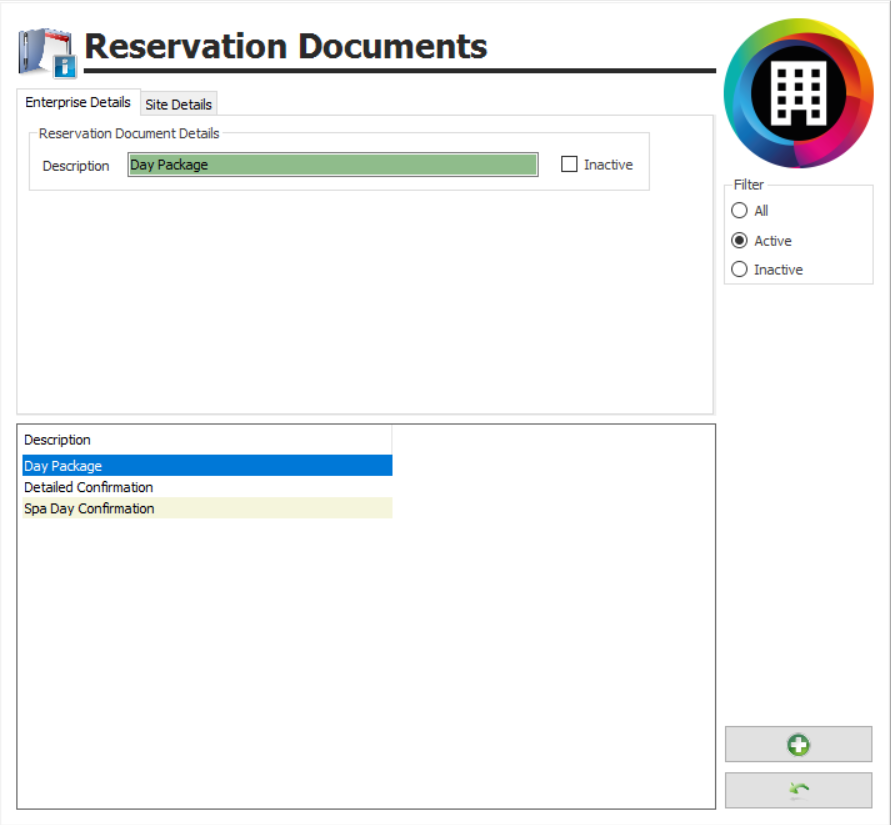
- Click Reservations Documents.
Figure 17
- To create a new reservation document, click the “Green +”.
Figure 18
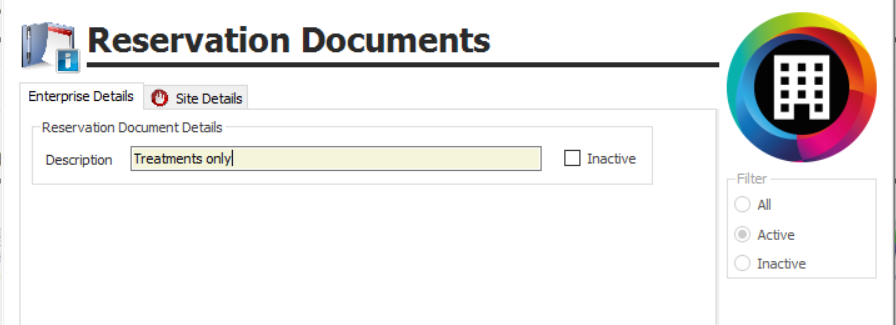
- In the Description box enter a name that will identify the template for future use.
- Click the “Green Tick” to save your changes.
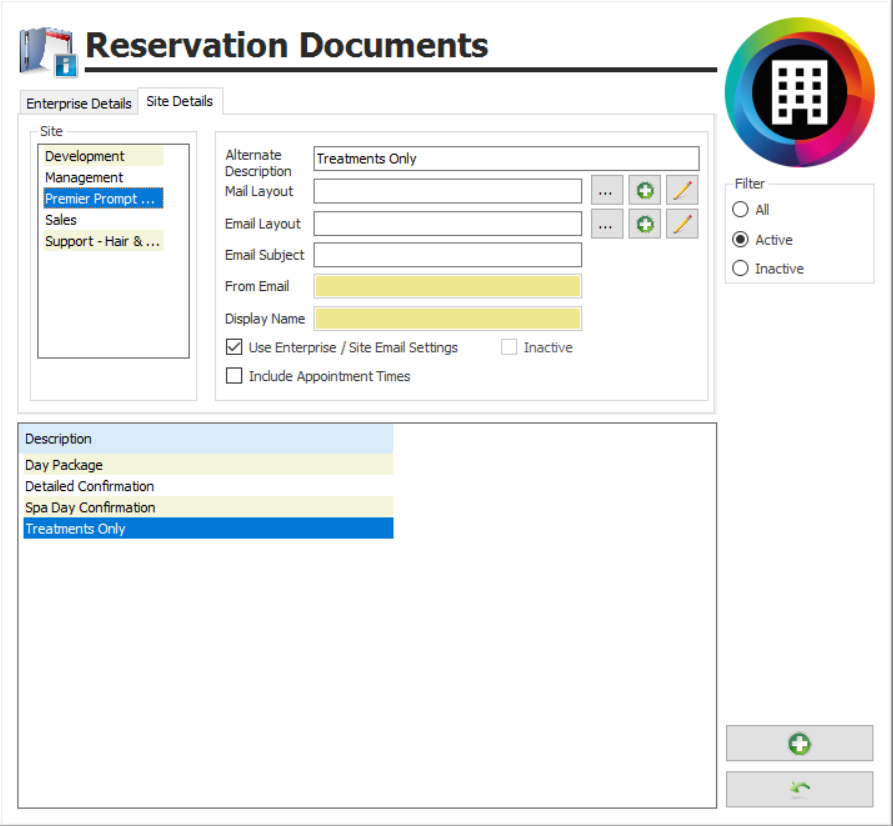
- Select the Site Details tab and the following screen will display (figure 19).
Figure 19
- If applicable ensure that the correct Site is selected.
Enter the following details, as required:
- Alternate Description – this allows a site specific document name to be entered. This will only be seen within the system by users set up to view Alternate Descriptions in User Manager. Depending on which of two merge fields you choose to include within your Reservation Document, you can select whether the Enterprise Details description (use the _ENT merge field) or the Alternative Description (use the _SITE merge field) are included.
Templates can be created for either posting - Mail Layout - or for emailing to clients - Email Layout. They are both created and managed in the same way. The only major differences apply when you are producing the final documents.
The Email Subject, From Email and Display Name fields are only required when sending emails.
Mail Layout and Email Layout will show the filename and location of the word document you are linking to the selected Reservation Document. Instructions on how to create a new template are given below.
You create and manage templates using the three icons adjacent to each layout:
o The Search or Ellipsis (...) button allows you to browse your computer or network to find a template that has already been created and saved.
o The “Green +” allows you to create and then save a new template.
o The “Pencil” allows you to edit an existing template.
- Email Subject –enter the subject line that you wish to be displayed to the email’s recipients.
- Use Enterprise / Site Email Settings - with this ticked you will send this template using the default email account created in Email Setup in Site Settings. Un-tick and you can enter a specific From Email account and associated Display Name that you want to use in association with this particular template.
It is therefore possible to have specific templates being emailed from specific email accounts. Since clients can reply to emails, this will also control who will receive any replies.
- Include Appointment Times - tick if you want appointment times to display within the template.
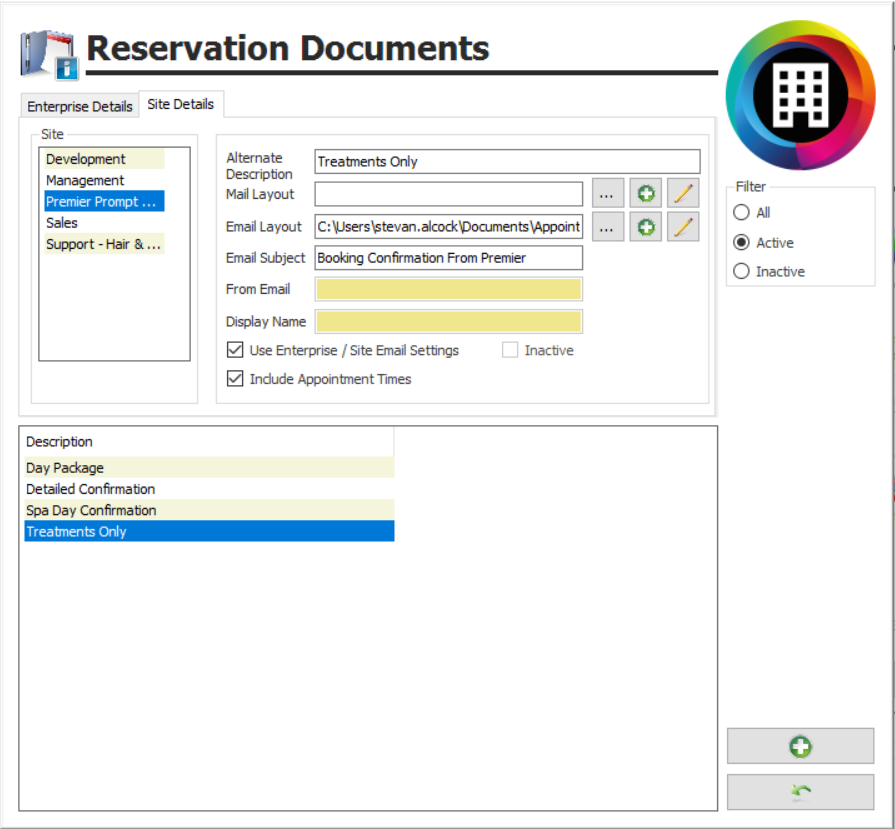
Once the document template is created (see below) and linked using the Search function, the Layout fields will automatically show the documents’ locations (figure 20).
Figure 20
To create a new Reservation Confirmation document / email template:
- Click the “Green +” adjacent to Email Layout.
You will be presented with a blank Microsoft Word document. Using the standard tools available in Word create your template, including for example: text, pictures, images, and links to websites and online content.
Because you have created the Word document through Premier, the document will automatically link to the client database in Premier Core.
You can also include merge fields, such as client and booking details. Again, as you have created the Word document through Premier Core, a ready-made list of merge fields is available to you. The end result will be emails that contain fixed or generic content as well as client specific information.
To add merge fields to your Word document work through the following.
- Click within the document where you want the merge field to display.
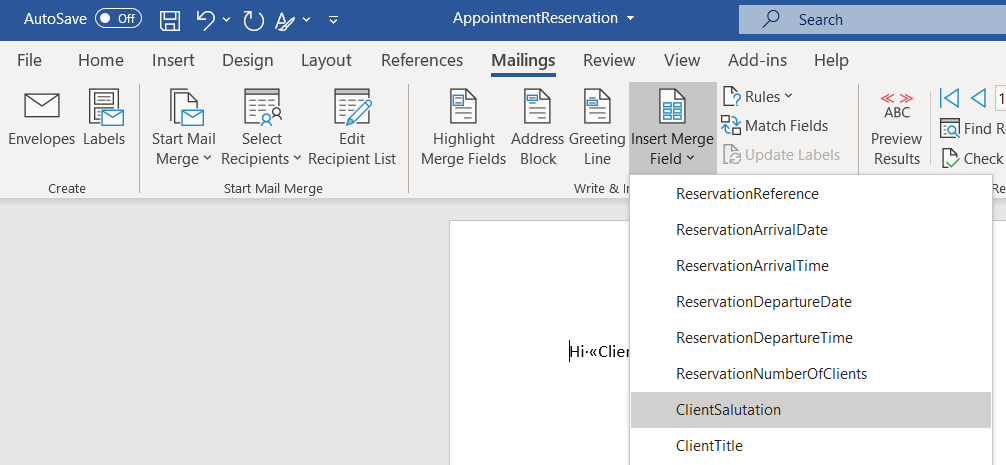
- Select Mailings in the Word task bar (figure 21), and then click the down arrow in the bottom part of Insert Merge Field.
Figure 21
- Select your desired merge field and it will be inserted into the Word document, in the chosen location.
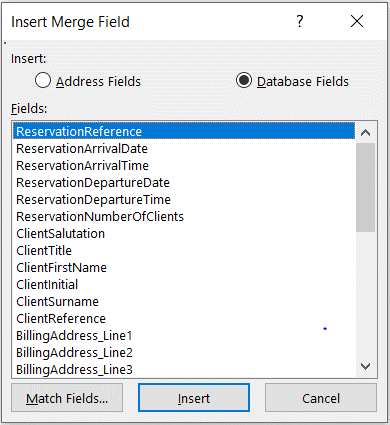
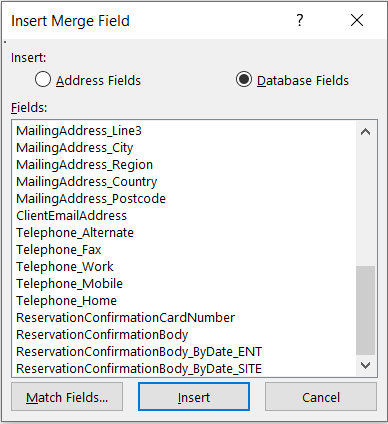
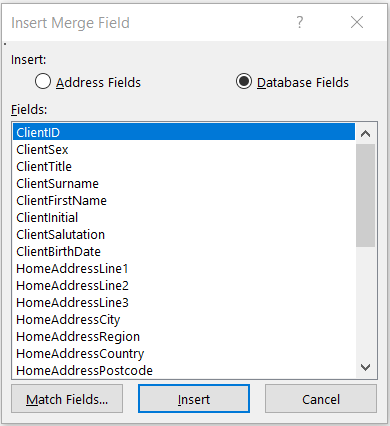
Click the upper part of the Insert Merge Field icon and the same list of merge fields display, but in a different format (figure 22).
Figure 22
- In this case, having selected the location for the merge field in the Word document, select the required merge field from the list and then click Insert to add this into your document.
A merge field can be identified by the double angular brackets that surround it, i.e. <<MergeField>>. The name of the merge field and therefore the expected content is displayed within the double angular brackets.
- Continue to add all your required merge fields.
Commonly used fields include: the Reservation Reference number, Arrival and Departure dates and times, and the Number of Clients.
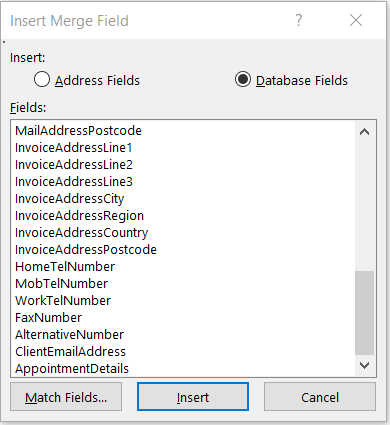
Details of the package or appointments, including client names, package names if relevant, scheduled appointments - dates and times, non-schedulable package elements, are all contained in the Reservation Confirmation Body merge fields. Use one of the two By Date versions if appointments are likely to be booked over more than one day (figure 23).
Figure 23
The _ENT version uses the description as entered on the Enterprise Details tab, the _SITE version uses the alternate description from the Site Details tab.
- Save the Word document as you would any other Microsoft Word document on a shared drive that will be accessible to any computer likely to produce the emails. The name used does not need to match the name of the template within your Core system.
- Use the “…” button to browse to the Word document you have just created and saved.
- Select the name of the Word document in the displayed list and then either double click or click Open.
You have now linked the Word document with the Reservation Document template.
- Once completed click the “Green Back Arrow” to leave the screen.
Enquiry Info Packs
The Enquiries facility within your Core by Premier system is designed so that you can capture the details of any new or existing clients who call and request information. For example, they may be requesting membership information, details of your packages, or a copy of your current treatment menu.
Having all the information the enquiry requires pre-prepared in templates makes it much quicker and easier for staff to send the details out and ensures that the correct message is being communicated.
Figure 24
The process for creating these templates is identical to that for Reservation Documents detailed above, with the exception that this is performed within the Enquiry Info Packs section.
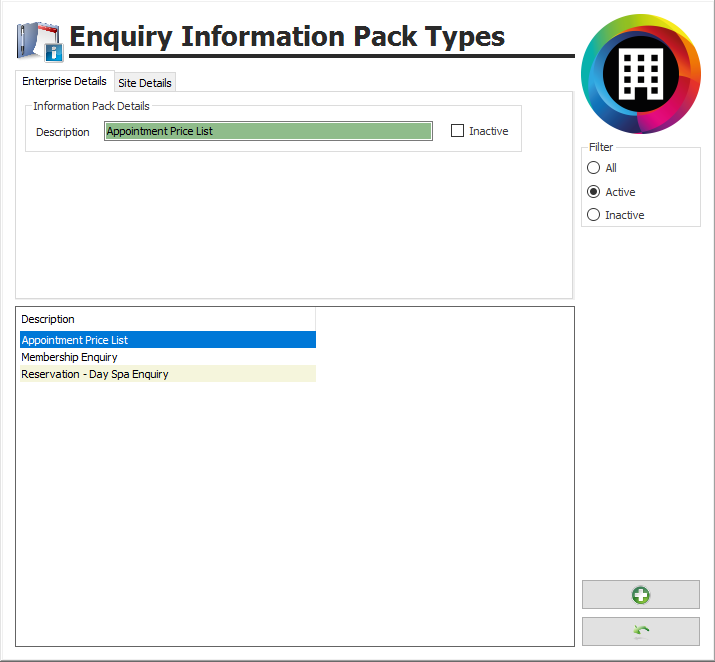
- Click Enquiry Info Packs.
Figure 25
- To create a new Enquiry Information Pack document, click the “Green +”.
Figure 26
- In the Description box enter a name that will identify the template for future use.
- Click the “Green Tick” to save your changes.
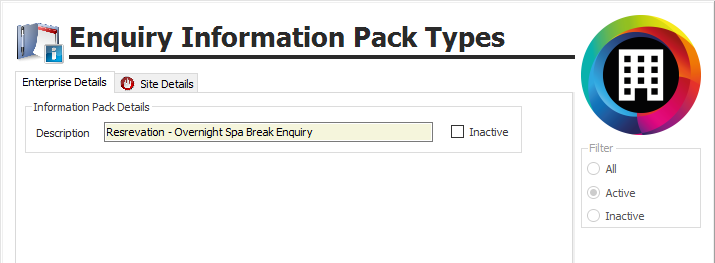
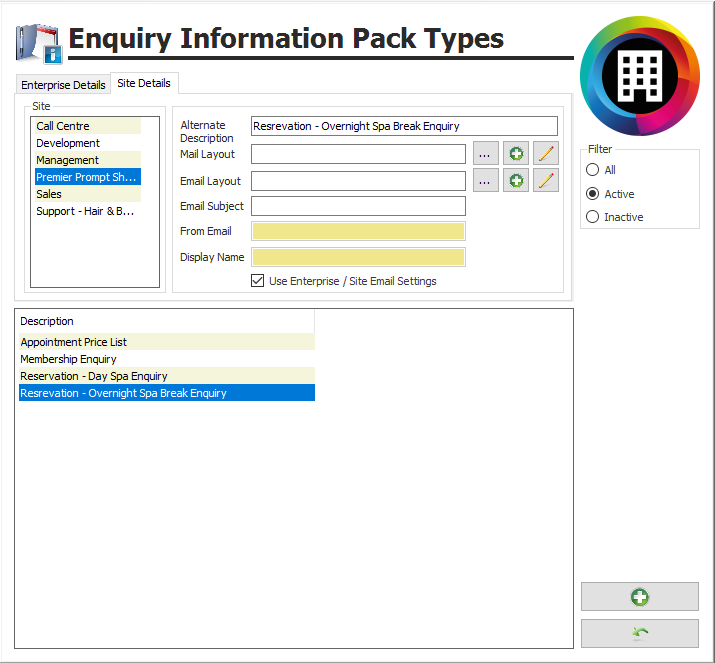
- Select the Site Details tab and the following screen will display (figure 27).
Figure 27
- If applicable ensure that the correct Site is selected.
Enter the following details, as required:
- Alternate Description – this allows a site specific document name to be entered. This will only be seen within the system by users set up to view Alternate Descriptions in User Manager.
Templates can be created for either posting - Mail Layout - or for emailing to clients - Email Layout. They are both created and managed in the same way. The only major differences apply when you are producing the final documents.
The Email Subject, From Email and Display Name fields are only required when sending emails.
Mail Layout and Email Layout will show the filename and location of the word document you are linking to the selected Information Enquiry Pack. Instructions on how to create a new template are given below.
You create and manage templates using the three icons adjacent to each layout:
o The Search or Ellipsis (...) button allows you to browse your computer or network to find a template that has already been created and saved.
o The “Green +” allows you to create and then save a new template.
o The “Pencil” allows you to edit an existing template.
- Email Subject –enter the subject line that you wish to be displayed to the email’s recipients.
- Use Enterprise / Site Email Settings - with this ticked you will send this template using the default email account created in Email Setup in Site Settings. Un-tick and you can enter a specific From Email account and associated Display Name that you want to use in association with this particular template.
It is therefore possible to have specific templates being emailed from specific email accounts. Since clients can reply to emails, this will also control who will receive any replies.
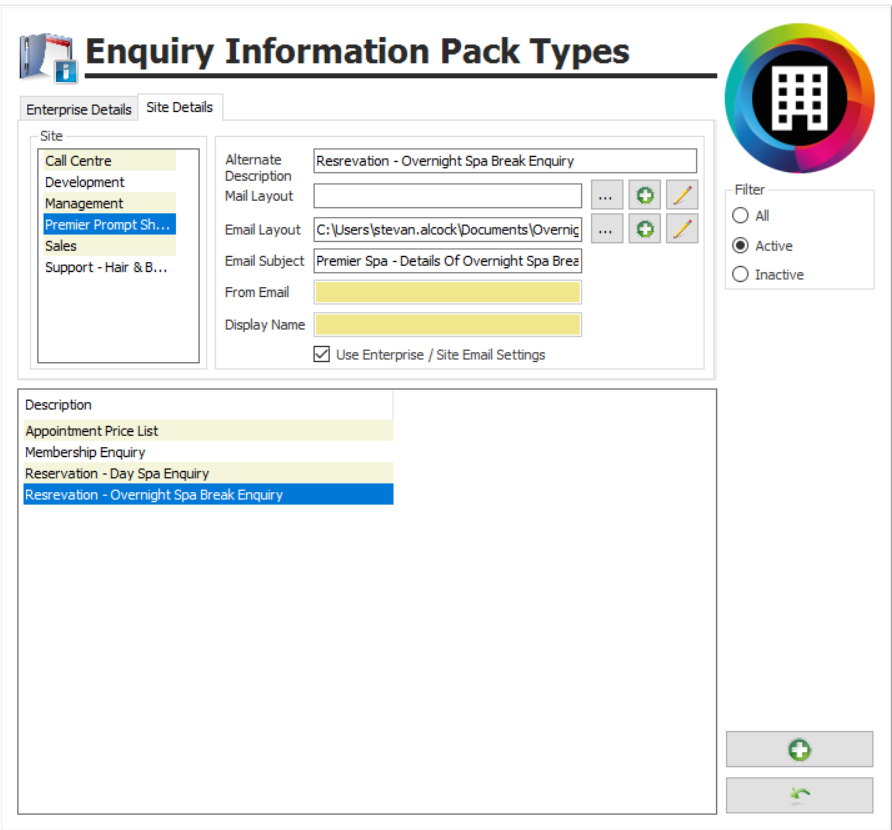
Once the document template is created (see below) and linked using the Search function, the Layout fields will automatically show the documents’ locations (figure 28).
Figure 28
To create a new Enquiry Info Pack document / email template:
- Click the “Green +” adjacent to Email Layout.
You will be presented with a blank Microsoft Word document. Using the standard tools available in Word create your template, including for example: text, pictures, images, and links to websites and online content.
Because you have created the Word document through Core by Premier, the document will automatically link to the client database in Premier Core.
You can also include merge fields, such as client details. Again, as you have created the Word document through Premier Core, a ready-made list of merge fields is available to you. The end result will be emails that contain fixed or generic content as well as client specific information.
To add merge fields to your Word document work through the following.
- Click within the document where you want the merge field to display.
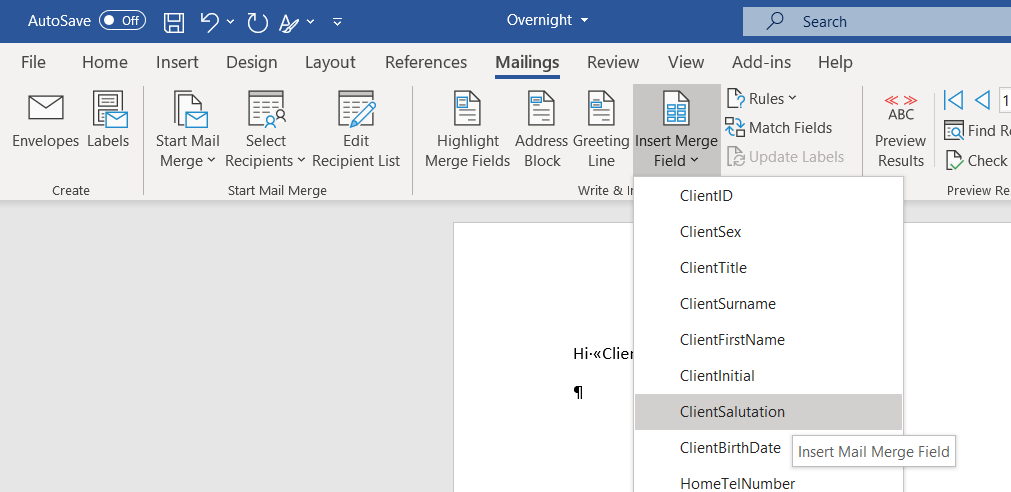
- Select Mailings in the Word task bar (figure 29), and then click the down arrow in the bottom part of Insert Merge Field.
Figure 29
- Select your desired merge field and it will be inserted into the Word document, in the chosen location.
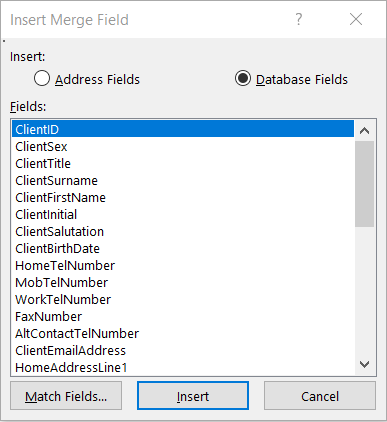
Click the upper part of the Insert Merge Field icon and the same list of merge fields display, but in a different format (figure 30).
Figure 30
- In this case, having selected the location for the merge field in the Word document, select the required merge field from the list and then click Insert to add this into your document.
A merge field can be identified by the double angular brackets that surround it, i.e. <<MergeField>>. The name of the merge field and therefore the expected content is displayed within the double angular brackets.
- Continue to add all your required merge fields.
Commonly used fields include client contact details.
- Save the Word document as you would any other Microsoft Word document on a shared drive that will be accessible to any computer likely to produce the emails. The name used does not need to match the name of the template within your Premier Core system.
- Use the “…” button to browse to the Word document you have just created and saved.
- Select the name of the Word document in the displayed list and then either double click or click Open.
You have now linked the Word document with the Reservation Document template.
- Once completed click the “Green Back Arrow” to leave the screen.
Standard Documents
Any templates other than those to be used as Reservation Confirmations, or Enquiry Info Packs, are created and edited in Standard Documents.
Such documents include:
o Appointment reminders.
o Appointment confirmations - note that only one such template is available and will apply to all non-reservation bookings.
o Marketing emails.
o Emails sent from client record cards.
o Emails to members.
o Emails to clients with outstanding account balances.
Any of these emails can be sent manually as and when required or automated to run at regular intervals.
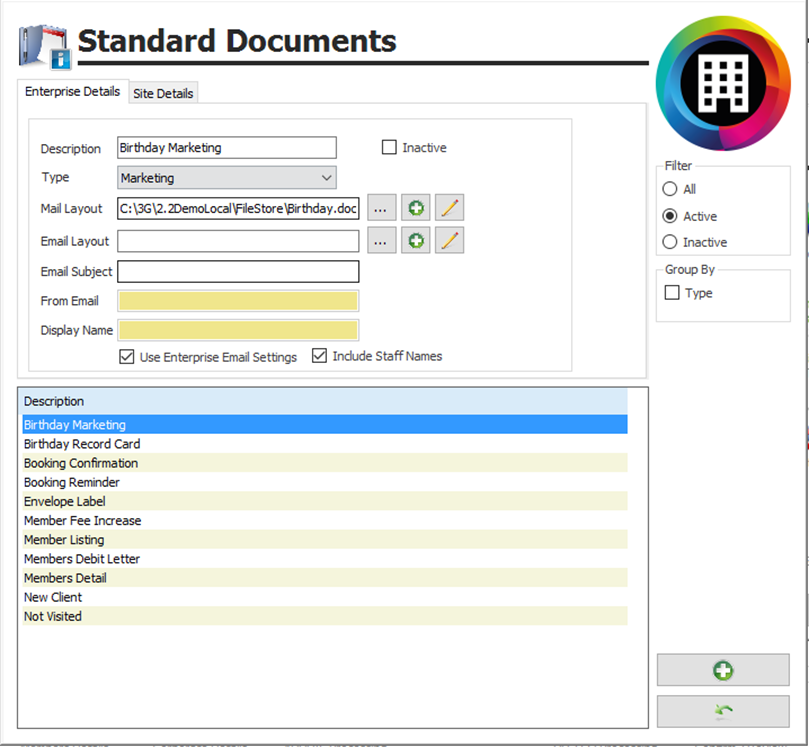
- Click Standard Documents.
Figure 31
- To create a new standard document, click the “Green +”.
Figure 32
- In the Description box enter a name that will identify the template for future use.
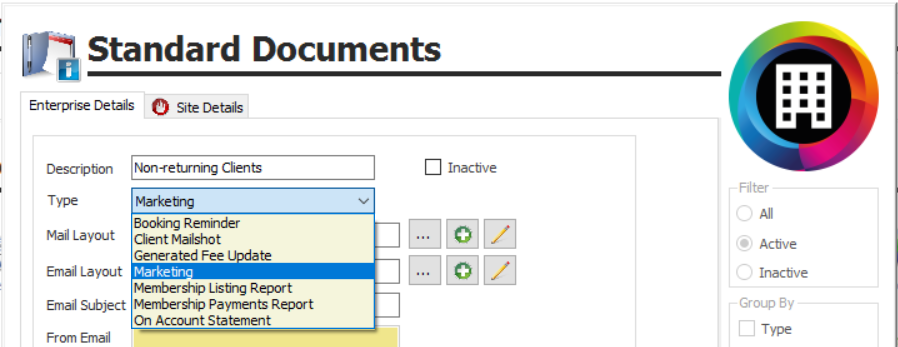
- Select the required document Type.
Document types are used as follows:
o Booking Reminder - appointment and group activity reminders typically sent the day before an appointment or group activity. They are sent using the “Appointment Reminders” report available in the Clients section of Reception or Manager reports.
o Client Mailshot - emails sent from an individual client’s record card.
o Generated Fee Update - sent using the Generated Fee Update function available in the Membership section of Manager. Typically to inform direct debit payers of a change to their membership payment.
o Marketing - any emails sent using Marketing.
o Membership Listing Report - emails sent from the “Members Listing” report available in the Members section of Manager Reports. Typically used when emailing renewal notices.
o Membership Payments Report - emails sent from the “Members’ Payments” report available in the Members section of Manager Reports. Typically used when emailing payment statements and invoices.
o On Account Statement - emails sent from the “Clients’ Items On Account” report available in the Members section of Manager Reports. Typically used when emailing account statements when asking for payment.
- Click the “Green Tick” to save your changes.
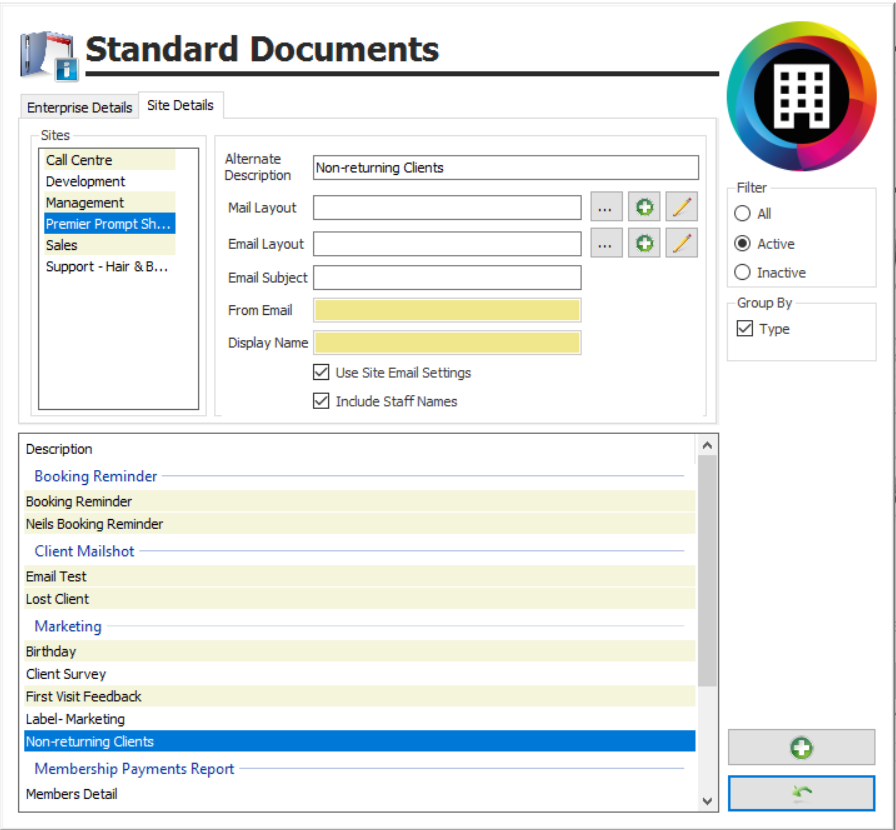
- Select the Site Details tab and the following screen will display (figure 33).
Figure 33
- If applicable ensure that the correct Site is selected.
- Tick Group By - Type - as shown in figure 33 to group the templates by the document type.
Enter the following details, as required:
- Alternate Description – this allows a site specific document name to be entered. This will only be seen within the system by users set up to view Alternate Descriptions in User Manager.
Templates can be created for either posting - Mail Layout - or for emailing to clients - Email Layout. They are both created and managed in the same way. The only major differences apply when you are producing the final documents.
The Email Subject, From Email and Display Name fields are only required when sending emails.
Mail Layout and Email Layout will show the filename and location of the word document you are linking to the selected template. Instructions on how to create a new template are given below.
You create and manage templates using the three icons adjacent to each layout:
o The Search or Ellipsis (...) button allows you to browse your computer or network to find a template that has already been created and saved.
o The “Green +” allows you to create and then save a new template.
o The “Pencil” allows you to edit an existing template.
- Email Subject –enter the subject line that you wish to be displayed to the email’s recipients.
- Use Enterprise / Site Email Settings - with this ticked you will send this template using the default email account created in Email Setup in Site Settings. Un-tick and you can enter a specific From Email account and associated Display Name that you want to use in association with this particular template.
It is therefore possible to have specific templates being emailed from specific email accounts. Since clients can reply to emails, this will also control who will receive any replies.
- Include Staff Names - tick if you want the names of the staff members linked to any appointments or group activities to display within your appointment reminders and confirmations templates.
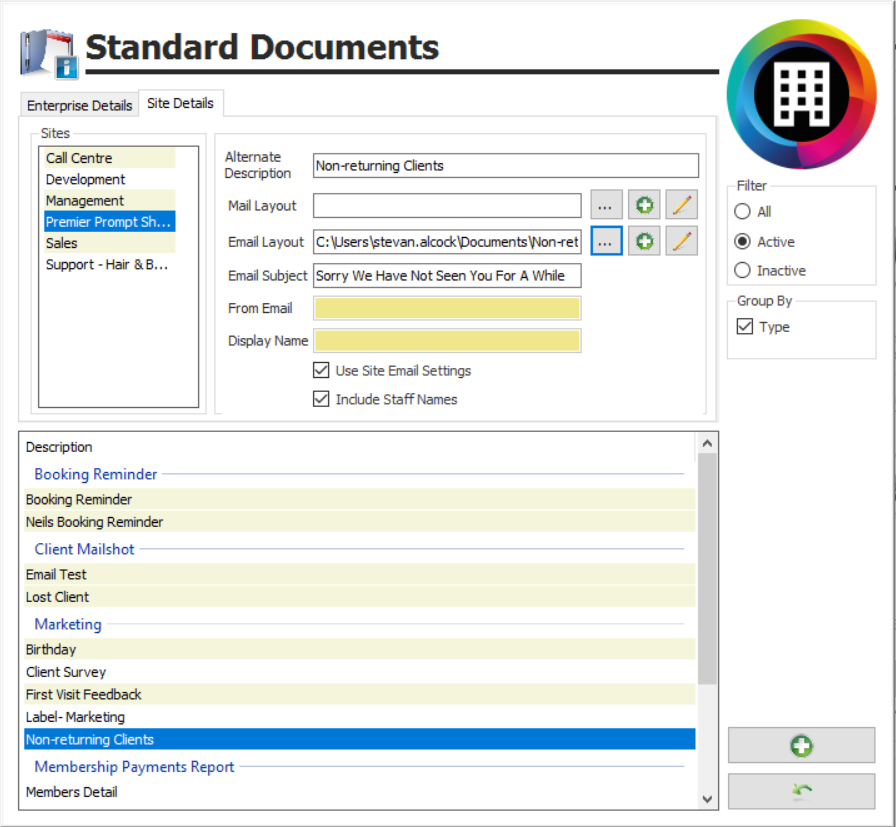
Once the document template is created (see below) and linked using the Search function, the Layout fields will automatically show the documents’ locations (figure 34).
Figure 34
To create a new Standard document / email template:
- Click the “Green +” adjacent to Email Layout.
You will be presented with a blank Microsoft Word document. Using the standard tools available in Word create your template, including for example: text, pictures, images, and links to websites and online content.
Because you have created the Word document through Premier Core, the document will automatically link to the client database in Premier Core.
You can also include merge fields, such as client and booking details. Again, as you have created the Word document through Premier Core, a ready-made list of merge fields is available to you. The end result will be emails that contain fixed or generic content as well as client specific information.
To add merge fields to your Word document work through the following.
- Click within the document where you want the merge field to display.
- Select Mailings in the Word task bar (figure 35), and then click the down arrow in the bottom part of Insert Merge Field.
Figure 35
- Select your desired merge field and it will be inserted into the Word document, in the chosen location.
Click the upper part of the Insert Merge Field icon and the same list of merge fields display, but in a different format (figure 36).
Figure 36
- In this case, having selected the location for the merge field in the Word document, select the required merge field from the list and then click Insert to add this into your document.
A merge field can be identified by the double angular brackets that surround it, i.e. <<MergeField>>. The name of the merge field and therefore the expected content is displayed within the double angular brackets.
- Continue to add all your required merge fields.
The merge fields available will depend on the document Type selected.
When using the Booking Confirmation and Booking Reminder document Types, details of the appointments; including dates, times and if selected staff names, are all contained within the Appointment Details merge field (figure 37).
Figure 37
- Save the Word document as you would any other Microsoft Word document on a shared drive that will be accessible to any computer likely to produce the emails. The name used does not need to match the name of the template within your Premier Core system.
- Use the “…” button to browse to the Word document you have just created and saved.
- Select the name of the Word document in the displayed list and then either double click or click Open.
You have now linked the Word document with the Standard Document template.
- Once completed click the “Green Back Arrow” to leave the screen.
Sending Emails
Marketing
For full details on how to use the range of functionality available in the Marketing suite of Premier Core, please refer to the prompt sheet on Marketing. Here we are concentrating on how to send an email to clients once they have been selected.
If you are a multi-site business and wish to send emails for multiple sites from a central email account, access Marketing through Administrator. Your Premier Core system will use the Email Setup as configured in Main System Details in General Menu in Administrator.
If you are a single site business, or a multi-site business and wish to send emails per site, access Marketing through Manager. Your Premier Core system will use the Email Setup as configured in Site Settings in General Menu in Manager.
- From the main menu in Manager or Administrator select Marketing (figure 38).
Figure 38
- Once you have selected the clients you wish to email click the “Green Tick”.
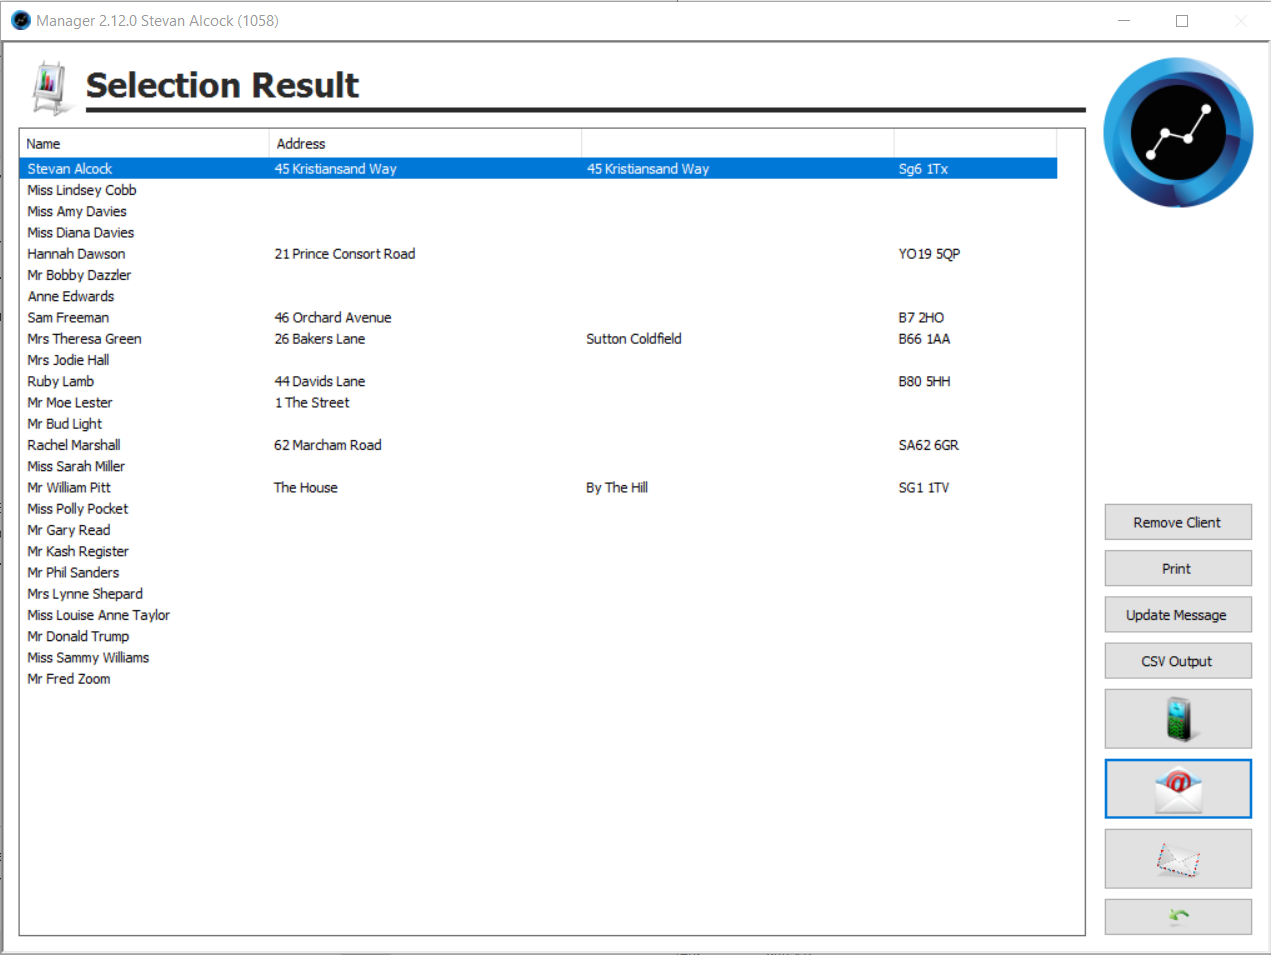
- After being provided with the number of matching clients and the options to Send immediately or Save to re-use later, click the next “Green Tick” and a list of the selected clients will display.
Figure 39
- To send an email to these clients, click the email button (figure 40).
Figure 40
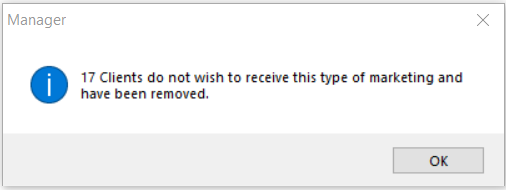
If there are any clients in the list that either do not have an email address on their record card, or who have opted not to receive emails, I.e. Email has been un-ticked in the list of Contact Media types on their client record card, the following screen will display (figure 41).
Figure 41
- Click Ok.
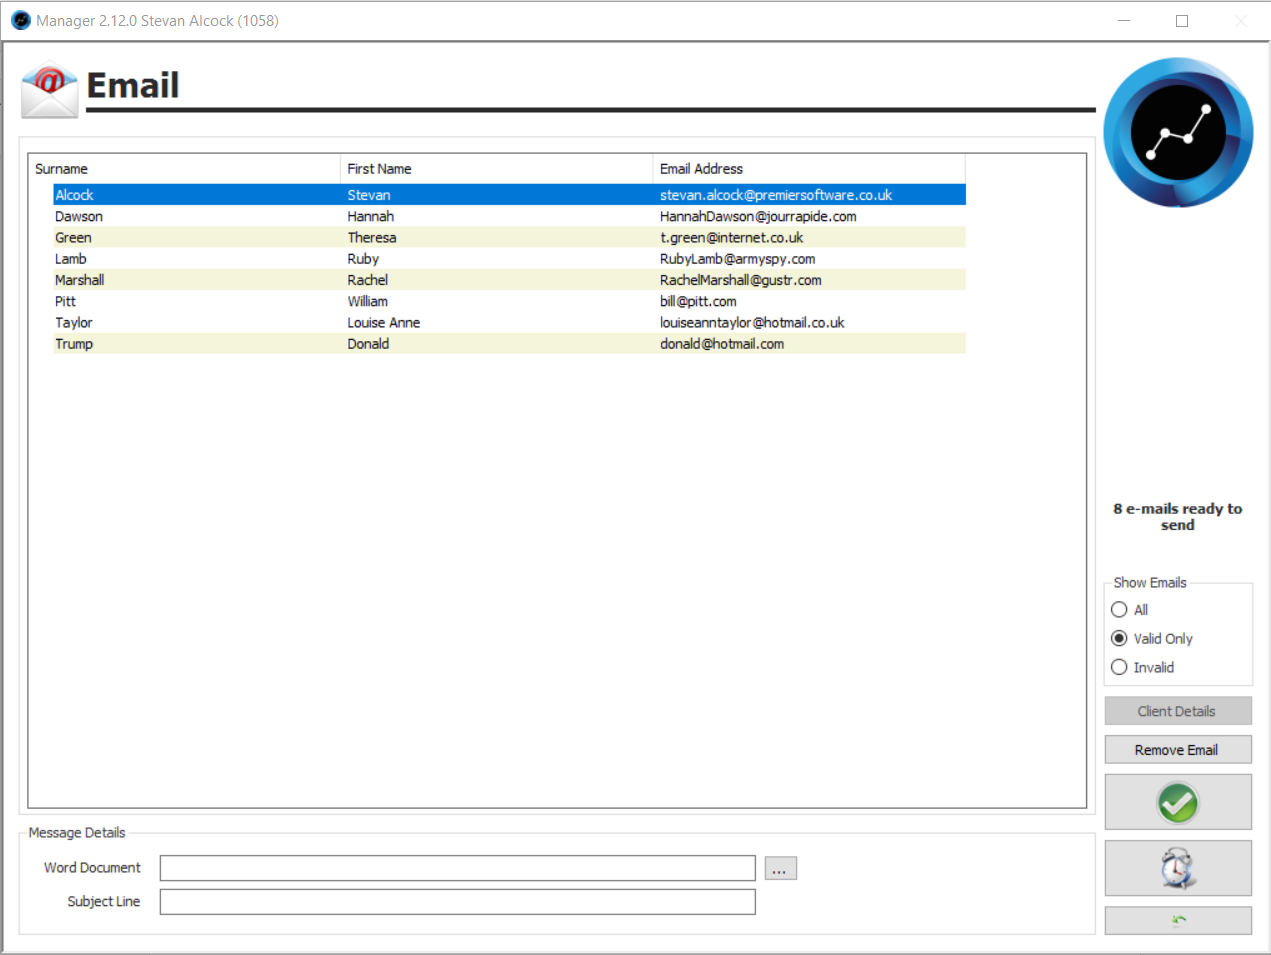
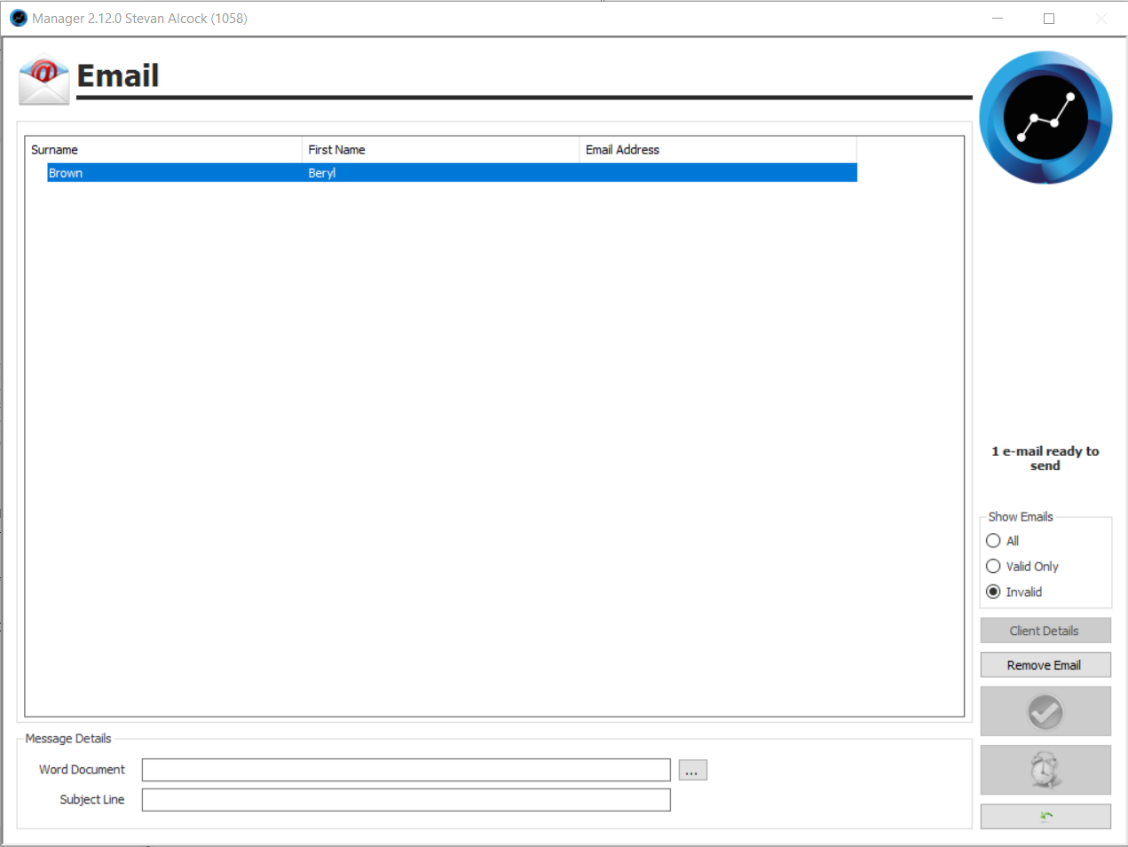
A list of those clients with invalid email addresses will display (figure 42).
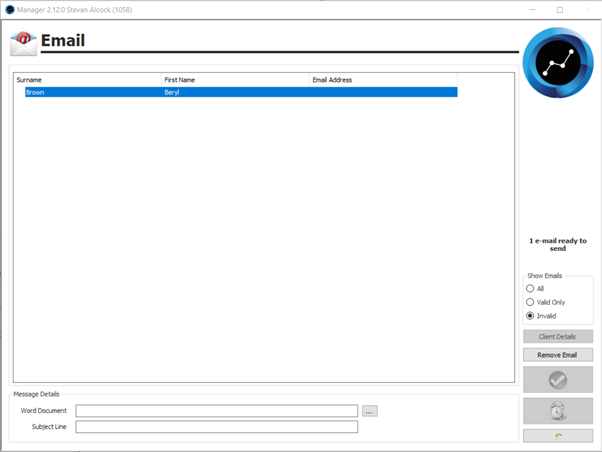
Figure 42
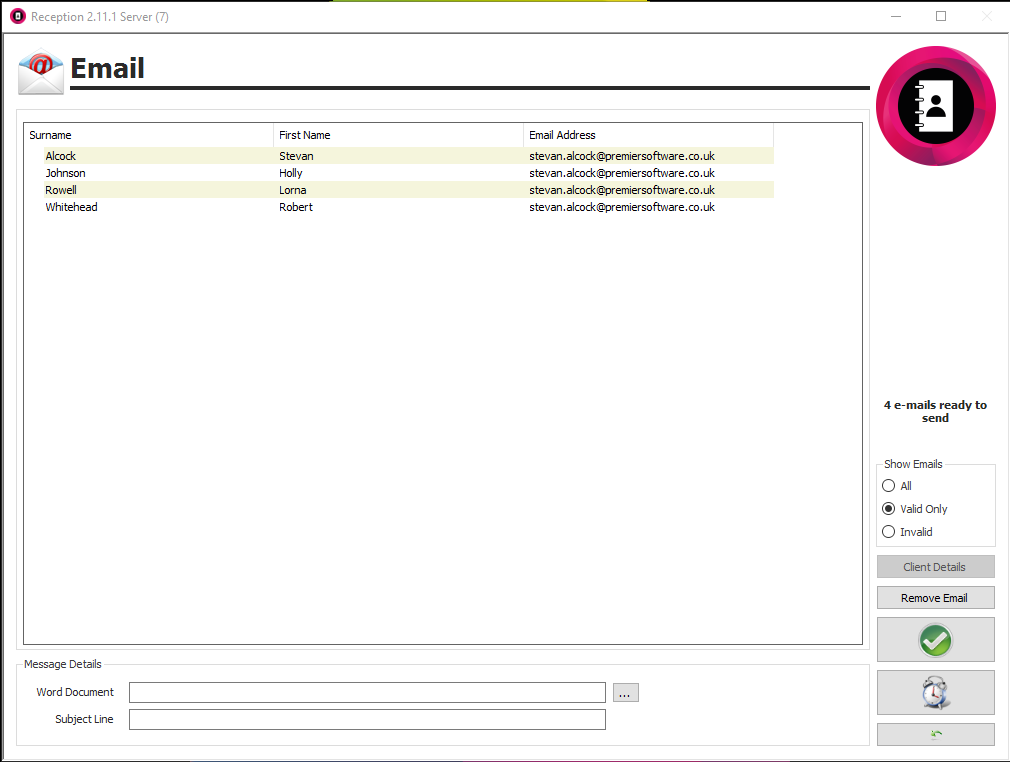
- Change the view to show a list of the clients with valid emails. In the Show Details section, select Valid Only (figure 43).
Figure 43
- If you wish to remove a client from the list, highlight the client’s name and then click Remove Email.
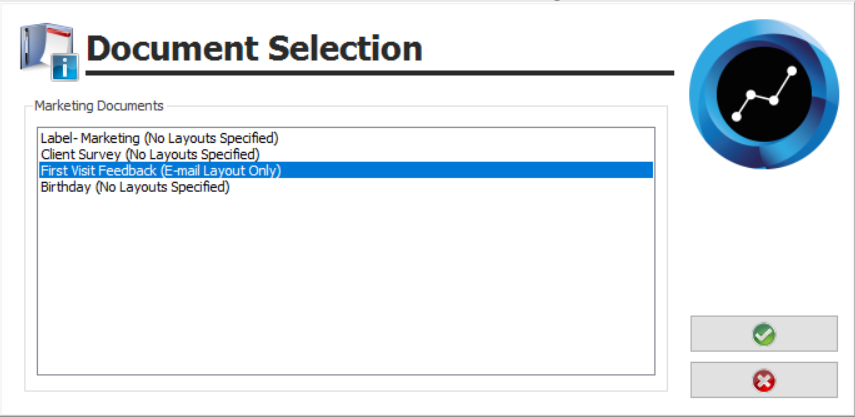
- Click the “Search” (“…”) button adjacent to Word Document in the Message Details section and a list of your marketing templates will display (figure 44). A template must already exist for it to be emailed.
Figure 44
- Click on the required Marketing Document and then click the “Green Tick”.
- Enter a Subject Line for the email, unless one was created when the template was created.
- Click the “Green Tick”
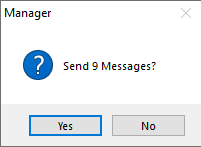
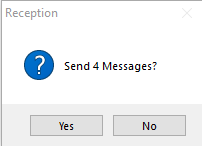
A final confirmation window will display, showing the number of emails to be sent (figure 45).
Figure 45
- Click Yes to send the emails.
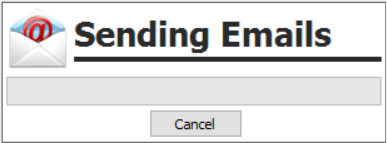
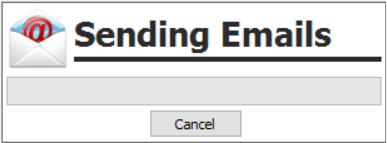
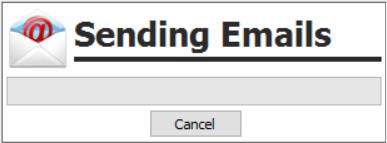
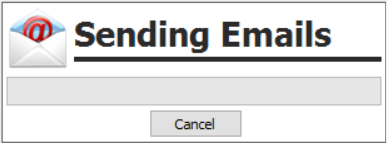
A window will appear stating that your emails are being sent (figure 46).
Figure 46
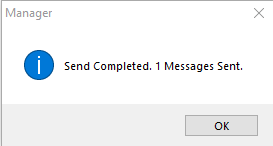
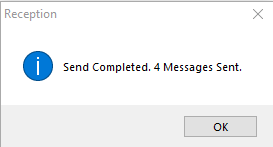
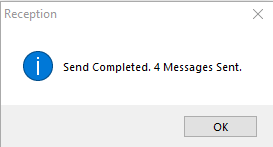
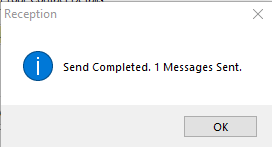
Confirmation that the emails have been sent, or not, will then display (figure 47).
Figure 47
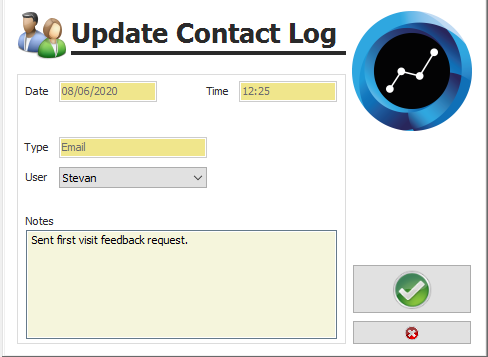
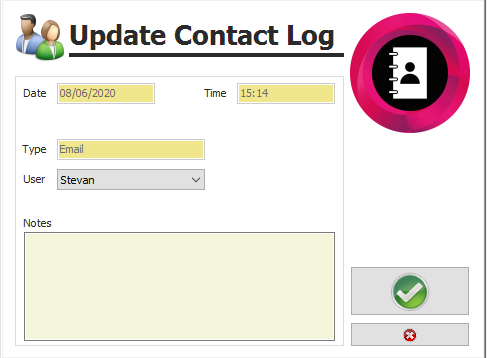
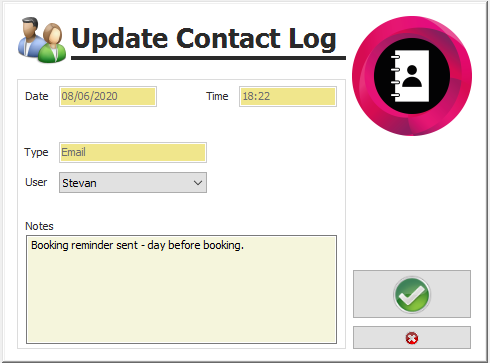
- Click OK and you will be prompted to update the clients’ contact logs with additional notes on the emails just sent. The same note will be added to all the clients’ records.
- The User will default to the person logged on but can be manually amended if required.
Figure 48
Regardless of whether you enter any notes, a record will be placed onto the Contact Log tab of the clients’ records cards. This will include the date and time the email was sent, that it was an email rather than text or letter and the user responsible.
- Add your Notes.
- Click the “Green Tick”.
A client’s email history can be reviewed whenever desired.
- To do so, open Reception and click Clients (figure 49).
Figure 49
- Search to the desired client.
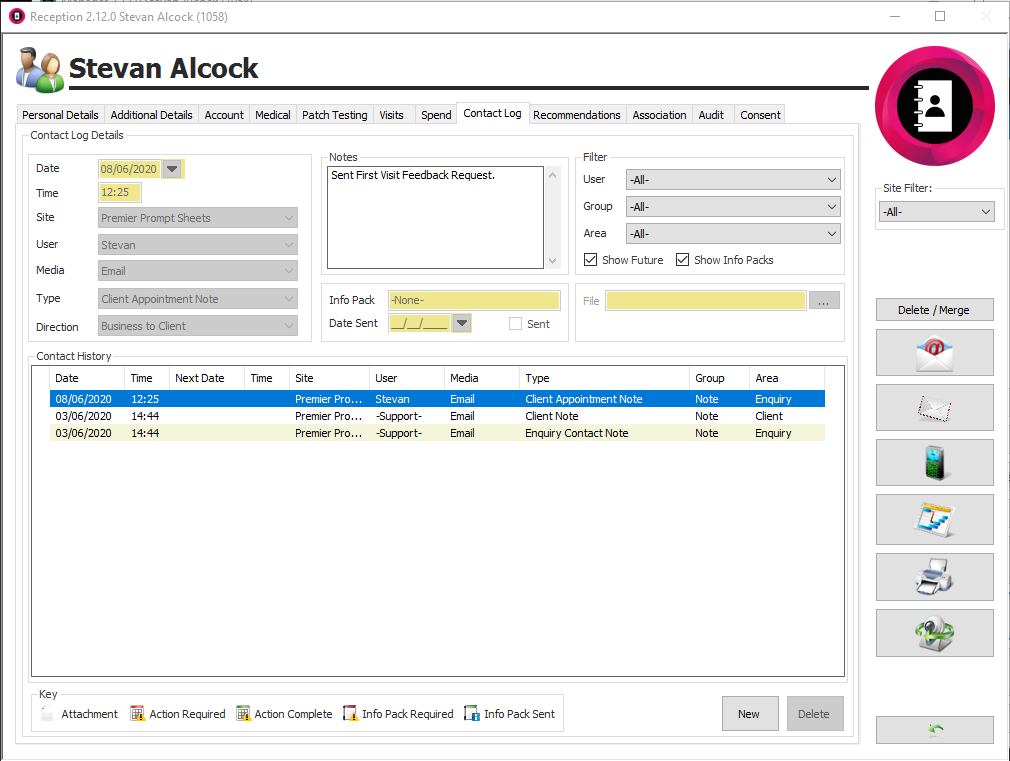
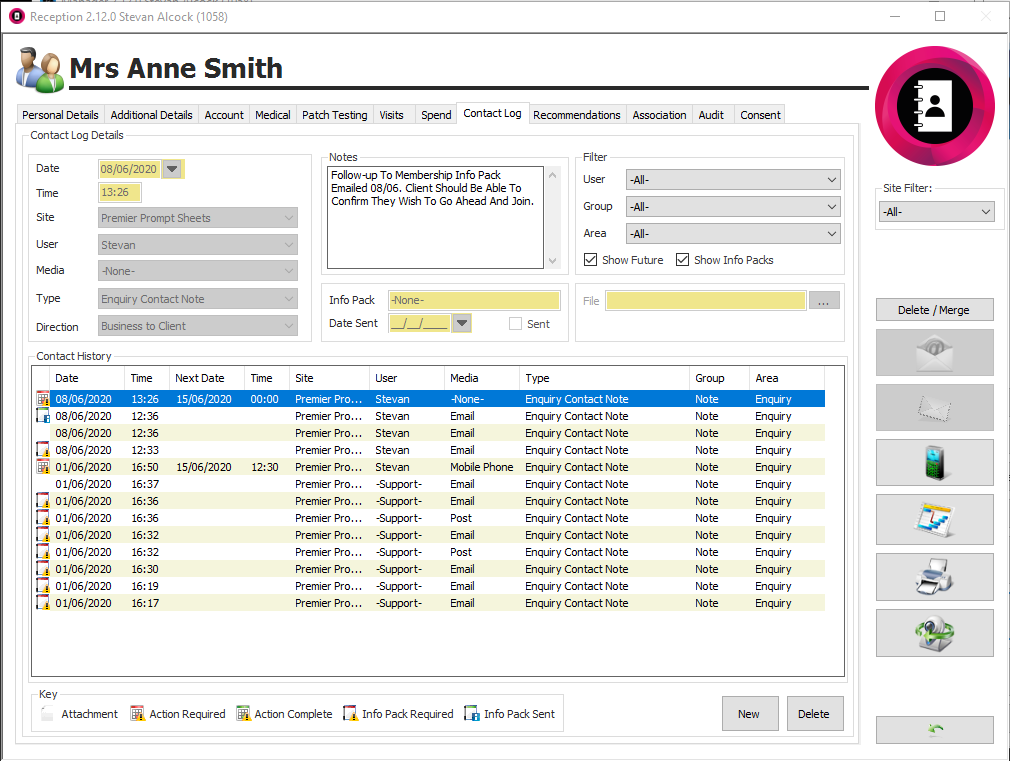
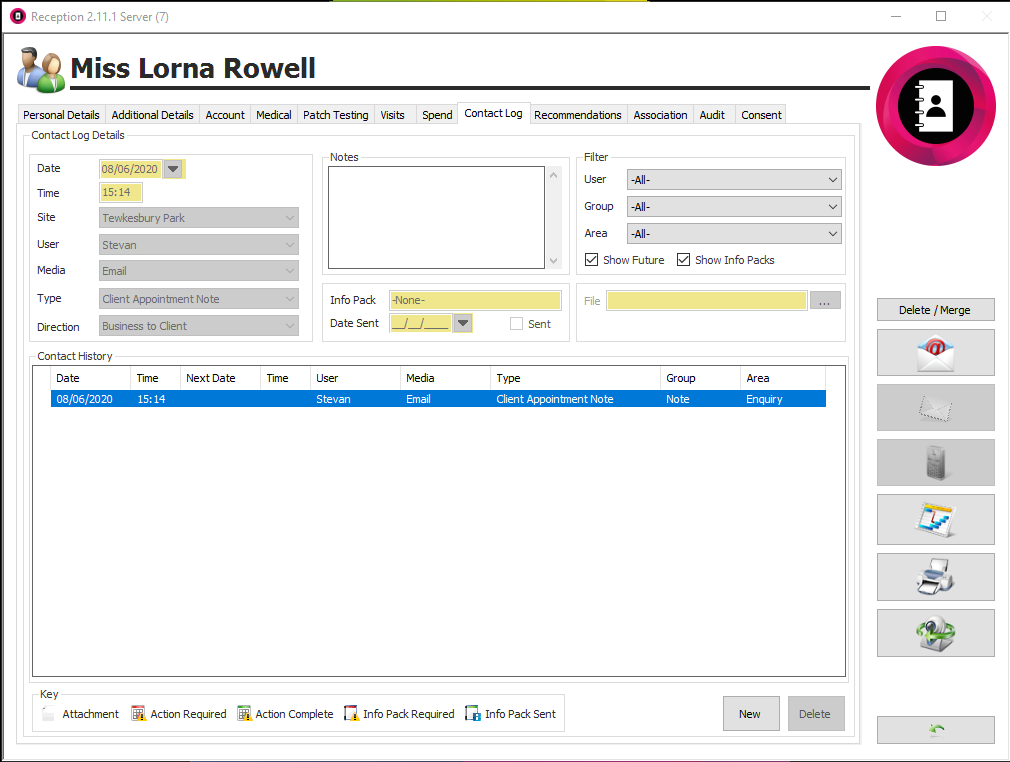
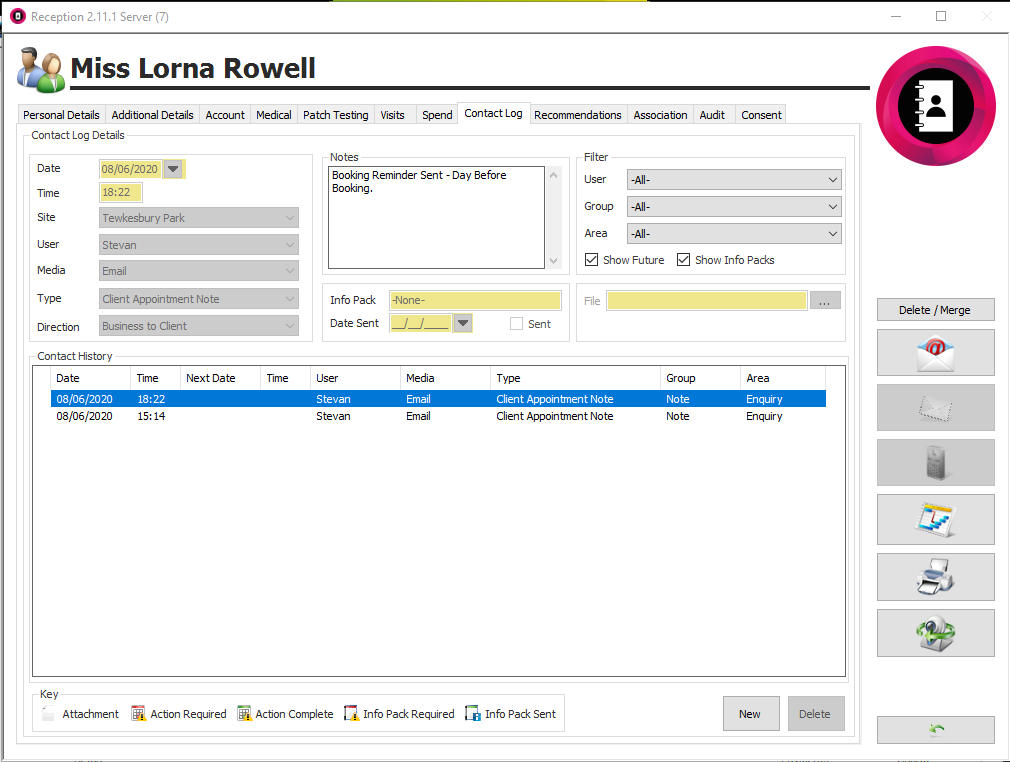
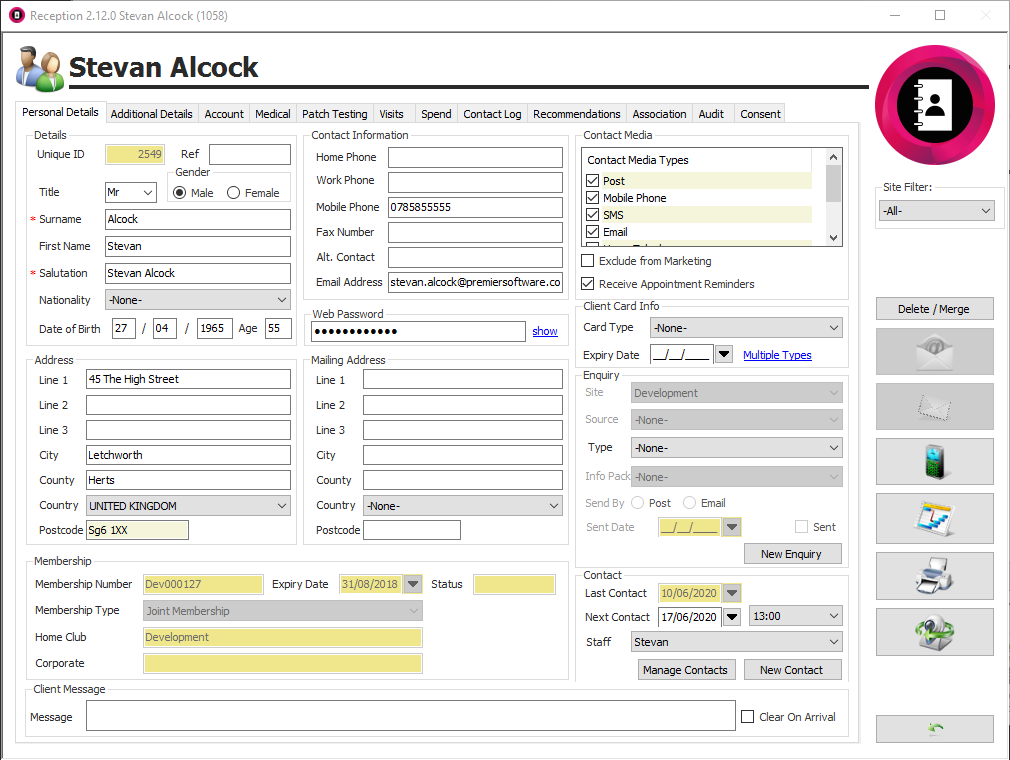
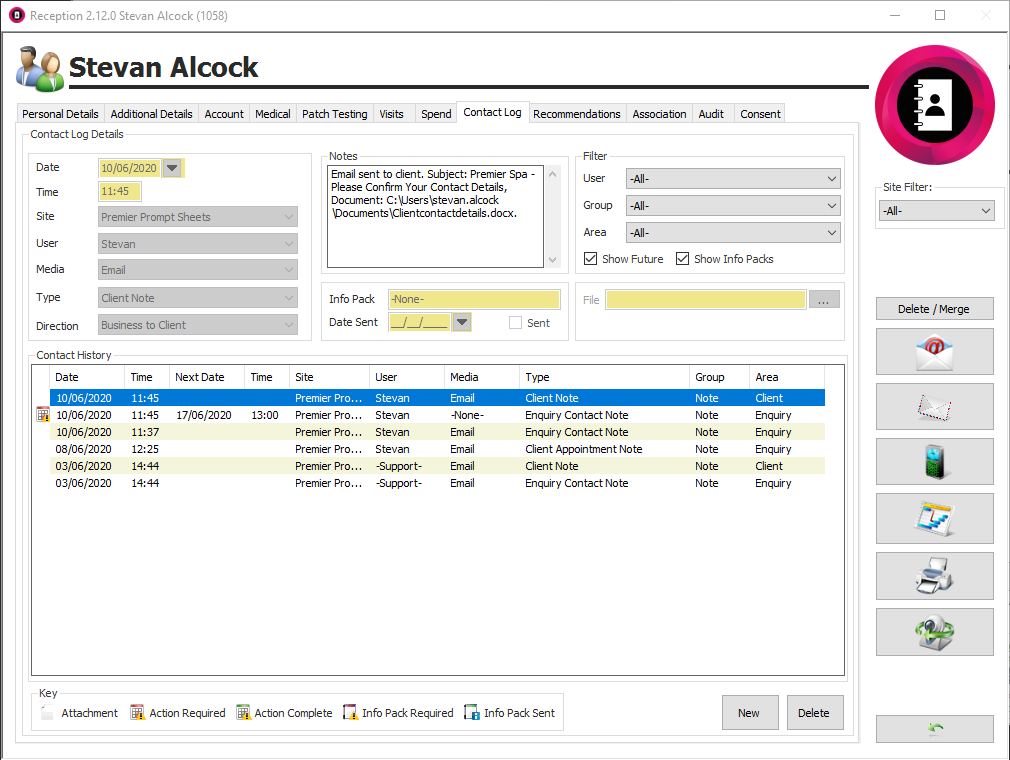
- Select the Contact Log tab and the following screen will display (figure 50).
Figure 50
The client contact log will display all emails and texts sent to the client, show all their cancellations and any appointments they did not arrive for, as well as any manually logged contacts created by clicking New.
Enquiries
Enquiries is designed to record the details of new and existing clients and members who request information on your products and services. These could be membership enquires, or potential clients requesting information on treatments, classes or packages.
Client details are stored along with the source of the client. A record is created of historical contacts and information sent, and future follow-ups can be scheduled.
- In Reception click Enquiries (figure 51).
Figure 51
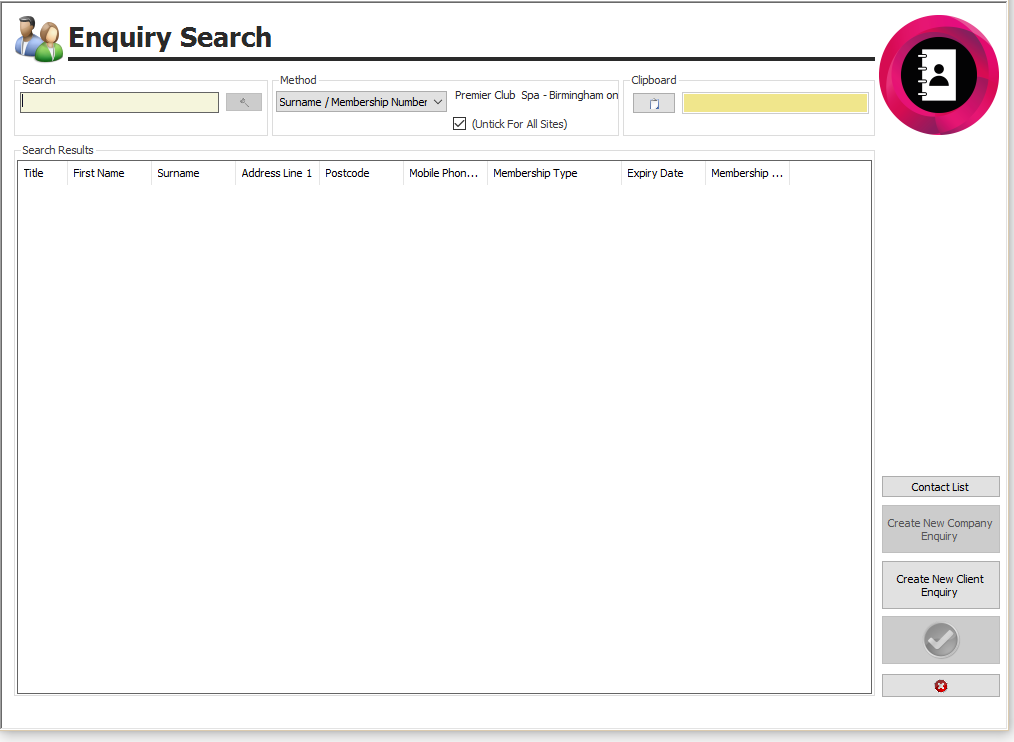
This will display the Enquiry Search screen (figure 52).
Figure 52
- Search for the desired client, generally by entering their surname in the search field (Figure 52).
- Then either:
- To select an existing client, highlight the name in the list and “Green Tick”.
- To create a new client, click Create New Client Enquiry.
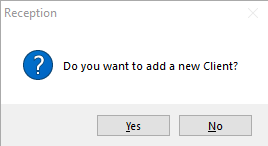
- If no existing records exist that match your search criteria, you will be prompted to create a new Client (Figure 53).
Figure 53
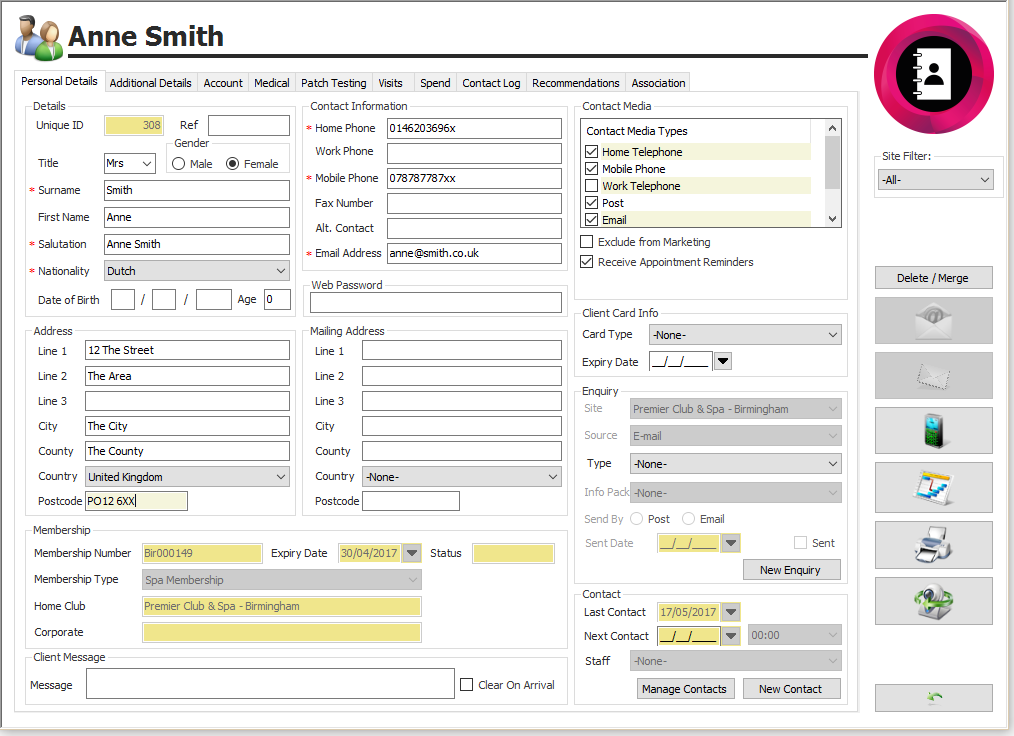
Figure 54
- Enter the name and contact details of a new client or confirm the details of an existing client’s record.
- Click the “Green Tick” to save the Client’s record card.
To send an Info Pack.
- Click New Enquiry as shown in figure 54.
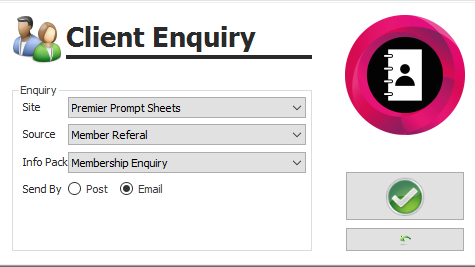
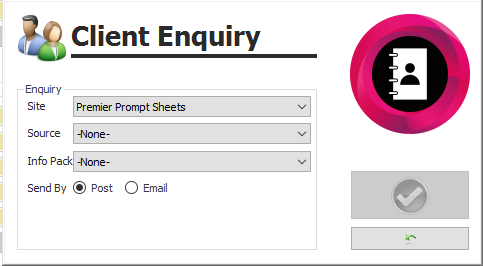
The Client Enquiry screen will display (figure 55).
Figure 55
- Select the Source of the enquiry.
New sources can be added in Manager (or Administrator if multi-site). Go to General Menu, Site Settings and then Client Source.
- Select the Info Pack to be sent to the client.
- Confirm whether you will Send By Post or Email the Info Pack.
- Click the “Green Tick”.
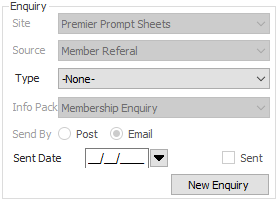
The information is saved on the Client’s record card (Figure 54) and displays as below (figure 56).
Figure 36
- When you are ready to send the email; either, click the “Green Back Arrow”, or click the “Email Button” (figure 57)
Figure 57
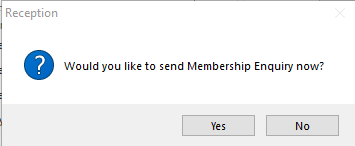
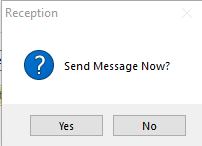
- You will be prompted to email the Info Pack (Figure 58).
Figure 58
- Click Yes to send the emails.
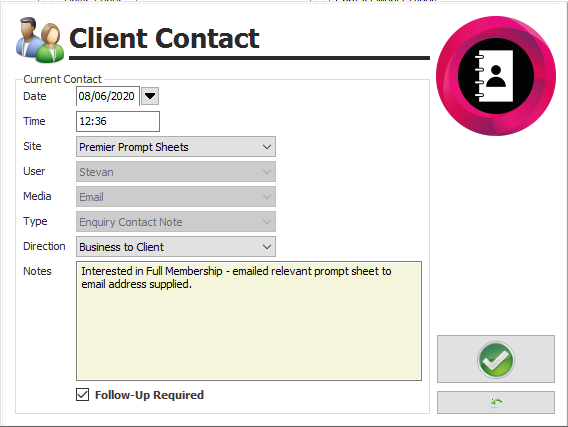
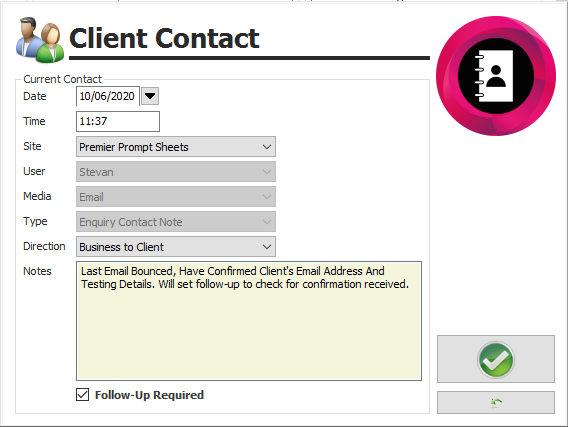
- You are then prompted to update the client’s contact log with additional notes on the email just sent (Figure 59).
Figure 59
- Add your Notes.
- Tick Follow-Up Required to schedule a subsequent contact with the client.
- Click the “Green Tick”.
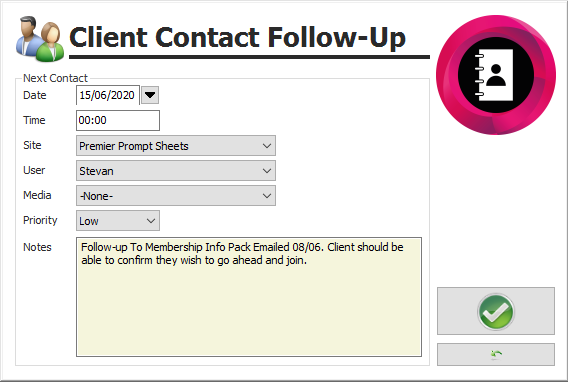
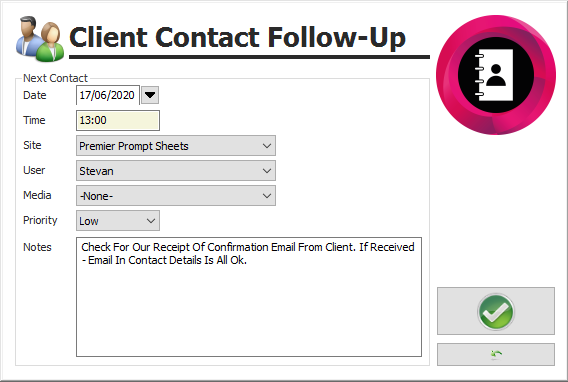
If you selected Follow-Up Required in figure 59, the Client Contact Follow-Up will now display (Figure 60).
Figure 60
- Complete the necessary fields, enter any notes, and click the “Green Tick”.
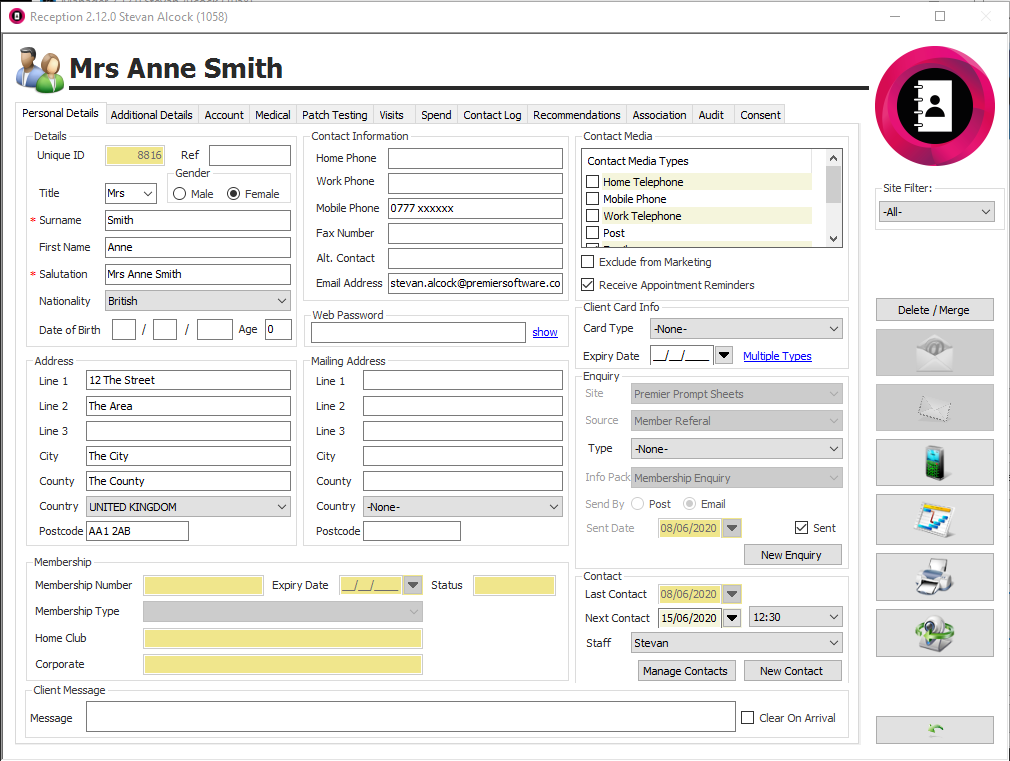
A summary of Last and Next Contacts will display on the Personal Details tab of the client’s record card when accessed in Enquiries (Figure 61).
Figure 61
For full details on how to monitor and manage Enquiries, please refer to the relevant prompt sheet.
A record of the contact will also appear on the Contact Log tab of the Client’s record card. This will include the date and time the email was sent, that it was an email rather than text or letter and the user responsible.
A client’s email history can be reviewed whenever desired.
- To do so, open Reception and click Clients (figure 62).
Figure 62
- Search to the desired client.
- Select the Contact Log tab and the following screen will display (figure 63).
Figure 63
The client contact log will display all emails and texts sent to the client, show all their cancellations and any appointments they did not arrive for, as well as any manually logged contacts created by clicking New.
Two specific icons in the Contact History refer to Info Packs: Info Pack Required and Info Pack Sent.
Appointment Confirmations
Appointment Confirmations can be sent manually or be scheduled to be sent automatically, typically every 10-15 minutes.
- To do either, go to Reports in either Manager or Reception.
Figure 64
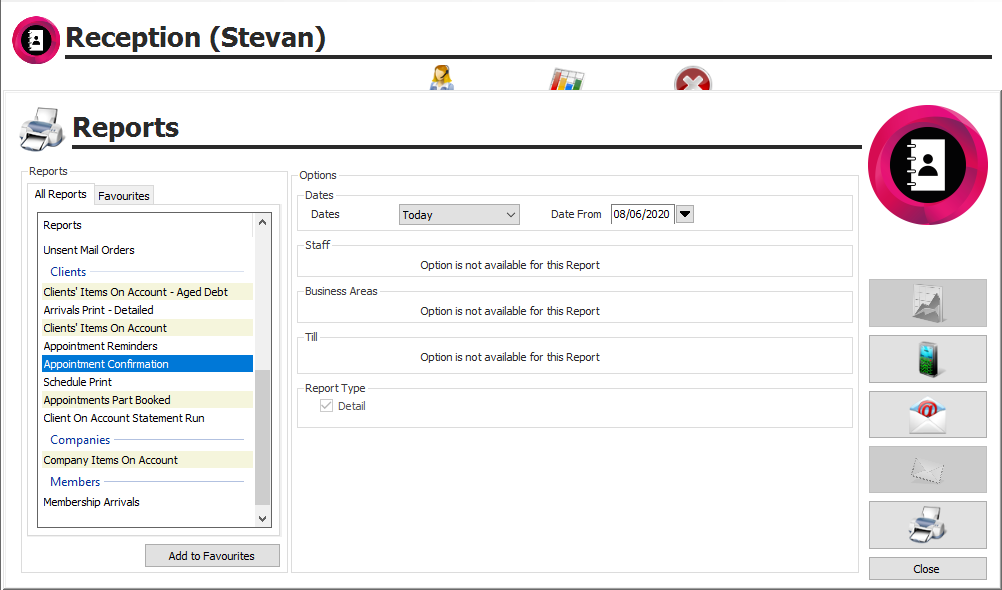
- Scroll down the list of reports until you reach the Clients section and then select Appointment Confirmation (figure 65).
Figure 65
- Select the required Dates. If automating the procedure, set the Dates to Today.
The frequency for sending automated emails is configured later in the process and is covered in the prompt sheet detailing Automated Reports and Marketing.
- Click the “Email” Icon (figure 66).
Figure 66
A list of those clients with invalid email addresses will display (figure 67).
Figure 67
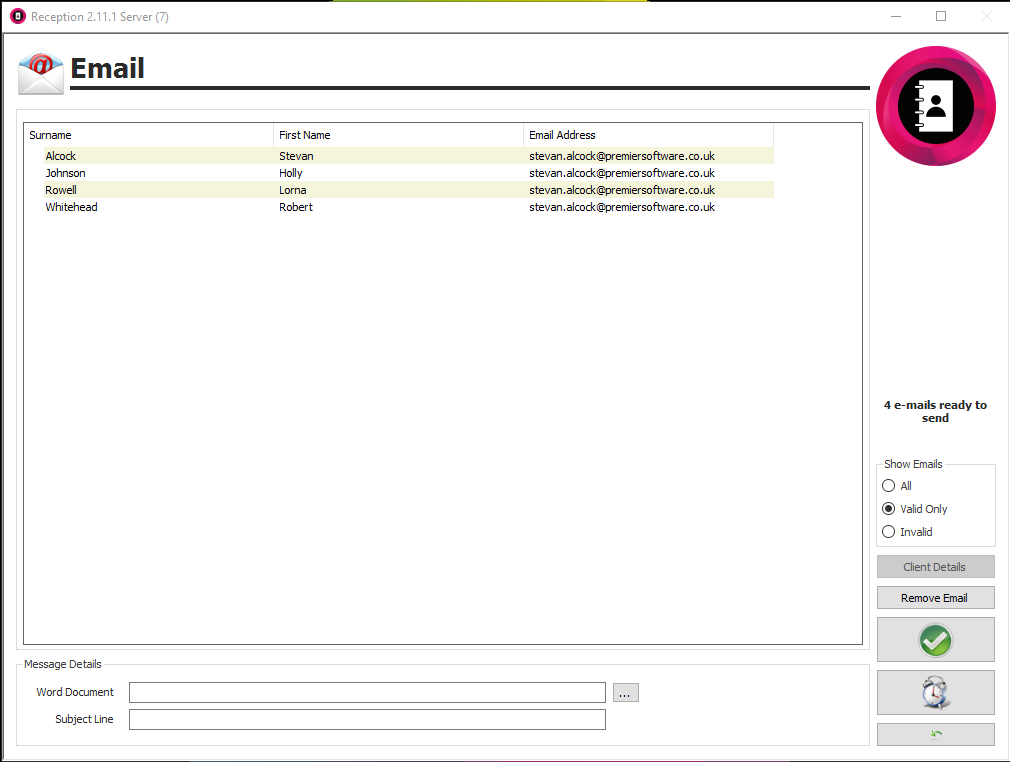
- Change the view to show a list of the clients with valid emails; in the Show Details section, select Valid Only (figure 68).
Figure 68
- If you wish to remove a client from the list, highlight the client’s name and then click Remove Email.
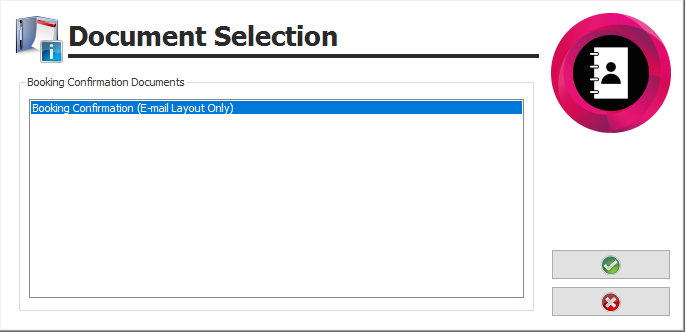
- in the Message Details section click the “Search” (“…”) button adjacent to Word Document and your Booking Confirmation template will be listed (figure 69); only one Booking Confirmation template is possible. A template must already exist for it to be emailed.
Figure 69
- Click on Booking Confirmation (E-mail Layout Only) and then click the “Green Tick”.
- Enter a Subject Line for the email, unless one was created when the template was saved.
- Click the “Green Tick”.
A final confirmation window will display, showing the number of emails to be sent (figure 70).
Figure 70
- Click Yes to send the emails.
A window will appear stating that your emails are being sent (figure 71).
Figure 71
Confirmation that the emails have been sent, or not, will then display (figure 72).
Figure 72
- Click OK and you will be prompted to update the clients’ contact logs with additional notes on the emails just sent. The same note will be added to all the clients’ records.
- The User will default to the person logged on but can be manually amended if required.
Figure 73
Regardless of whether you enter any notes, a record will be placed onto the Contact Log tab of the clients’ records cards. This will include the date and time the email was sent, that it was an email rather than text or letter and the user responsible.
- If so desired, add your Notes.
- Click the “Green Tick”.
A client’s email history can be reviewed whenever desired.
- To do so, open Reception and click Clients (figure 74).
Figure 74
- Search to the desired client.
- Select the Contact Log tab and the following screen will display (figure 75).
Figure 75
The client contact log will display all emails and texts sent to the client, show all their cancellations and any no shows, as well as any manually logged contacts created by clicking New.
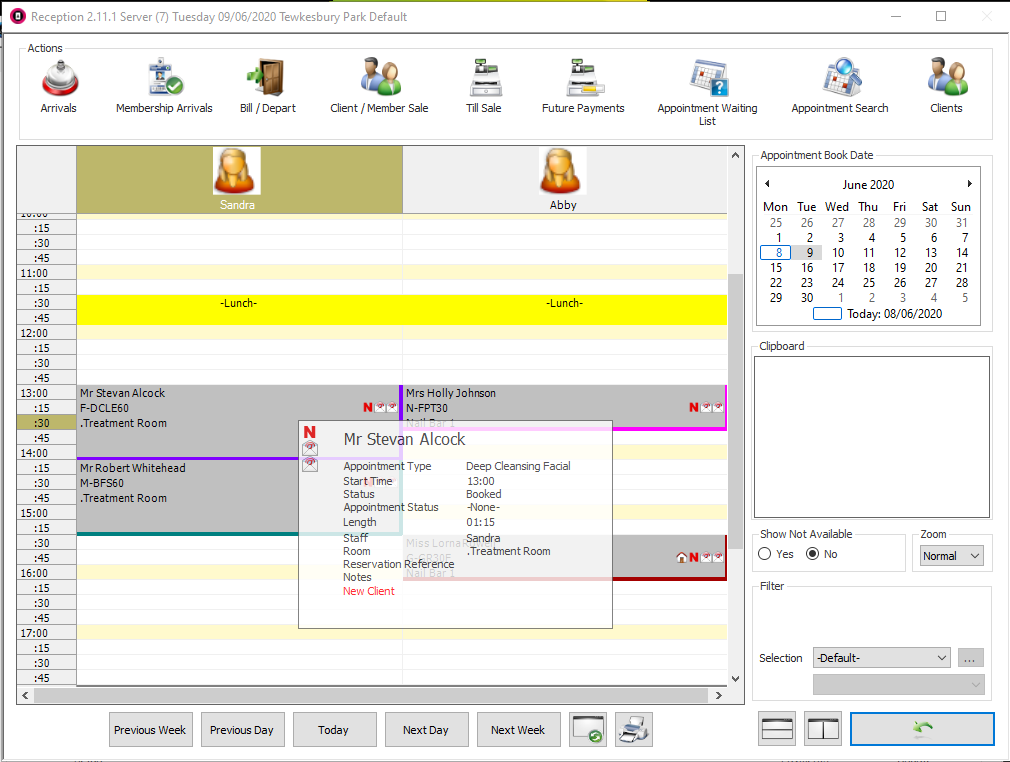
Two other notifications within Premier Core identify that the appointment has been sent a confirmation.
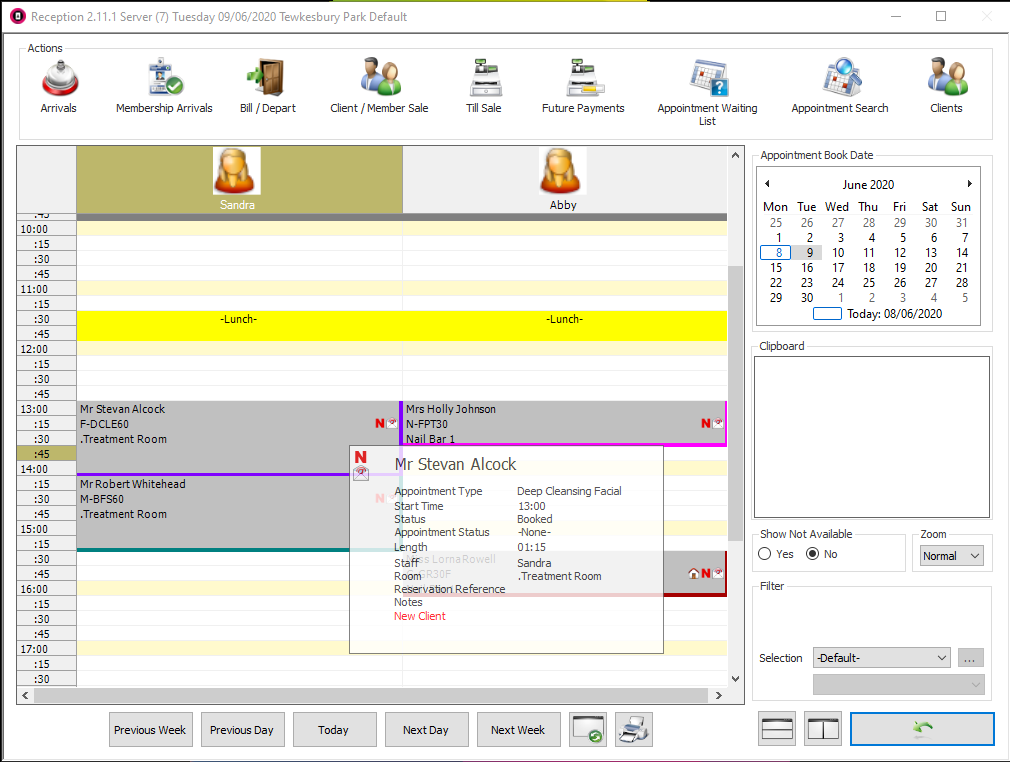
The appointment as displayed on the Appointment Booking screen will now include an email icon, see figure 76.
Figure 76
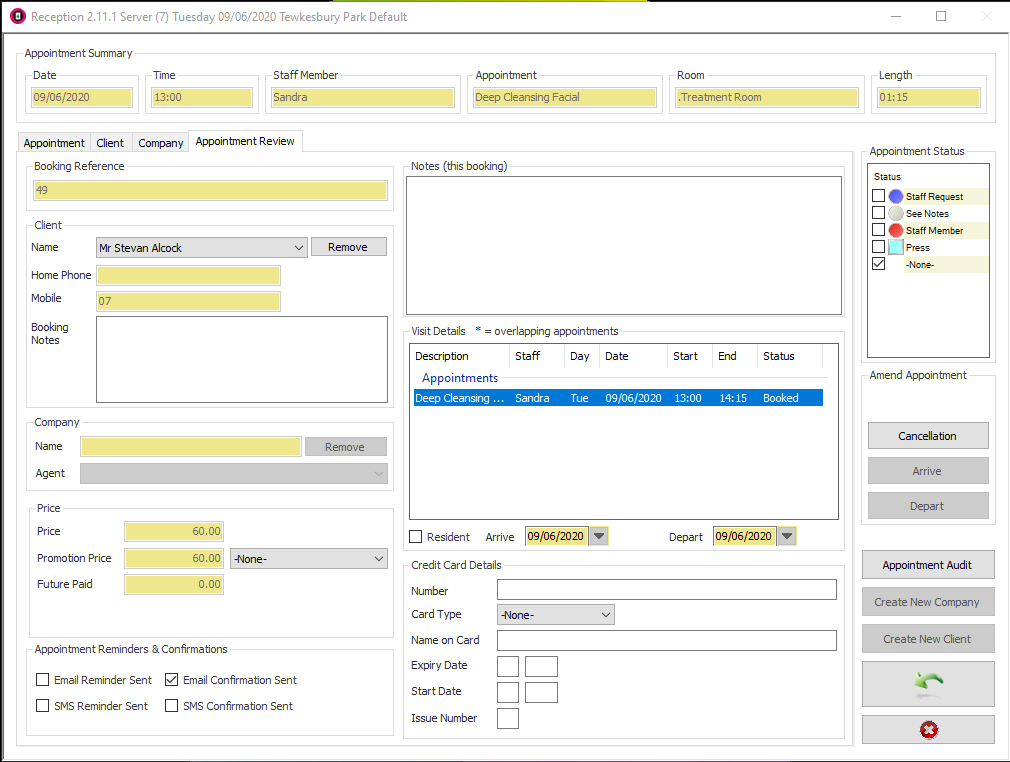
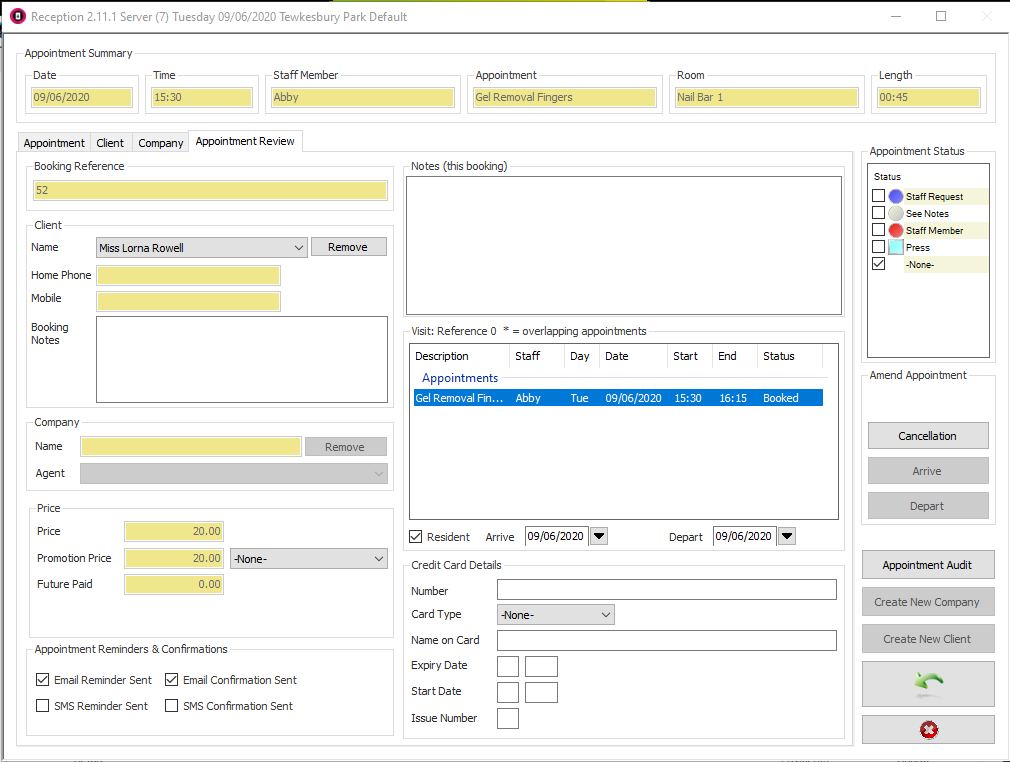
- Click on the appointment and you will be presented with the Appointment Review, figure 77.
Figure 77
This includes an “Appointment Reminders & Confirmations section. Ticks in boxes show if the appointment has been confirmed and or a reminder sent.
- To resend a Confirmation for an appointment, simply move the appointment on the Appointment Booking screen, or un-tick “Email Confirmation Sent”.
If you manually send confirmations, repeat the Appointment Confirmation emailing process detailed above. If your system is set to automatically send email confirmations, no further action is required, and the client will receive a confirmation with the next batch.
Appointment Reminders
Appointment Reminders can be sent manually or be scheduled to be sent automatically, typically once or twice a day for appointments booked for the next day.
- To do either, go to Reports in either Manager or Reception.
Figure 78
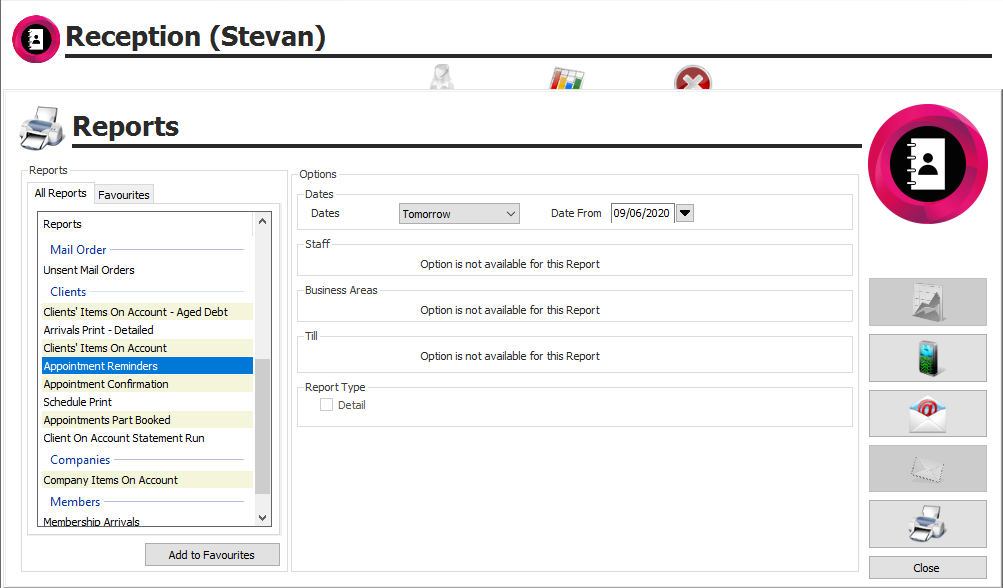
- Scroll down the list of reports until you reach the Clients section and then select Appointment Reminders (figure 79).
Figure 79
- Select the required Dates. If automating the procedure, set the Dates to Tomorrow.
The frequency for sending automated emails is configured later in the process and is covered in the prompt sheet detailing Automated Reports and Marketing.
- Click the “Email” Icon (figure 80).
Figure 80
A list of those clients with invalid email addresses will display (figure 81).
Figure 81
- Change the view to show a list of the clients with valid emails; in the Show Details section, select Valid Only (figure 82).
Figure 82
- If you wish to remove a client from the list, highlight the client’s name and then click Remove Email.
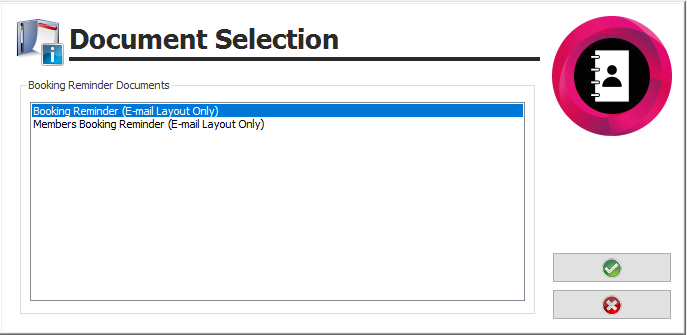
- in the Message Details section click the “Search” (“…”) button adjacent to Word Document and your available Booking Reminder templates will be listed (figure 83). A template must already exist for it to be emailed. Only one Booking Reminder template can be automated at any one time.
Figure 83
- Click on the appropriate Booking Reminder template and then click the “Green Tick”.
- Enter a Subject Line for the email, unless one was created when the template was saved.
- Click the “Green Tick”.
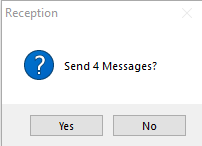
A final confirmation window will display, showing the number of emails to be sent (figure 84).
Figure 84
- Click Yes to send the emails.
A window will appear stating that your emails are being sent (figure 85).
Figure 85
Confirmation that the emails have been sent, or not, will then display (figure 86).
Figure 86
- Click OK and you will be prompted to update the clients’ contact logs with additional notes on the emails just sent. The same note will be added to all the clients’ records.
- The User will default to the person logged on but can be manually amended if required.
Figure 87
Regardless of whether you enter any notes, a record will be placed onto the Contact Log tab of the clients’ records cards. This will include the date and time the email was sent, that it was an email rather than text or letter and the user responsible.
- If so desired, add your Notes.
- Click the “Green Tick”.
A client’s email history can be reviewed whenever desired.
- To do so, open Reception and click Clients (figure 88).
Figure 88
- Search to the desired client.
- Select the Contact Log tab and the following screen will display (figure 89).
Figure 89
The client contact log will display all emails and texts sent to the client, show all their cancellations and any no shows, as well as any manually logged contacts created by clicking New.
Two other notifications within Premier Core identify that the appointment has been sent a confirmation.
The appointment as displayed on the Appointment Booking screen will now include an email icon, see figure 90. If the client has been emailed both a confirmation and a reminder, as is the case in Figure 90, two email icons will now display.
Figure 90
- Click on the appointment and you will be presented with the Appointment Review, figure 91.
Figure 91
This includes an “Appointment Reminders & Confirmations section. Ticks in boxes show if the appointment has been confirmed and or a reminder sent.
- To resend a Reminder for an appointment, simply move the appointment on the Appointment Booking screen, or un-tick “Email Reminder Sent”.
If you manually send reminders, repeat the Appointment Reminder emailing process detailed above. If your system is set to automatically send email reminders again, prior to the arrival date and time for the client, no further action is required, and the client will receive an amended reminder with the next batch.
Reservations
Reservation emails are sent manually, directly from the reservation booking screens, meaning that a user can select the most appropriate email template for each booking. Most sites therefore have a range of template documents created. The majority are booking confirmations for different types of bookings, but they could also include a cancellation confirmation.
- In Reception click Reservations (figure 92).
Figure 92
Please refer to the dedicated Reservations prompt sheet for full details on how to create and manage package and group bookings.
- Create your new Reservation, or search to an existing booking.
Figure 93
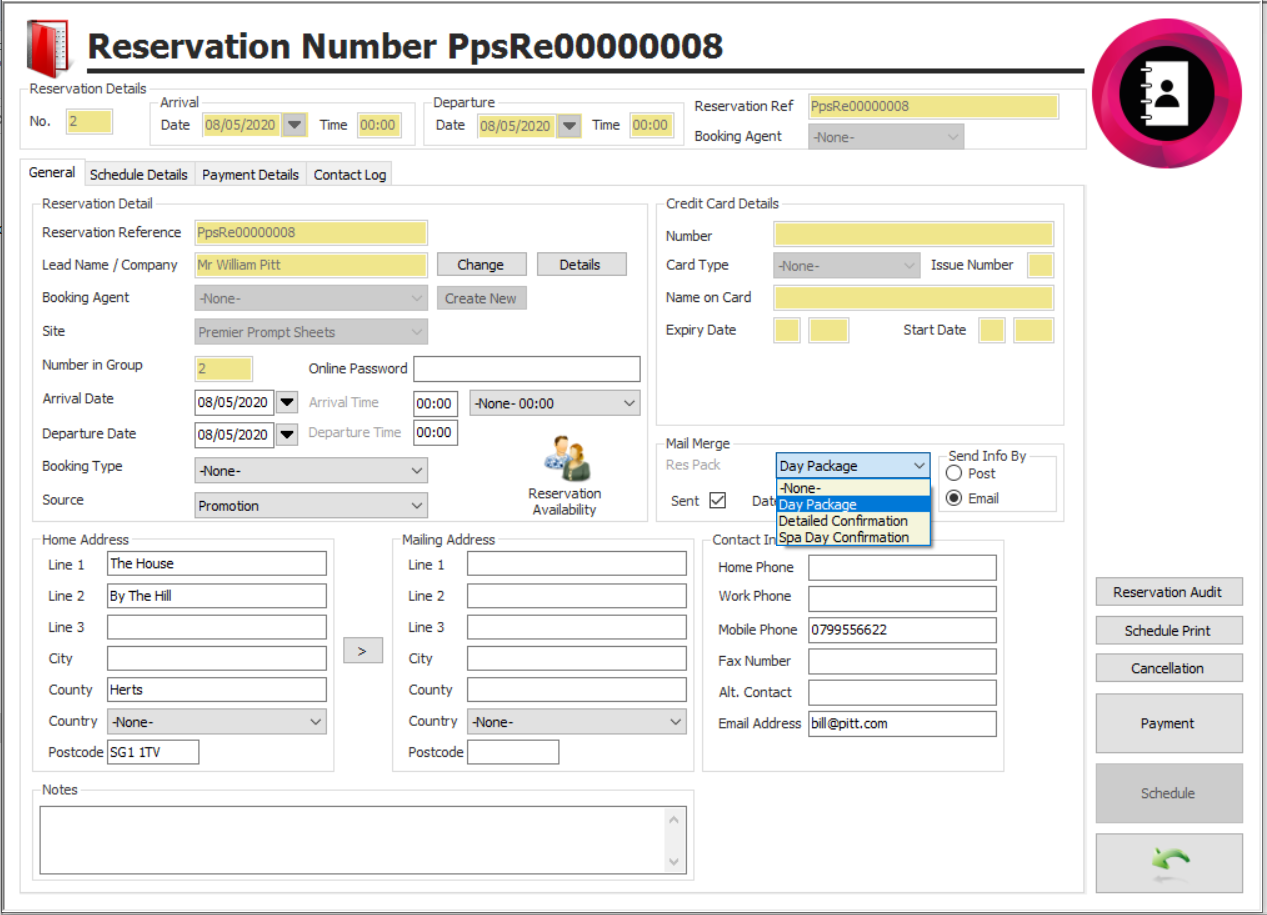
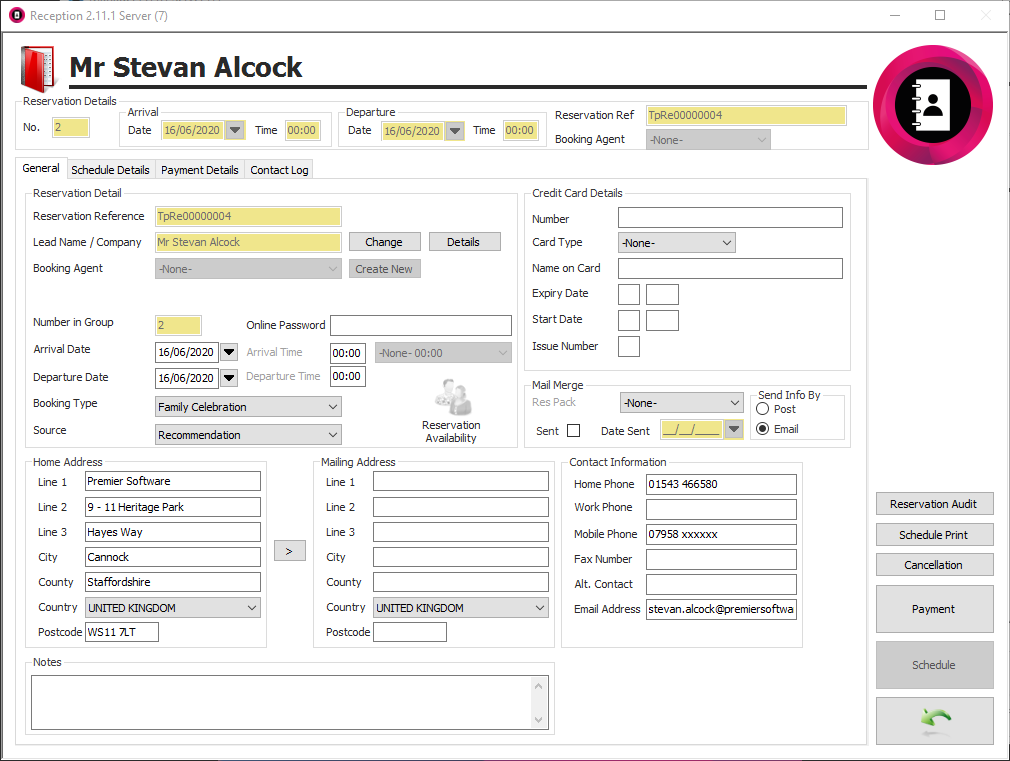
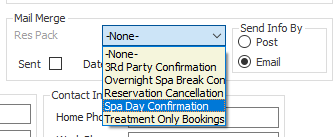
- Go to the General tab and locate the Mail Merge section, see figure 94.
Figure 94
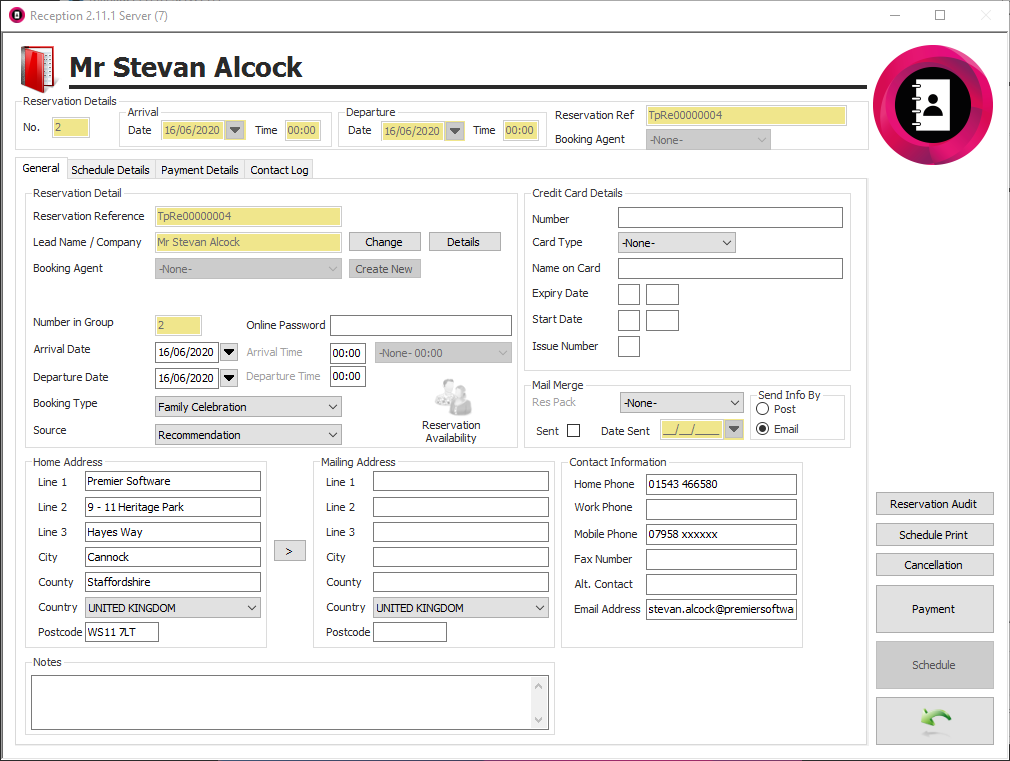
- Using the dropdown adjacent to Res Pack, select the required template from the list presented.
Figure 95
- Ensure that Send Info By - Email is selected.
The Date Sent will be completed and the Sent box ticked automatically once the email has been sent.
If the “Sent” box is ticked by default, this should be changed in Manager > General Menu > Site(s) > Site Settings and in the Reservation Options section un-tick “Mark Reservation Details As Sent on Input”. Otherwise, users will have to remember to un-tick the “Sent” box on every reservation booking before any emails will be sent.
- Complete the booking process, if you have not already done so, and to send the email click the “Green back arrow”.
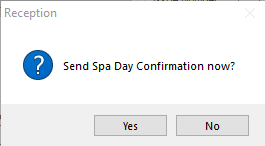
A confirmation screen will display (figure 96).
Figure 96
- Click Yes to send the email.
The email will be sent to the Email Address listed in Contact Information on the General tab of the reservation - and is typically that of the lead client.
Should you need to resend an email or having amended or even cancelled the booking wish to send an updated email.
- Ensure that the correct template has been selected from the Res Pack dropdown.
- Un-tick Sent.
- Click the “Green back arrow”.
- Click Yes to send the email.
Sending an email from a client card - Client Mailshot
Emails can be sent to an individual client or member from their client record card.
An appropriate email template must have already been created in Standard Documents. The document “Type” should be set to “Client Mailshot”; please refer to the earlier parts of this prompt sheet for full details.
- In Reception click Clients (figure 97)
Figure 97
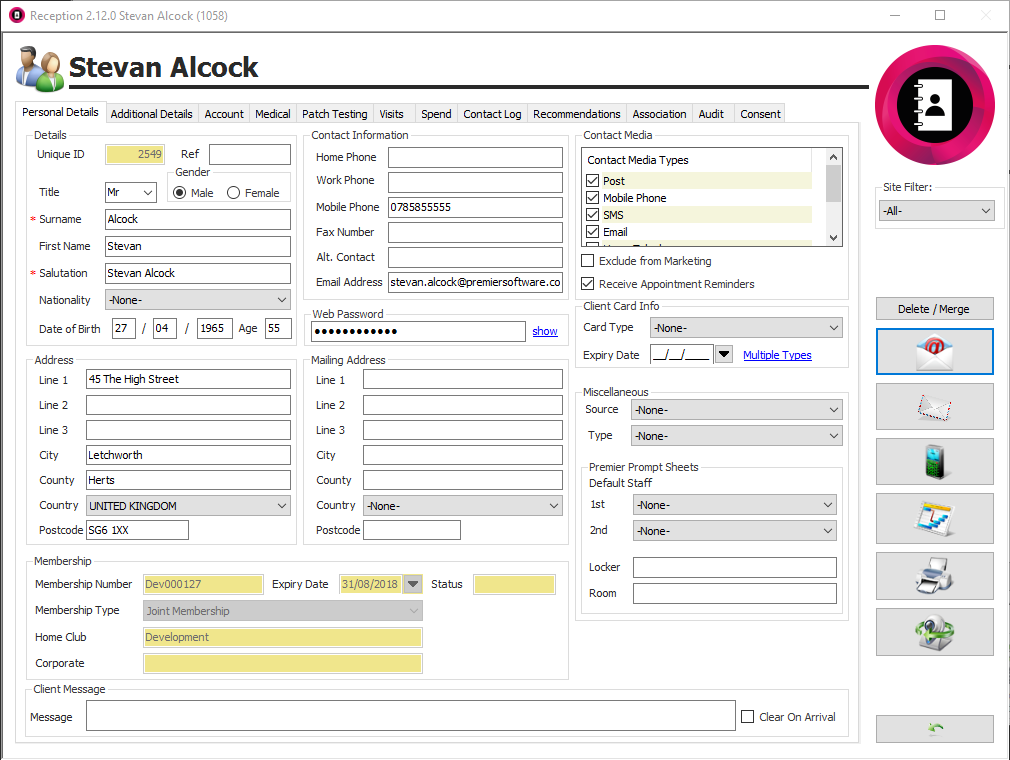
- Search to the relevant client and click the “Green tick” to open their client card (figure 98).
Figure 98
- Click the “Email” icon (figure 99).
Figure 99
- You will be presented with a list of the available Client Mailshot email templates (figure 100).
Figure 100
- Select the required template by clicking on it in the list and then click the “Green tick”.
Figure 101
- Enter a Subject Line for the email, unless one was created when the template was saved.
- Click Send Email.
A final confirmation window will display, showing the number of emails to be sent (figure 102).
Figure 102
- Click Yes to send the emails.
A window will appear stating that your emails are being sent (figure 103).
Figure 103
Confirmation that the emails have been sent, or not, will then display (figure 104).
Figure 104
- Click OK and you will be prompted to update the client’s contact log with additional notes on the email just sent (figure 105).
Figure 105
- Add your Notes.
Regardless of whether you enter any notes, a record will be placed onto the Contact Log tab of the clients’ records cards. This will include the date and time the email was sent, that it was an email rather than text or letter and the user responsible.
- Use the Direction options to identify whether your site contacted the client, or the client contacted the site.
- Tick Follow-Up Required to schedule a subsequent contact with the client.
- Click the “Green Tick”.
If you selected Follow-Up Required in figure 105, the Client Contact Follow-Up will now display (Figure 106).
Figure 106
- Complete the necessary fields, enter any notes, and click the “Green Tick”.
A summary of Last and Next Contacts will display on the Personal Details tab of the client’s record card when accessed in Enquiries (Figure 107).
Figure 107
For full details on how to monitor and manage Enquiries, please refer to the relevant prompt sheet.
A record of the contact will also appear on the Contact Log tab of the Client’s record card. This will include the date and time the email was sent, that it was an email rather than text or letter and the user responsible.
A client’s email history can be reviewed whenever desired.
- To do so, open Reception and click Clients (figure 108).
Figure 108
- Search to the desired client.
- Select the Contact Log tab and the following screen will display (figure 109).
Figure 109
The client contact log will display all emails and texts sent to the client, show all their cancellations and any appointments they did not arrive for, as well as any manually logged contacts created by clicking New.
Related Articles
Premier | Automated Marketing and Reports
Description With version 2.2 onwards Premier Core includes automated marketing, automated reception reporting and automated appointment reminders and confirmations. A small number of changes have been made to the system to support this: The 2 ...Premier | Marketing
Description The Marketing section of your Premier software allows you to specify a select group of clients that you wish to target for a particular mail shot. Once the clients have been selected you then have the option to mail merge, email merge or ...Premier | Email Settings
Description This guide will help you to diagnose and resolve email settings you may be experiencing. Email settings are managed by your IT provider and they will be the ones to assist with obtaining updated settings if required. Premier Core ...Prmeier | SMS Text Reminders
Description SMS Text Reminders Resolution SMS TEXT MESSAGING The following screen will appear (see Figure 1): Figure 1 “Greeting” – input the greeting that you wish to start the text message with. “Include Salutation” – tick this box if you wish to ...Premier | Email Service Provider Setup
? Summary This article will guide you through process of turning on Premier's new email service provider. This may be required due to a planned change from Microsoft relating to SMTP and basic authentication. Starting March 1, 2026, Microsoft will ...


