Premier | Client Sale
Description
Client sale allows you to complete a bill and allocate all items to a specific client, therefore saving all previous treatments and any stock items onto their client card so you are able to view them at any time.
Resolution
In “Reception” click onto “Client / Member Sale”
- In the “Search” box enter your clients “Surname”
- Click onto the magnifying glass or press Enter
- If your client already exists in your database select them from the list provided and then “Green Tick”, if not “Create New” and input relevant client details
- A box will appear stating the “Client is not on departure list, continue with sale?” Click “Yes”
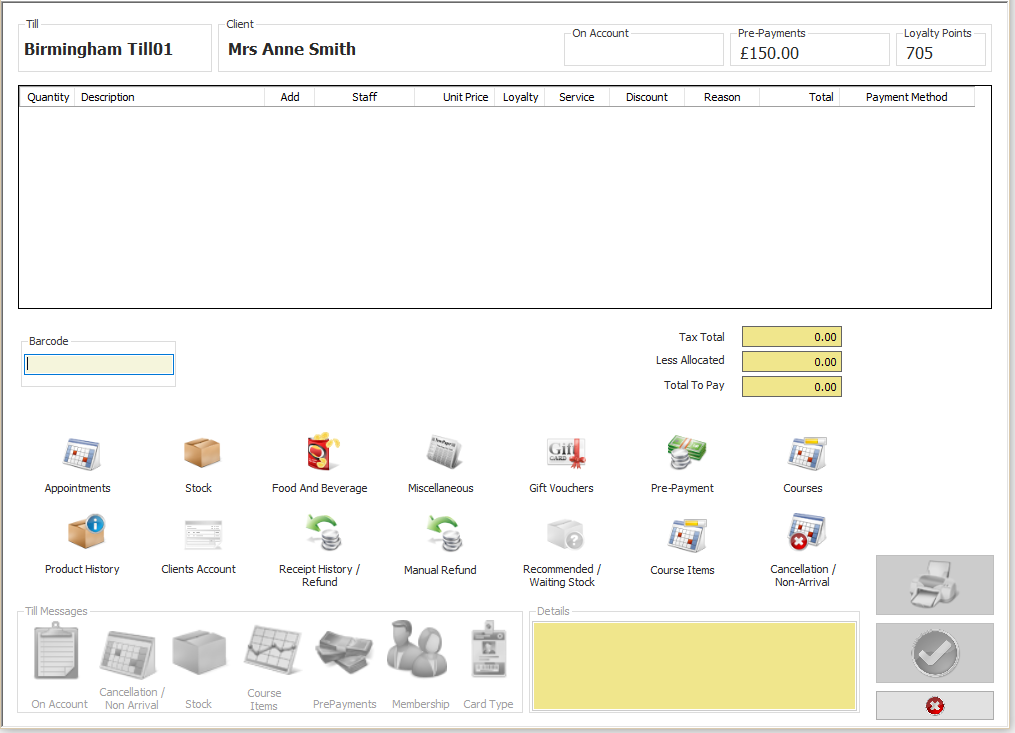
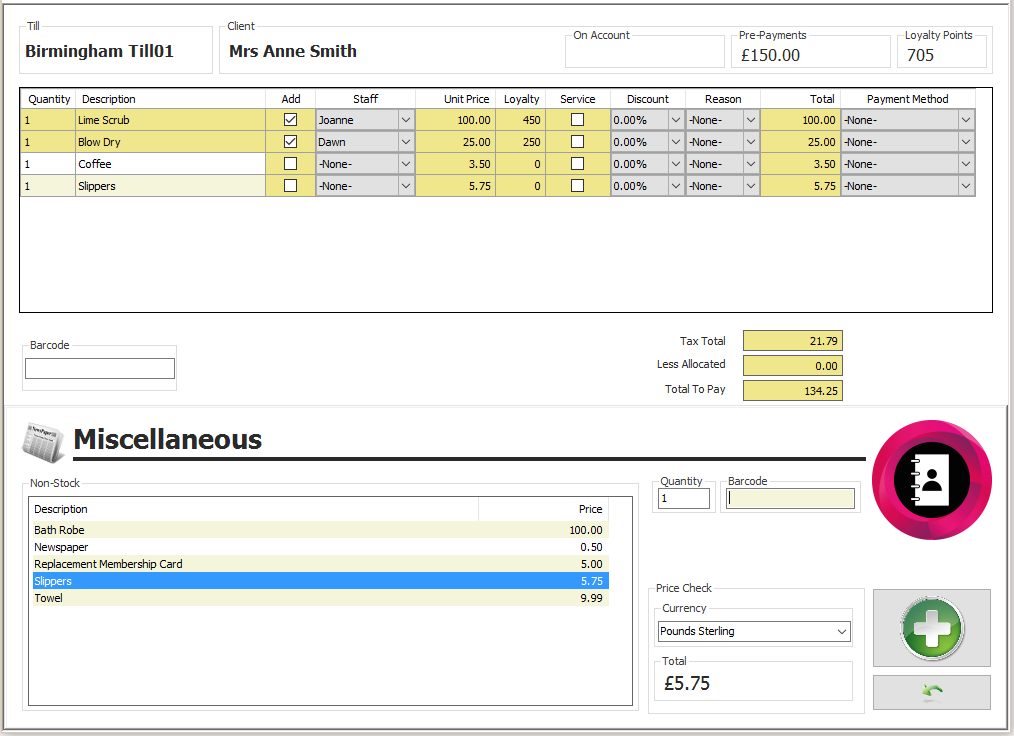
The following information is displayed:
- “Till” – this will give you the till name.
- “Client” – this gives you the client name.
- “On Account” – this will tell you how much revenue the client has accrued on Account.
- “Pre Payments” – this will tell you how much money the client has on their pre payment account.
- “Loyalty Points” – this will give you a total of loyalty points that the client has accrued.
- “Quantity” – this will tell you how many of the items that the client is being billed for.
- “Description” this will give you the description of the items being billed for.
- “Add” – this box will only be ticked if your client has been upsold a treatment, for example if your client has booked in for a facial and during that treatment time the therapist has conducted another treatment and this needs to be “Added” on before the client departs. If a treatment is added on at this stage this box will automatically be ticked
- “Staff” this shows you the staff member who has conducted the treatment or who has sold a retail item, if you need to amend the staff member click onto the downwards arrow located next to the staff name and select the required staff member.
- “Unit price” – this tells you how much the item on the client’s bill is for.
- “Service” this box will only be ticked if you charge the client a service charge for this item.
- “Discount” - before you can allocate a discount you are required to enter a reason in the reason box located next to the discount box, once this has been allocated you will be able to enter an amount in the discount box.
- “Reason” using the dropdown box select the reason for the discount, note some reason codes will require the manager’s authorisation before proceeding, if this is the case a box will automatically appear asking for their log on details.
- “Total” this gives the total amount that is due from the appointment / retail item, accounting for any discounts.
- “Payment Method” – this will only be used if you require the item to be complimentary, accounting for a course item or putting the item On Account.
- “Tax Total” – this shows the tax amount.
- “Less Allocated” – this will show any monies that have already been paid.
- “Total to Pay” – this gives a grand total.
Adding Treatments
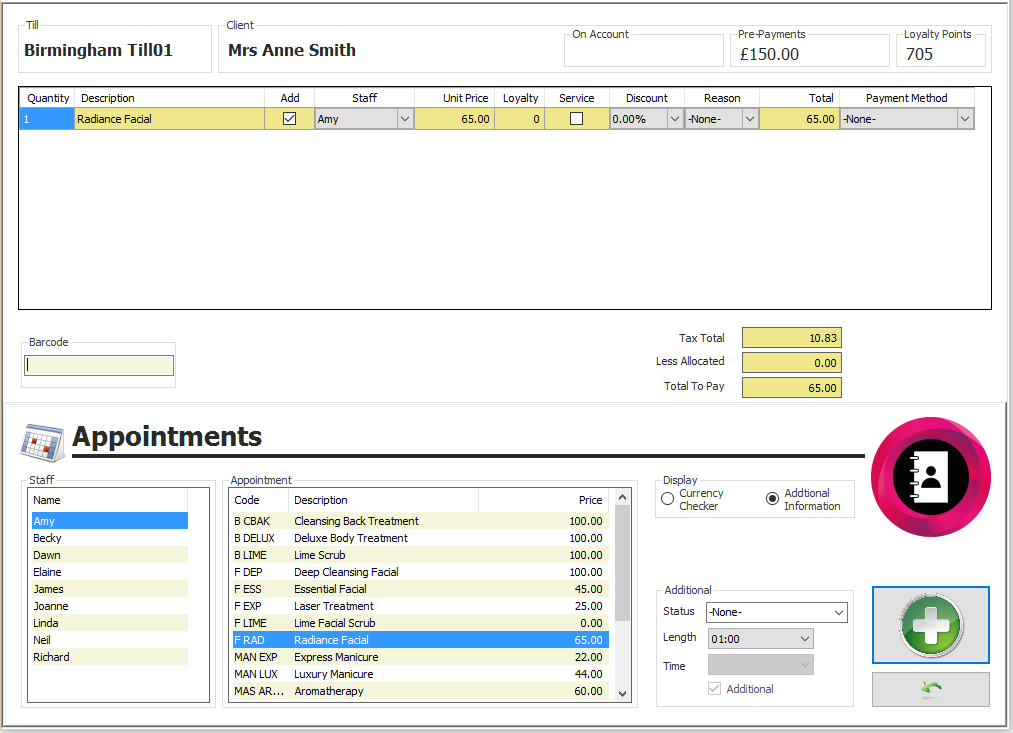
- Select the “Treatments” icon
- You will now be presented with the following screen
- Select the “Staff” member that performed the treatment
- Select the “Treatment” the client had
- The “Status” and “Length” can be changed at the side if required
- Click on the “Green Plus”
- Click on “Green Backwards Arrow” to close the additional screen and proceed with the bill
Any treatments added in this way will have a tick in the “Add.” box marking it as an additional treatment. This will relate back to the reports so that it will be clear how much “up selling” or “Additional Services” are being completed. Please note if this is not an additional treatment untick the additional box
Adding Stock
- If there is a barcode scanner present; simply scan the items and they will be added to the bill. If there is no barcode scanner:
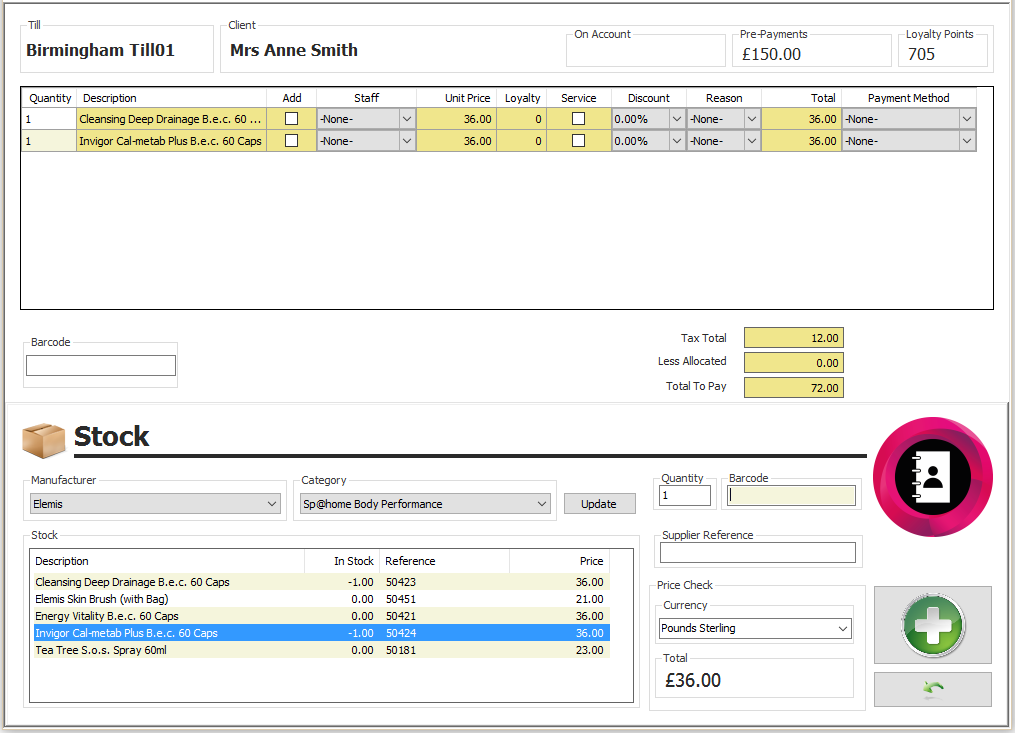
- Select the “Stock” icon, you will now see the following screen,
- Select the “Manufacturer” that is required, this is done by clicking on the “Downwards Arrow” located at the end of the manufacturers box
- You can also select the “Category” to filter the list further
- Press the “Update” icon, you will then receive a list of all retail items
- Select the relevant stock item
- Enter the amount they are purchasing in the “Quantity” field
- Click on the “Green Plus”
- Click on the “Backwards Arrow” to close the additional screen and proceed with the bill
Food and Beverage
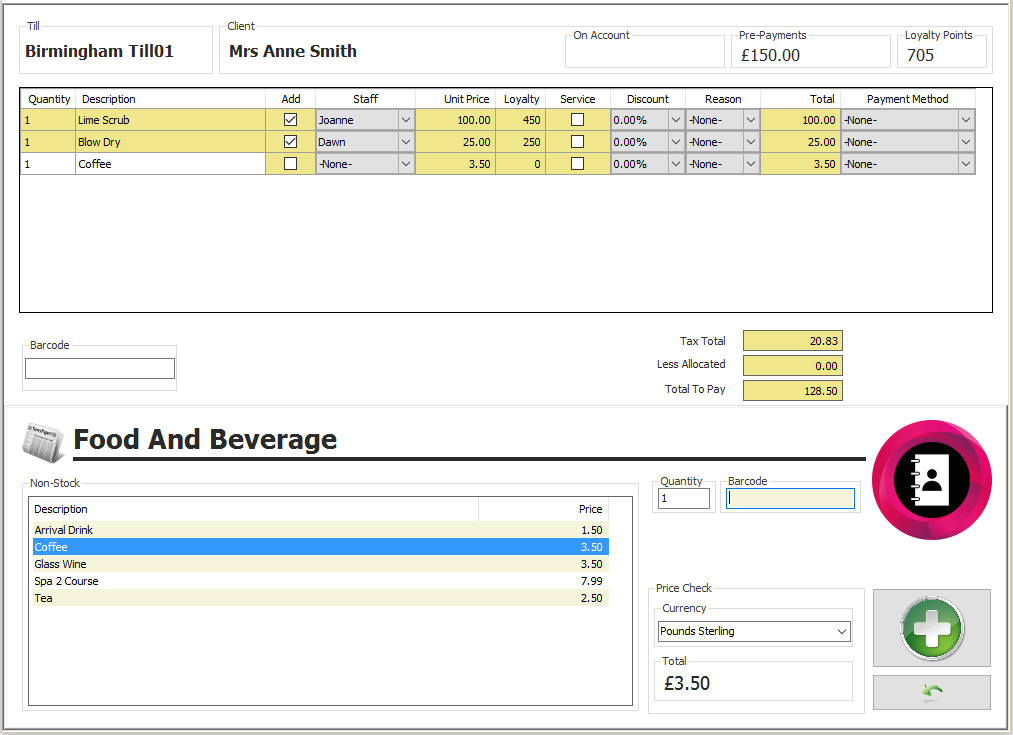
- If you need to add on any food or beverage items that the client has purchased please click onto the “Food and Beverage” icon, you will then see the following screen
- Select the item that you require from the list provided
- Enter the amount they are purchasing in the “Quantity Box”
- Click onto the “Green Plus”
- Click onto the “Green Backwards Arrow” and this will add this item onto the client’s bill
Miscellaneous
- If you need to add on a miscellaneous item to the clients bill click onto the “Miscellaneous” icon, you will then see the following screen
- Select the item required from the list provided
- Enter the amount they are purchasing in the “Quantity Box”
- Click onto the “Green Plus”
- Click onto the “Green Backwards Arrow”, this will add on the item required to the client’s bill.

Please note any stock items which are added will automatically be allocated to the therapist that conducted the treatment, (if no treatments are added to the bill the staff member will be shown as none) if another member of staff sold the product please click onto the “Downward Arrow” located next to the staff name and change it accordingly or input the name of the staff member who has sold the retail item
 Any items added using the Food and Drink, Stock or Miscellaneous icon will default the staff member of none, if you need to allocate a specific staff member click onto the “Downwards Arrow” located next to the staff name box and select the staff name required.
Please see separate prompt sheets for the selling and redeeming of Gift Vouchers / Pre-Payments and Courses
There are also several other icons that you may find beneficial to check before the client is departed and if you are required to take any action the icon will be highlighted and you will be unable to activate the green tick
- “Product History” – this icon will be highlighted if your client has purchased stock from your before, you are able to see what they have purchased and when.
- “Clients Account” – this will only highlight if you allow clients to have an account and it will detail all items on account – see separate prompt sheet on clients account for full details.
- “Receipt History” – this will show all items that the client has purchased along with the date and how the items were purchased.
- To refund an item click onto the Receipt History icon, select the item from the list provided and then click onto Refund, this will add the item to the client’s bill as a minus figure so you are aware it is refund.
- “Manual Refund” – this will show all items that have been added to your client’s bill and give you the option to select an item and refund it.
- “Recommended / Waiting Stock” – this will highlight if you have inputted Recommended Stock onto the client card, it will show which items have been recommended to the client.
- If you require to add on an item of stock that has been recommended click onto the Recommended / Waiting Stock icon, select the relevant item and then press the Green Plus icon, this will then add this stock item to clients bill.
- “Waiting Stock” – this will only highlight if your client is on the product waiting list and the item is now in stock and ready to be collected.
- “Course Items” – this will only highlight if the client has purchased a course – please see separated prompt sheet on courses for full details.
- “Cancellation / Non Arrival” – this will only highlight if the client has failed to turn up for a treatment or you have cancelled a treatment and selected the pay later option – please see separate prompt sheet on cancellations for full details.

If the icon is not highlighted it simply means the client has nothing that falls within the criteria needed
Related Articles
Premier | Till Sale
Description Till sale enables you to sell an item to a client, however, it does not ask you to input a client's name. Therefore no information will be stored on the client's card and no further information will be viewable once the client has left ...Premier | Courses
Description Courses are used to sell multiple appointments in advance and track usage on the day of the appointment. Typically the value of appointments included in a Course are at a reduced value due to purchasing these in bulk, therefore on ...Premier | Adding And Managing Client Sources
? Summary Client Sources in Premier allow you to record how each client first heard about the spa. This helps track the effectiveness of marketing campaigns and provides insights into which marketing methods generate the most clients. ❓ Likely ...Premier | Future Payments
Description The future payment facility enables an appointment which is already booked to be paid for in advance. Resolution Selling a Future Payment In “Reception” click on “Future Payments” (See figure 1). Figure1 Search for your client. Select ...Premier | Amending Till Receipts
Click on “Amend Receipts” in Reception (figure1) Figure 1 When entering “Till Receipts” the following screen (figure 2) will appear, if for any reason you need to reprint the clients receipt, ensure you are on the correct client and then click onto ...
